Control Surface Users Guide
V-Control Pro Users Guide
Edit Pack Users Guide
V-Console Users Guide
V-Panner Users Guide
V-PlugIn Users Guide
Spill Plug-in Users Guide
 WARNING: DO NOT USE Ethernet Setup in Pro Tools as it will try to recognize ProControl/Control|24.
Requires Mac OS 10.10 / Windows 10 and later.
Contents
Setting Up The Ethernet Controllers in V-Control Pro for Mac
Setting Up The Ethernet Controllers in V-Control Pro for Windows
Setting Up A Command|8 in V-Control Pro.
Setting Up A Digidesign 003 in V-Control Pro.
Using V-Window with a Control Surface
Using MIDI Mode with a Control Surface
Control|24/C|24
Using C|24 with Digital Performer
Using Control|24 with Digital Performer
Using Control|24/C|24 with Live
Using Control|24/C|24 with Logic
Using Control|24 with Luna
Using C|24 with Luna
Using Control|24/C|24 with Mixbus
Using Control|24 with Pro Tools
SUsing Control|24 or C|24 with Reaper
Using Control|24/C|24 with Steinberg
Using Control|24/C|24 with Studio One
Command|8
Using Command|8 with Live
Using Command|8 with Logic
Using Command|8 with Luna
Using Command|8 with Mixbus
Using Command|8 with Reaper
Using Command|8 with Steinberg
Digidesign 003
Using Digidesign 003 with Live
Using Digidesign 003 with Logic
Using Digidesign 003 with Mixbus
Using Digidesign 003 with Reaper
Using Digidesign 003 with Steinberg
D-Command
Using D-Command with Live
Using D-Command with Logic
Using D-Command with Luna
Using D-Command with Mixbus
Using D-Command with Pro Tools
Using D-Command with Steinberg
Using D-Command with Studio One
ProControl
Using ProControl with Digital Performer
Using ProControl with Live
Using ProControl with Logic
Using ProControl with Luna
Using ProControl with Mixbus
Using ProControl with Pro Tools
Using Up ProControl with Reaper
Using ProControl with Steinberg
Setting Up The Controllers in V-Control Pro for Mac
Requires Mac OS 10.10 and later.
With V-Control Pro, Pro Control, Control 24, C|24, Command|8 and the D-Command, owners can use their controller with the latest version of Pro Tools, Logic X, Cubase/Nuendo, Live, MixBus or Studio One. Follow the steps below to setup with Pro Tools.
- With ProControl, Control|24, C|24, or D-Command connected to the local network, launch V-Control Pro.
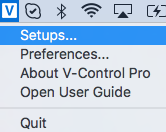
- Click on the V-Control Pro icon in the task bar and select Setups....
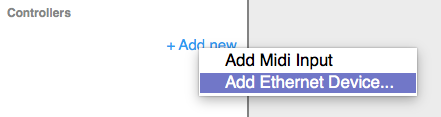
- Click on +Add New in the Controllers section of the Setups window and select Add Ethernet Device....
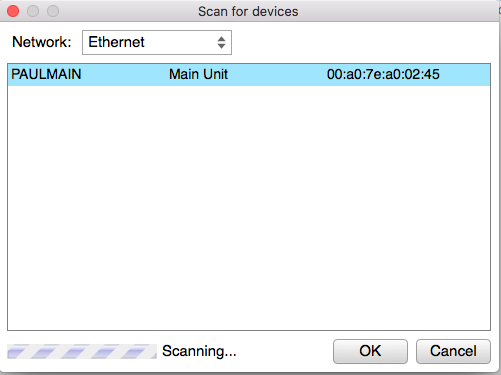
- Select the ProControl, Control|24, C|24, or D-Command unit you wish to add in the Scan Devices window once it appears and select Okay.
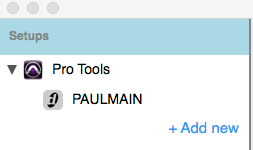
- Once The DAW is launched it will automatically pair with ProControl, Control|24, C|24, or D-Command in the V-Control Pro setups.
WARNING: DO NOT USE Ethernet Setup in Pro Tools as it will try to recognize ProControl, Control|24, C|24, or D-Command
Back to top
Setting Up The Ethernet Controllers in V-Control Pro for Windows.
Requires Windows 10 and later.
With V-Control Pro, ProControl, Control|24, C|24, or D-Command owners can use their controller with the latest version of Pro Tools, Cubase/Nuendo, Live, MixBus or Studio One. Follow the steps below to setup with the Control Surface with V-Control Pro.
- With ProControl, Control|24, C|24, or D-Commandconnected to the local network, launch V-Control Pro.
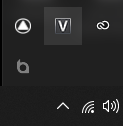
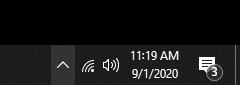
- If you do not see the V-Control Pro icon in the task bar, click on the Up Arrow to show all hidden notification icons.
- Click on the V-Control Pro icon in the task bar and select Setups....
- Click on +Add New in the Controllers section of the Setups window and select Add Ethernet Device....
- Select the ProControl, Control|24, C|24, or D-Command unit you wish to add in the Scan Devices window once it appears and select Okay.
- Once the DAW is launched it will automatically pair with ProControl, Control|24, C|24, or D-Command in the V-Control Pro setups.
WARNING: DO NOT USE Ethernet Setup in Pro Tools as it will try to recognize ProControl, Control|24, C|24, or D-Command
Back to top
Setting Up A Command|8 in V-Control Pro.
Click on the V-Control Pro icon in the task bar and select Setups....
Click on +Add New in the Controllers section of the Setups window and select Add Command|8.
Once The DAW is launched it will automatically pair with the Command|8 in the V-Control Pro setups.
Back to top
Setting Up A Digidesign 003 in V-Control Pro.
Click on the V-Control Pro icon in the task bar and select Setups....
Click on +Add New in the Controllers section of the Setups window and select Add Digidesign 003.
Once The DAW is launched it will automatically pair with the Digidesign 003 in the V-Control Pro setups.
!!NOTE!! For Windows users with Cubase, the 003 Out MIDI ports must be disabled in the Studio Setups MIDI Port section.
Back to top
Using V-Window with a Control Surface
With V-Control Pro and the V-Window feature, users can instantly control any plug-ins or controls on screen through their control surface's channel strip with a touch of a button.
To activate V-Window, press the Master Faders button on most surfaces. For DAWs with a dedicated Master Fader control, the Master Fader will be required to be pressed multiple times to cycle to V-Window Mode.
V-Window Modes:
When V-Window is active, Press the Mute button on the Channel strip with V-Window to cycle between the different modes. The different modes available are:
- VButton: Use this mode to interact with button controls. The mouse will stay in its place and activate a button press when the fader is touched.
- VButtonSet: Use this mode to create and cycle through different button set points. With the mouse hovering above the on screen button's position press Shift+Solo on the control surface to set a Pin at that location. Using the fader in this mode will cylce between multiple Pins to use with VButton mode.
- VWKnob: Use this mode when interacting with knob controls on the plug-ins GUI.
- VWHSlider: Use this mode when interacting with horizontal slider controls on the plug-ins GUI.
- VWVSlider: Use this mode when interacting with vertically slider controls on the plug-ins GUI.
While in V-Window Mode, pressing the Solo button will pin the mouse location and revert to that location any time the fader is touched. Once the fader is released, the mouse is also returned to that pin position. This way it is very easy to pin a parameter and instantly control it without having to worry with the mouse cursor is on the screen.
Use the Select button while in V-Window mode to reset the fader position.
Back to top
Using MIDI Mode with a Control Surface
With V-Control Pro, users can enable MIDI Mode on their control surface with the touch of a button. MIDI Mode converts the surfaces faders, knobs, and buttons into assignable MIDI Controls that can be mapped in the DAW.
Use the following button to toggle MIDI Mode on the specified surface:
- C|24: Focus
- Control|24: MON/0
- D-Command: MIDI Events List
- ProControl: MON/0
Back to top
Control|24/C|24
Using C|24 with Digital Performer
This is how you set up Digital Performer with C|24
- Click on the + sign to add additional control surfaces.
- Set each control surface as follows.
- Unit: Expander (XT) Input: V-Control XT2-1 Output: V-Control XT2
- Unit: Expander (XT) Input: V-Control XT3-1 Output: V-Control XT3
Back to top
Using Control|24 with Digital Performer
This is how you set up Digital Performer with Control|24
- Launch V-Control Pro
- Launch Digital Performer
- In the Digital Performer top menu bar go to: Setup / Control Surface Setup...
- Configure the Control Surface Setup Window as followed:
- Driver: Mackie Control
- Unit: Mackie Control
- Input Port: V-Control
- Output Port: V-Control
- Click on the + sign to add additional control surfaces.
- Set each control surface as follows.
- Unit: Expander (XT) Input: V-Control XT2-1 Output: V-Control XT2
- Unit: Expander (XT) Input: V-Control XT3-1 Output: V-Control XT3
Back to top
Using Control|24/C|24 with Live
Setting up Control|24/C|24 with Live
In the Ableton Live top menu bar select: Ableton/Preferences...
In the preferences window, select MIDI/Sync
Select the following for the Control Surface Setup:
- Control Surface: MackieControl
- Input: V-Control
- Output: V-Control
- Control Surface: MackieControlXT
- Input: V-Control XT2
- Output: V-Control XT2
- Control Surface: MackieControlXT
- Input: V-Control XT3
- Output: V-Control XT3
Toggle On for Remote for the following:
- Input: MackieControl Input (V-Control)
- Input: MackieControlXT Input (V-Control XT2)
- Input: MackieControlXT Input (V-Control XT3)
- Output: MackieControl Output (V-Control)
- Output: MackieControlXT Output (V-Control XT2)
- Output: MackieControlXT Output (V-Control XT3)
Using Control|24/C|24 with Live
Assign Modes: Use assign buttons to change knob mode for channel strips.
- L/R: Assigns Pan Mode to knobs.
- Sends A-E:Assigns Sends Mode. Send mode displays the sends for the selected channel.
- Params:Assigns Plug-in Mode. Plug-In Mode displays the plug-ins for the selected channel. Use the knob button to select the plug-in for editing.
- Input/Ouput: Assigns Input/Output Mode. Press multiple times to cycle between different modes: Audio Input, Input Channel, Output Channel, Output Configuration.
Cursor Modes: There are different modes available for the cursor keys depending on the mode.
- Normal: Starts in Normal mode by default, cursor keys allow track navigation and clip selection.
- Zoom: Press the zoom key to access Zoom mode, left and right cursor keys zoom in and out in the arrangement window. Live must be the application in focus to function properly. Pressing the zoom key again will return cursor keys to Normal mode.
- Marker: Press the Navigate key to access Marker Mode. The left and right cursor keys jump between previous marker and next marker. The down cursor key creates a marker at the current playhead position. Pressing the Navigate key again will return to Normal mode.
Wheel Modes: There are different modes available for the wheel functionality depending on the mode.
- None: When no wheel mode is selected, the wheel does not function.
- Scene: Press the Scrub button to access Scene Mode. In scene mode, the wheel navigates up and down between different scenes. Use the Punch button in the transport to trigger the scene.
- Shuttle: Press the Shuttle button to access Shuttle mode. In shuttle mode, the wheel moves the playhead forward or back.
Transport Keys: Use these keys for the transport.
- In: Toggles Punch-in
- Out: Toggles Punch-out
- Pencil: Toggles Draw function.
- Grab: Toggles Follow function.
- Loop Play: Toggles Loop.
Window keys: Use the Window buttons to display different windows in Live.
- Mix/Edit: Toggles between Session and Arrangement view.
- Transport: Toggle the Browser window.
- Wincfg(C|24):Toggles the Detail window.
- Status(Control|24): Toggles the Detail window.
- Plug-in: Toggles the Clip window.
Utility keys: Use these keys for specific functions.
- Undo: Undo the last action.
- Undo+Shift(Control|24): Redo the last action undone.
- Redo(C|24): Redo the last action undone.
Softkeys: There are function keys that can be mapped using the Live MIDI Mapper.
Control|24: Use the F1-F10 keys on the top left corner of Control|24.
C|24: Use the Softkeys button to assign the knob buttons on the first 16 channel strips to behave as function keys.
Back to top
Using Logic with Control|24/C|24
Setting up Control|24/C|24 with Logic
Launch Logic Pro X
Ensure "Automatic Installation" is enabled in the Control Surface setup in Logic.
Logic automatically detects any controller setup through V-Control Pro. Click Connect when the automatic setup window pops up.
Select "Add" when the window pops up saying it has detected Control|24/C|24
Control|24/C|24 and Logic Pro X should now have bidirectional communication.
Using Control|24/C|24 with Logic
AUTOMATION
- Press the Auto button on the channel strip to cycle through different Automation Modes.
- Automation can also be changed by holding down the Auto button on the channel strip and using the Automation buttons in the Automation section of Control|24.
SENDS
- Use the Send Assignment buttons to assign the selected send to all channel strips. Use the knobs on each channel strip to adjust the send level.
- Use the Pan/Sends button on the channel strip to edit all the sends for that selected channel. The sends for the selected channel will be spread across the pan encoders.
INSERTS
Use the insert buttons on the channel strips to edit and assign plug-ins for that selected channel
Back to top
Using Control|24 with Luna
V-Window Plug-In Control: Simply hover the mouse pointer above a plug-in parameter, enable V-Window mode (tap the Master button twice), and now the fader remotely controls the mouse up and down for smooth, accurate control. The touch-sensitive fader makes it work perfect with LUNA touch and latch mode automation. For horizontal sliders, press the CTRL button on your keyboard.
Transport: Here is a list of the Transport commands available with Luna.
- Play: Starts playback.
- Stop: Stops playback.
- Rewind: Moves playhead backward.
- Fast Forward: Go To End.
- Record: Starts Recording of session.
- Loop Play: Start Looped playback.
- Audition: Toggles Metronome
- Marker: Creates Marker at playhead.
- Counter Mode: Toggles Counter Display Bars/Beats or Min/Sec.
Automation: Here is a list of the Automation commands available with Luna
- Read: Toggles between Off and Read Automation Modes.
- Touch: Toggles Touch Automation Mode.
- TRIM: Toggles TRIM Automation Mode.
Utility: Here is a list of utility commands available for Luna.
- Undo: Undo the last command.
- Cancel: Acts as the Escape key.
- Enter: Acts as the Enter key.
Cursor keys: Here is a list of the Cursor commands available for Luna.
- Zoom: Toggles between Zoom and Nav mode.
- Up: In Nav mode press to select previous track. In Zoom mode increases all track heights.
- Down: In Nav mode press to select next track. In Zoom mode decreases all track heights.
- Left: In Nav mode press to scroll to previous marker. In Zoom mode press to Zoom out.
- Right: In Nav mode press to scroll to next marker. In Zoom mode press to Zoom In.
Back to top
Using C|24 with Luna
V-Window Plug-In Control: Simply hover the mouse pointer above a plug-in parameter, enable V-Window mode (tap the Master button twice), and now the fader remotely controls the mouse up and down for smooth, accurate control. The touch-sensitive fader makes it work perfect with LUNA touch and latch mode automation. For horizontal sliders, press the CTRL button on your keyboard.
Transport: Here is a list of the Transport commands available with Luna.
- Play: Starts playback.
- Stop: Stops playback.
- Rewind: Moves playhead backward.
- Fast Forward: Go To End.
- Record: Starts Recording of session.
- Loop Play: Start Looped playback.
- Audition: Toggles Metronome
- Marker: Creates Marker at playhead.
- Counter Mode: Toggles Counter Display Bars/Beats or Min/Sec.
Automation: Here is a list of the Automation commands available with Luna
- Read: Toggles between Off and Read Automation Modes.
- Touch: Toggles Touch Automation Mode.
- TRIM: Toggles TRIM Automation Mode.
Utility: Here is a list of utility commands available for Luna.
- Undo: Undo the last command.
- Cancel: Acts as the Escape key.
- Enter: Acts as the Enter key.
Cursor keys: Here is a list of the Cursor commands available for Luna.
- Zoom: Toggles between Zoom and Nav mode.
- Up: In Nav mode press to select previous track. In Zoom mode increases all track heights.
- Down: In Nav mode press to select next track. In Zoom mode decreases all track heights.
- Left: In Nav mode press to scroll to previous marker. In Zoom mode press to Zoom out.
- Right: In Nav mode press to scroll to next marker. In Zoom mode press to Zoom In.
Back to top
Using Control|24/C|24 with MixBus
Setting Up Control|24/C|24 with MixBus
Follow the steps to setup Control|24 or C|24 with MixBus.
- Launch V-Control Pro
- Open the V-Control Pro Setups window
- Click on +Add New in the Controllers section and click on Add Ethernet Device...
- Select the Control|24 or C|24 unit and click Add>
- Launch Mixbus
- In the Mixbus top menu bar go to: Mixbus / Preferences
- In the Preferences window, click on Control Surfaces and then click on the box next to Mackie Control to enable it.
- Click on Show Protocol Settings with Mackie Control selected to open the protocol setup window.
- For Device type select Mackie Control with Two Extenders and setup the ports as shown:
- Main surface at position 1 sends via: V-Control
- Main surface at position 1 receives via: V-Control
- Main surface at position 2 sends via: V-Control XT2
- Main surface at position 2 receives via: V-Control XT2
- Main surface at position 3 sends via: V-Control XT3
- Main surface at position 3 receives via: V-Control XT3
- The Control|24 or C|24 is now setup with MixBus
Using Control|24/C|24 with MixBus
Assign Modes: Use the Assign buttons or Channel Strip buttons to change modes for the knobs.
- Pan: Assigns knobs to control Stereo Panning on channel strips
- Sends A-E: Assigns knobs to edit sends for Selected Tracks.
- Input/Output: Assigns knobs to edit selected track parameters.
- EQ (Channel Strip): Assigns knobs to edit EQ parameters for Selected Track.
- Dyn (Channel Strip): Assigns knobs to edit Dynamics paramteres for Selected Track.
- Sends (Channels Strip): Assigns knobs to edit sends for Selected Track.
Transport: Here is a list of the functionality available with Mixbus.
- Play: Starts playback.
- Stop: Stops playback.
- Rewind: Moves playhead backward.
- Fast Forward: Moves playhead forward.
- RTZ: Returns playhead to start.
- GTE: Moves playhead to end.
- Record: Starts Recording of session.
- Ext Trans/Dyn Trans: Toggles Metronome.
- Loop Play: Start Looped playback.
- Loop Rec: Punch In.
- Punch: Punch Out.
- In: Mark In.
- Out: Mark Out.
- Pre Roll: Sets Punch from selection.
- Post Roll: Sets Session Start/End from selection.
- Audition: Sets Loop from Range Selection.
- Counter Mode: Changes Counter display.
Automation: Use the Automation buttons to change the automation mode for the selected tracks.
- Read: Enables Read/Play Automation
- Write: Enables Write Automation
- Touch: Enables Touch Automation
- Off: Enables Off/Manual Automation
Mixer Views: Use the Zoom Preset buttons to change which tracks are viewed in the mixer.
- Zoom Preset 1: Press this button to show all MIDI Tracks. Press again to show all tracks.
- Zoom Preset 2: Press this button to show all Audio Tracks. Press again to show all tracks.
- Zoom Preset 3: Press this button to show all bus tracks. Press again to show all tracks.
- Zoom Preset 4: Press this button to show all Aux tracks. Press again to show all tracks.
- Zoom Preset 5: Pres this button to only show selected tracks. Press again to show all tracks.
Utility Buttons: Mixbus uses the following Utility functions.
- Undo: Press to undo the last action.
- Shift+Undo/Redo for C|24: Press to redo the last action.
- Save: Press to save the session.
- Enter: Acts as Enter key.
- Escape: Acts as ESC key.
- Do To All: Select All Tracks.
- Do To Selected: Deselect All Tracks.
Softkeys: Users can customize the assigned softkeys in the Mackie Control Protocol settings of MixBus.
- Control|24: The F1-F8 keys act as the customizable keys for MixBus.
- C|24: Press the Softkeys button to change the knob buttons to F1-F8 as the customizable keys for Mixbus.
Navigation: Use the navigation buttons for control of markers and zooming on the edit window.
- Wheel: Moves playhead across timeline.
- Navigate: Toggles Marker mode for the cursor keys.
- Zoom: Toggles Zoom mode for the cursor keys.
- Down Arrow: Creates Marker at playhead position when in Marker Mode. Zoom Out Vertically when Zoom mode is active.
- Up Arrow: Deletes Marker at playhead position when in Marker Mode. Zoom in Vertically when Zoom mode is active.
- Left Arrow: Goes to Previous Marker when in Marker Mode. Zoom Out Horizontally when Zoom mode is active.
- Right Arrow: Goes to Next Marker when in Marker Mode. Zoom in Horizontally when Zoom mode is active.
Back to top
Using Control|24 with Pro Tools
Launch Pro Tools.
In the Pro Tools top menu bar select: Setup / Peripherals
Select the MIDI Controllers tab
For Controller #1, setup as shown.
- Type: "HUI" Receive From: "V-Control" Send To: "V-Control"
For Controller #2, setup as shown.
- Type: "HUI" Receive From: "V-Control XT2" Send To: "V-Control XT2"
For Controller #3, setup as shown.
- Type: "HUI" Receive From: "V-Control XT3" Send To: "V-Control XT3"
Control|24 is now connected and ready to use with Pro Tools.
Back to top
Troubleshooting with Control|24 with Pro Tools.
- As V-Control Pro uses the HUI protocol to communicate with Pro Tools. One way to resolve most issues when receiving the "Pro Tools is not able to communicate with HUI.." dialog is to open the MIDI peripherals setup window in Pro Tools and click Okay. Doing so will resync the connection between Pro Tools and V-Control Pro.
- If using multiple and there is no control when selecting an extended bank (9-16, 17-24, 25-32) check the V-Control Pro "Preferences" to make sure the DAW Track count is set to the desired number of tracks available to control.
- If the ProControl/Control24 unit temporary loses connection with V-Control Pro and the faders and track names are not in sync. Double tap the Flip button on the control surface to refresh and update the Faders/Track names.
- If all control units are controlling the same bank, go into the V-Control Pro "Setups.." menu to assign each unit to a specific bank.
Control|24 Functions with Pro Tools
V-Control Pro uses the HUI protocol to communicate with Pro Tools so there are some differences to take into account when using Control|24.
Press the Master Fader button to enable the V-Window feature for the last fader on the surface. Simply hover the mouse over the parameter you want to control. When you touch and move the fader, the mouse is remotely controlled to click and drag for precise control.
Metering in Pro Tools with Control|24
HUI metering uses just 12 segments where Control|24 has 15 segments so V-Control Pro has to adapt 12 to 15. HUI metering behaves differently for Pro Tools 11 and later than it did with previous versions of Pro Tools. Peak hold is never active no matter what the Pro Tools metering preferences are set to. Also, clip indication is only used for record-enabled tracks that are metering audio input. This is probably because of the newer mixer's headroom where audio does not clip (even though the Mixer window does indicate a clip.)
Click HERE to view the V-Control Pro Users Guide
Back to top
Editing Pro Tools Inserts with Control|24
NOTE: Inserts in Pro Tools can only be edited on the first 8 channels on the Control|24. To access other tracks in the session, bank/scroll over to have those tracks on the first 8 channel strips of the Control|24.
To edit an insert follow these steps:
- Press the Insert button on a channel strip to display the inserts for the selected channel across the channel LCDs.
- To assign an insert, first press the Assign button and then use the knobs to select the insert. Press the knob button to finalize insert selection.
- Press the knob button below the insert shown in the LCD to open the parameter editor.
- Use the knobs to edit the value of each labeled parameter.
- Use the Flip button to flip parameter values to faders.
- Use Channel Scroll Left and Channel Scroll Right buttons to page through more parameters.
- To go back to insert selection for a channel, tap the Insert/Params button.
Back to top
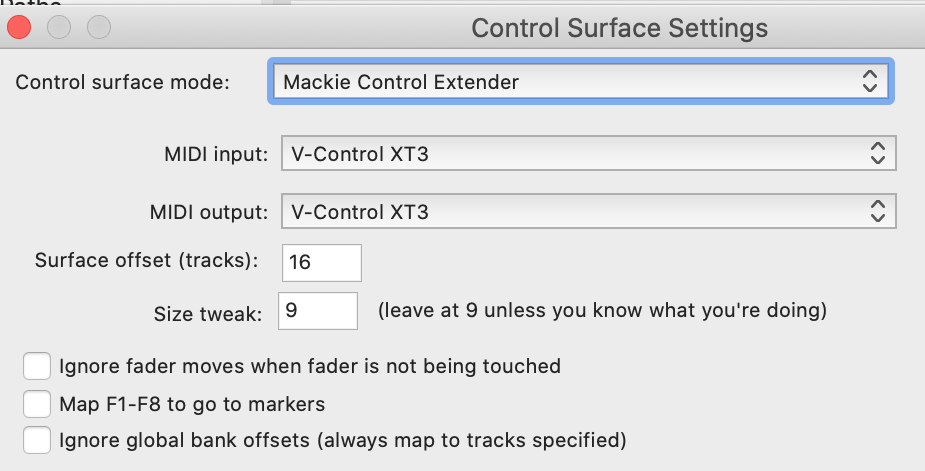
Setting Up Control|24 or C|24 with Reaper
Functionality is currently limited with Reaper
This is how you set up Reaper with a Control|24 or C|24
- Launch V-Control Pro
- Add Control|24 or C|24 to V-Control Pro Setups if not done already.
- Launch Reaper
- In the Reaper top menu bar go to: Reaper / Preferences...
- Navigate to the Control/OSC/Web section of the Preferences window.
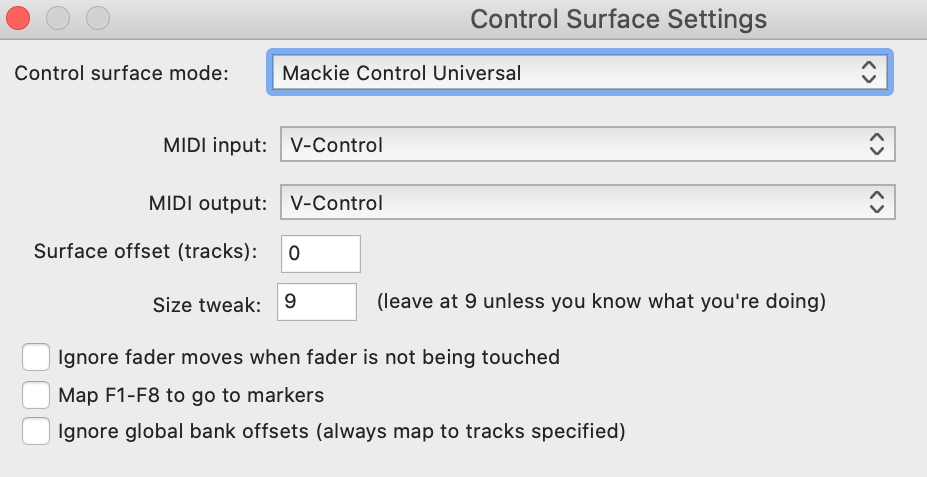
- Click on Add to bring up the Control surface setup window.
- Select the following in the Control Surface Settings Window:
- Control Surface Mode: Mackie Control Universal
- MIDI Input: V-Control
- MIDI Output: V-Control
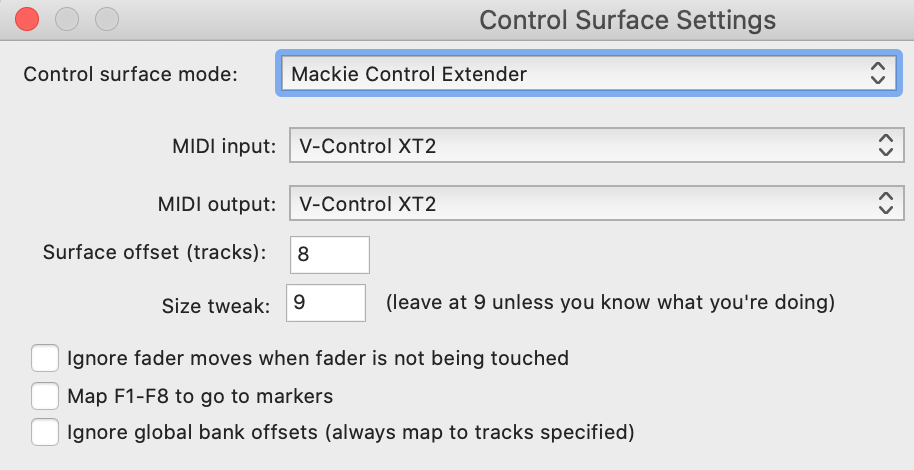
- Click on Add again to bring up a new window:
- Select the following in the Control Surface Settings Window to add the 2nd bank:
- Control Surface Mode: Mackie Control Extender
- MIDI Input: V-Control XT2
- MIDI Output: V-Control XT2
- Surface Offset (Tracks): 8
- Click on Add again to bring up a 3rd new window:
- Select the following in the Control Surface Settings Window to add the 3rd bank:
- Control Surface Mode: Mackie Control Extender
- MIDI Input: V-Control XT3
- MIDI Output: V-Control XT3
- Surface Offset (Tracks): 16
Back to top
Using Control|24/C|24 with Steinberg
Setting Up Control|24/C|24 with Steinberg
In the Steinberg top menu bar go to: Studio / Studio Setup...
In the Studio Setup window, click on the "+" sign.
- Select Digidesign Control|24/C|24 from the drop down list.
Click Ok to close the Studio Setup Window.
Using Control|24/C|24 with Steinberg
INSERTS
- Use the insert buttons on the channel strip to edit plug-ins for that channel.
- Use the Scroll Bar Left and Scroll Bar Right buttons to scroll through pages and access plug-in parameters.
EQ
- Use the EQ buttons on the channel strip to edit the EQ for that selected channel. The parameters can be edited using the knobs.
- Use the Scroll Bar Left and Scroll Bar Right buttons to scroll through pages available for EQ editing.
SENDS
- Use the Pan/Sends buttons on the channel strip to edit the sends for the selected channel.
- Use the Scroll Bar Left and Scroll Bar Right buttons to scroll through pages available for Send editing.
- The first page is for adjusting Send Levels.
- The Second Page is for assigning Pre or Post fader for the sends.
- The third page is for Send assignment
AUTOMATION
- Press the AUTO on the channel strip to cycle through Automation modes on the track.
- Use the buttons in the automation section of ProControl to affect all tracks:
- Read All
- Write All
- Trim
- Touch: Set Automation mode to Touch
- Latch: Set Automation mode to Latch
- Off: Set Automation mode to X-Over
USER COMMANDS
Zoom Presets 1-5 on the Control|24/C|24 can be mapped to User Commands in the Studio Setups window when Control|24/C|24 is selected.
Back to top
Using Control|24/C|24 with Studio One
Here is how to use Control|24\C|24 with Studio One through V-Control Pro.
Bank Assignments
Use the Bank assignments to change the assignment of the channel strips:
- Pan: Assigns V-Pots to channel pan.
- Sends: Press the Send A button to assign the V-Pots to Sends. Pressing it continuously will cycle through different send modes.
- SE: When in SE mode, all sends for the selected channel will be displayed across the channel strips.
- S1-8: When in this mode, the selected send assignment will be displayed across for all channels. For example, when showing S1, all channels will show it's send assignment for Send 1.
- Track: Press the Input or Output assignment buttons to display Track mode for the selected track across the channel strips.
- FX Bypass: Press the Ins/Byp button to access the FX Bypass 1-8 for the selected channel.
- Plug-In: Press the Inserts button on any of the channel strips to select the channel and assign plug-in mode.
- Plug-in parameters can be assigned by using the Control Link window in Studio One.
Global Views
Press the Show Values button on the Control|24 and the Soft Keys button on the C|24 to select Track View Modes.
- Global: Press the knob button on Channel 1 to show all available tracks. (Send, Console, and Outputs)
- Inputs: Press the knob button on Channel 2 to show only available Inputs.
- Audio: Press the knob button on Channel 3 to show only Audio Tracks.
- Instrument: Press the knob button on Channel 4 to show only Instrument tracks.
- FX: Press the knob button on Channel 5 to show only FX tracks.
- Busses: Press the knob button on Channel 6 to show only Busses.
- Outputs: Press the knob button on Channel 7 to show only Outputs.
- Remote: Press the knob button on Channel 8 to show all remote bank channels.
Automation
Use the automation buttons to assign automation to the currently selected track. To toggle Automation off press the currently selected mode for the selected track.
Markers
Press the Mem Loc button in the Windows section of ProControl to toggle Marker mode.
With Marker Mode enabled the transport has the following functions:
- Record: Create Marker at playhead position.
- Rewind: Move to previous Marker.
- Fast Forward: Move to Next Marker.
Function Keys
The F1-F8 keys at the top left of the Control|24 act as the function keys for Studio One. Press the Softkeys button on the C|24 to access the function keys for Studio One. These can be customizable using the Mackie Control Device editor in Studio One.
Back to top
Command|8
Using Command|8 with Live
This is how you set up Live with Command|8.
In the Ableton Live top menu bar select: Ableton/Preferences...
In the preferences window, select MIDI/Sync
Select the following for the Control Surface Setup:
- Control Surface: MackieControl
- Input: V-Control
- Output: V-Control
Toggle On for Remote for the following:
- Input: MackieControl Input (V-Control)
- Output: MackieControl Output (V-Control)
Back to top
Using Command|8 with Logic
Here's how to setup with Logic and the Command|8.
Launch Logic Pro X
Ensure "Automatic Installation" is enabled in the Control Surface setup in Logic.
Logic automatically detects any controller setup through V-Control Pro. Click Connect when the automatic setup window pops up.
Select "Add" when the window pops up saying it has detected Command|8
Command|8 and Logic Pro X should now have bidirectional communication.
Back to top
Using Command|8 with Luna
V-Window Plug-In Control: Simply hover the mouse pointer above a plug-in parameter, enable V-Window mode (tap the Master button twice), and now the fader remotely controls the mouse up and down for smooth, accurate control. The touch-sensitive fader makes it work perfect with LUNA touch and latch mode automation. For horizontal sliders, press the CTRL button on your keyboard.
Transport: Here is a list of the Transport commands available with Luna.
- Play: Starts playback.
- Stop: Stops playback.
- Rewind: Go To Start.
- Fast Forward: Go To End.
- Record: Starts Recording of session.
- Loop Play: Start Looped playback.
- Counter Mode: Toggles Counter Display Bars/Beats or Min/Sec.
Utility: Here is a list of utility commands available for Luna.
- Undo: Undo the last command.
- Cancel: Acts as the Escape key.
- Enter: Acts as the Enter key.
Cursor keys: Here is a list of the Cursor commands available for Luna.
- Zoom: Toggles between Zoom and Nav mode.
- Up: In Nav mode press to select previous track. In Zoom mode increases all track heights.
- Down: In Nav mode press to select next track. In Zoom mode decreases all track heights.
- Left: In Nav mode press to scroll to previous marker. In Zoom mode press to Zoom out.
- Right: In Nav mode press to scroll to next marker. In Zoom mode press to Zoom In.
Back to top
Using Command|8 with MixBus
Follow the steps to setup Command|8 with MixBus.
- Launch V-Control Pro
- Add Command|8 to V-Control Pro Setups if not done already.
- Launch MixBus
- In the MixBus top menu bar go to: MixBus / Preferences
- In the Preferences window, click on Control Surfaces and then click on the box next to Mackie Control to enable it.
- Click on Show Protocol Settings with Mackie Control selected to open the protocol setup window.
- Main surface at position 1 sends via: V-Control
- Main surface at position 1 receives via: V-Control
- The Command|8 is now setup with MixBus
Back to top
Using Command|8 with Reaper
Functionality is currently limited with Reaper
This is how you set up Reaper with a Command|8
- Launch V-Control Pro
- Add Command|8 to V-Control Pro Setups if not done already.
- Launch Reaper
- In the Reaper top menu bar go to: Reaper / Preferences...
- Navigate to the Control/OSC/Web section of the Preferences window.
- Click on Add to bring up the Control surface setup window.
- Select the following in the Control Surface Settings Window:
- Control Surface Mode: Mackie Control Universal
- MIDI Input: V-Control
- MIDI Output: V-Control
Back to top
Using Command|8 with Steinberg
Setting Up Command|8 with Steinberg
In the Steinberg top menu bar go to: Studio / Studio Setup...
In the Studio Setup window, click on the "+" sign.
- Select Command|8 from the drop down list.
Click Ok to close the Studio Setup Window.
Back to top
Digidesign 003
Using Digidesign 003 with Live
This is how you set up Live with the 003.
In the Ableton Live top menu bar select: Ableton/Preferences...
In the preferences window, select MIDI/Sync
Select the following for the Control Surface Setup:
- Control Surface: MackieControl
- Input: V-Control
- Output: V-Control
Toggle On for Remote for the following:
- Input: MackieControl Input (V-Control)
- Output: MackieControl Output (V-Control)
Back to top
Using Digidesign 003 with Logic
Here's how to setup with Logic and the Digidesign 003.
Launch Logic Pro X
Ensure "Automatic Installation" is enabled in the Control Surface setup in Logic.
Logic automatically detects any controller setup through V-Control Pro. Click Connect when the automatic setup window pops up.
Select "Add" when the window pops up saying it has detected Digidesign 003
Digidesign 003 and Logic Pro X should now have bidirectional communication.
Back to top
Using Digidesign 003 with MixBus
Follow the steps to setup 003 with MixBus.
- Launch V-Control Pro
- Add 003 to V-Control Pro Setups if not done already.
- Launch MixBus
- In the MixBus top menu bar go to: MixBus / Preferences
- In the Preferences window, click on Control Surfaces and then click on the box next to Mackie Control to enable it.
- Click on Show Protocol Settings with Mackie Control selected to open the protocol setup window.
- Main surface at position 1 sends via: V-Control
- Main surface at position 1 receives via: V-Control
- The 003 is now setup with MixBus
Back to top
Using Digidesign 003 with Reaper
Functionality is currently limited with Reaper
This is how you set up Reaper with an 003
- Launch V-Control Pro
- Add Digidesign 003 to V-Control Pro Setups if not done already.
- Launch Reaper
- In the Reaper top menu bar go to: Reaper / Preferences...
- Navigate to the Control/OSC/Web section of the Preferences window.
- Click on Add to bring up the Control surface setup window.
- Select the following in the Control Surface Settings Window:
- Control Surface Mode: Mackie Control Universal
- MIDI Input: V-Control
- MIDI Output: V-Control
Using Digidesign 003 with Steinberg
Setting Up Digidesign 003 with Steinberg
In the Steinberg top menu bar go to: Studio / Studio Setup...
!!WINDOWS USERS!! Click to view the MIDI Port Setup
Disable all the 003 MIDI Out ports in the MIDI Setup window by unchecking them in the Visible column.
In the Studio Setup window, click on the "+" sign.
- Select Digidesign 003 from the drop down list.
Click Ok to close the Studio Setup Window.
Back to top
D-Command
Using D-Command with Digital Performer
This is how you set up Digital Performer with D-Command
- Launch V-Control Pro
- Launch Digital Performer
- In the Digital Performer top menu bar go to: Setup / Control Surface Setup...
- Configure the Control Surface Setup Window as followed:
- Driver: Mackie Control
- Unit: Mackie Control
- Input Port: V-Control
- Output Port: V-Control
If using an additional D-Command Faderpack add the following:
- Click on the + sign to add additional control surfaces.
- Set each control surface as follows.
- Unit: Expander (XT) Input: V-Control XT2-1 Output: V-Control XT2
- Unit: Expander (XT) Input: V-Control XT3-1 Output: V-Control XT3
Functions
Here is a list of the functions available with Digital Performer.
Mixer:
- Fader: Adjust channel fader. Flip to control knob parameters with Fader.
- Knob: Controls currently asigned bank mode selection.
- Mute: Mutes channel.
- Solo: Solos Channel.
- Select: Selects Channel.
- Pan: Assigns knobs to control pan position.
- Send: Assigns knobs to control Send levels
- Insert: Assigns knobs to control plug-in editor.
Transport:
- Play: Start Playhead
- Stop: Stop Playhead
- Record:Toggles Record
- Rewind: Rewinds Playhead
- Fast Forward: Fast Forward Playhead
Back to top
Using D-Command with Live
This is how you set up Live with D-Command.
In the Ableton Live top menu bar select: Ableton/Preferences...
In the preferences window, select MIDI/Sync
Select the following for the Control Surface Setup:
- Control Surface: MackieControl
- Input: V-Control
- Output: V-Control
Toggle On for Remote for the following:
- Input: MackieControl Input (V-Control)
- Output: MackieControl Output (V-Control)
If using a D-Command Faderpack as well, select the following for the Control Surface Setup:
- Control Surface: MackieControl
- Input: V-Control
- Output: V-Control
- Control Surface: MackieControlXT
- Input: V-Control XT2
- Output: V-Control XT2
- Control Surface: MackieControlXT
- Input: V-Control XT3
- Output: V-Control XT3
Toggle On for Remote for the following:
- Input: MackieControl Input (V-Control)
- Input: MackieControlXT Input (V-Control XT2)
- Input: MackieControlXT Input (V-Control XT3)
- Output: MackieControl Output (V-Control)
- Output: MackieControlXT Output (V-Control XT2)
- Output: MackieControlXT Output (V-Control XT3)
Functions
Here is a list of the functions available with Live.
Mixer:
- Fader: Adjust channel fader. Flip to control knob parameters with Fader.
- Knob: Controls currently asigned bank mode selection.
- Mute: Mutes channel.
- Solo: Solos Channel.
- Select: Selects Channel.
- Pan: Assigns knobs to control pan position.
- Send: Assigns knobs to control Send levels
- Insert: Assigns knobs to control plug-in editor.
Transport:
- Play: Start Playhead
- Stop: Stop Playhead
- Record:Toggles Record
- Rewind: Rewinds Playhead
- Fast Forward: Fast Forward Playhead
Back to top
Using D-Command with Logic
Here's how to setup with Logic and the D-Command.
Launch Logic Pro X
Ensure "Automatic Installation" is enabled in the Control Surface setup in Logic.
Logic automatically detects any controller setup through V-Control Pro. Click Connect when the automatic setup window pops up.
Select "Add" when the window pops up saying it has detected D-Command
D-Command and Logic Pro X should now have bidirectional communication.
Functions
Here is a list of the functions available with Logic.
Mixer:
- Fader: Adjust channel fader. Flip to control knob parameters with Fader.
- Knob: Controls currently asigned bank mode selection.
- Mute: Mutes channel.
- Solo: Solos Channel.
- Select: Selects Channel.
- Pan: Assigns knobs to control pan position.
- Send: Assigns knobs to control Send levels
- Insert: Assigns knobs to control plug-in editor.
EQ Section:
- In 1: Toggles Band 1 On/Off.
- In 2: Toggles Band 2 On/Off.
- In 3: Toggles Band 3 On/Off.
- In 4: Toggles Band 4 On/Off.
- Freq 1: Adjusts Band 1 Frequency.
- Freq 2: Adjusts Band 2 Frequency.
- Freq 3: Adjusts Band 3 Frequency.
- Freq 4: Adjusts Band 4 Frequency.
- Gain 1: Adjusts Band 1 Gain.
- Gain 2: Adjusts Band 2 Gain.
- Gain 3: Adjusts Band 3 Gain.
- Gain 4: Adjusts Band 4 Gain.
Automation:
- Write: Assigns Write automation to selected track.
- Read: Assigns Read automation to selected track.
- Touch: Assigns Touch automation to selected track.
- Latch: Assigns Latch automation to selected track.
- Off: Turns Off automation on selected track.
- Trim: Toggles Trim automation on selected track.
Automation Enables:
- Volume: Toggles Volume Automation
- Pan: Toggles Pan Automation
- Mute: Toggles Mute Automation.
- Send Level: Toggles Send Level Automation.
- Plug-in: Toggles Plug-In Parameter Automation.
Transport:
- Play: Start Playhead
- Stop: Stop Playhead
- Record:Toggles Record
- Rewind: Rewinds Playhead
- Pre Roll: Toggles Count In.
- Mark In: Mark In at current position.
- Mark Out: Mark Out at current position.
- Online: Toggles Metronome.
- Audition: Toggles Replace.
- Scrub: Enables Scrub Mode for Wheel.
- Shuttle: Enables Shuttle Mode for Wheel.
Windows:
- Mix: Toggles Mixer window view.
- Edit: Toggles Arrangement window view.
- Transport:Toggles transport window view.
- Plug-in: Opens Step Editor.
- Mem Loc: Toggles Marker window view.
Group:
- Suspend Groups: Toggles Group Suspend.
Utility:
- Save: Saves Session.
- Undo: Undo last action.
- Redo: Redo last action.
Navigation:
- Navigate: Toggles Marker Mode for cursor keys.
- Zoom: Toggles Zoom Mode for cursor keys.
- Up:Moves up selected channel.
- Down: Moves down selected channel. Inserts Marker in Marker Mode.
- Left: Moves to previous marker in Marker Mode.
- Right: Moves to next marker in Marker Mode.
- Nudge Left: Move mixer 1 channel to left.
- Nudge Right: Move mixer 1 channel to right.
- Bank Left: Move mixer 8 channel to left.
- Bank Right: Move mixer 8 channel to right.
Back to top
Using D-Command with MixBus
Follow the steps to setup D-Command with MixBus.
- Launch V-Control Pro
- Open the V-Control Pro Setups window
- Click on +Add New in the Controllers section and click on Add Ethernet Device...
- Select the D-Command unit and click Add>
- Launch MixBus
- In the MixBus top menu bar go to: MixBus / Preferences
- In the Preferences window, click on Control Surfaces and then click on the box next to Mackie Control to enable it.
- Click on Show Protocol Settings with Mackie Control selected to open the protocol setup window.
- For Device type select Mackie Control and setup the ports as shown:
- Main surface at position 1 sends via: V-Control
- Main surface at position 1 receives via: V-Control
- If using a D-Command FaderPack: For Device type select Mackie Control with two extenders and setup the ports as shown:
- Main surface at position 1 sends via: V-Control
- Main surface at position 1 receives via: V-Control
- Main surface at position 2 sends via: V-Control XT2
- Main surface at position 2 receives via: V-Control XT2
- Main surface at position 3 sends via: V-Control XT3
- Main surface at position 3 receives via: V-Control XT3
- The D-Command is now setup with MixBus
Functions
Here is a list of the functions available with Mixbus.
Mixer:
- Fader: Adjust channel fader. Flip to control knob parameters with Fader.
- Knob: Controls currently asigned bank mode selection.
- Mute: Mutes channel.
- Solo: Solos Channel.
- Select: Selects Channel.
- Pan: Assigns knobs to control pan position.
- Send: Assigns knobs to control Send levels
- Flip: Flips knob control to faders.
Automation:
- Write: Enables Write Automation for selected track.
- Read: Enables Play Automation for selected track.
- Touch: Enables Touch Automation for selected track.
- Off: Enables Manual Automation for selected track.
Transport:
- Play: Start Playhead
- Stop: Stop Playhead
- Record:Toggles Record
- Rewind: Rewinds Playhead
- Fast Forward: Fast Forward Playhead
Navigation:
- Zoom: Toggles Zoom Mode for Cursor Keys.
- Up: Moves up a channel in Arrangement Window. Increase Vertical zoom on selected channel in Zoom Mode.
- Down:Moves down a channel in Arrangement Windo. Decreases Vertical zoom on selected channel in Zoom Mode.
- Left: Moves playhead back in timeline. Decreases horizontal zoom in arrangement window in Zoom Mode.
- Right: Moves playhead forward in timeline. Increases horizontal zoom in arrangement window in Zoom Mode.
- Nudge Left: Move 1 channel left in mixer.
- Nudge Right: Move 1 channel right in mixer.
- Bank Left: Move 8 channels left in mixer.
- Bank Right: Move 8 channels right in mixer.
Back to top
Setting up D-Command for Pro Tools Studio.
In the Pro Tools top menu bar select: Setup / Peripherals
Select the MIDI Controllers tab
For Controller #1, setup as shown.
- Type: "HUI" Receive From: "V-Control" Send To: "V-Control"
If using the D-command Fader Module extension as well, Setup rows 2 and 3 as shown:
For Controller #2, setup as shown.
- Type: "HUI" Receive From: "V-Control XT2" Send To: "V-Control XT2"
For Controller #3, setup as shown.
- Type: "HUI" Receive From: "V-Control XT3" Send To: "V-Control XT3"
D-Command is now connected and ready to use with Pro Tools.
Pro Tools Controls with D-Command
V-Control Pro uses the HUI protocol to communicate with Pro Tools so there are some differences to take into account when using D-Command.
Press the Master Fader button to enable the V-Window feature for the last fader on the surface. Simply hover the mouse over the parameter you want to control. When you touch and move the fader, the mouse is remotely controlled to click and drag for precise control.
- To control sends, press the Send button on the channel strip and use the Page Up and Page Down Buttons to change which Send assignment is assigned to the knobs.
- Press the BypMute button on the channel strip to switch between Pre/post mode and Send Mute mode.
- If Send Mute is Disabled (PRE light is lit above BMP), press the BMP button to toggle Pre/Post Fader for Sends.
- If Send Mute mode is enabled, the BMP button will toggle Send mutes for the currnetly assigned Send.
- To assign Automation on a channel, hold down the AUTO button while selecting the Automation Mode. Release the AUTO button when done.
- Automation on a track can also be changed by holding down the AUTO button on the channel strip and touching the Select button on the channel. This will cycle through Automation modes.
- The Automation indicator leds in the channel strip can not distinguish WR, TC, and LT, so all three will light up when one is selected.
- Certain functions are not available. This will be indicated by a Function not available. message appearing in the scribble text.
Functions
Here is a list of the functions available with Pro Tools.
Mixer:
- Fader: Adjust channel fader. Flip to control knob parameters with Fader.
- Knob: Controls currently asigned bank mode selection.
- Mute: Mutes channel.
- Solo: Solos Channel.
- Select: Selects Channel.
- Pan: Assigns knobs to control pan position.
- Send: Assigns knobs to control Send levels
- Page Up: When Sends are assigned to knobs, Cycles up to the next Send.
- Page Down: When Sends are assigned to knobs, Cycles down to the next Send.
- BypMute: Toggles Send Mute Mode On/Off for Sends.
- BMP:Toggles Pre/Post Fader for Sends when Send Mute is Off. Toggles Send Mute on assigned send when Send Mute Mode is on.
Automation:
- Write: Enables Write automation.
- Read: Enables Read automation.
- Touch: Toggles Touch automation.
- Latch: Enables Latch automation.
- Off: Changes Automation to off.
Automation Enables:
- Vol: Toggle Enable Volume Automation.
- Pan: Toggle Enable Pan Automation.
- Mute: Toggle Enable Mute Automation.
- Sends: Toggle Enable Sends Automation.
- EQ: Toggle Enable Send Mute Automation.
- Plugin: Toggle Enable Plugin Automation.
Transport:
- Play: Start Playhead
- Stop: Stop Playhead
- Record:Toggles Record
- Rewind: Rewinds Playhead
- Fast Forward: Fast Forward Playhead
- Loop Play: Toggles Loop Play mode.
Window Buttons:
- Mix: Toggles Mix Window
- Edit: Toggles Edit Window
- Transport:Toggles Tranport Window
- Plug-in: Toggles Plug-in Window
Utility:
- Save: Saves Session
- Undo: Undo the last action.
Back to top
Using D-Command with Reaper
Functionality is currently limited with Reaper
This is how you set up Reaper with a D-Command
- Launch V-Control Pro
- Add D-Command to V-Control Pro Setups if not done already.
- Launch Reaper
- In the Reaper top menu bar go to: Reaper / Preferences...
- Navigate to the Control/OSC/Web section of the Preferences window.
- Click on Add to bring up the Control surface setup window.
- Select the following in the Control Surface Settings Window:
- Control Surface Mode: Mackie Control Universal
- MIDI Input: V-Control
- MIDI Output: V-Control
If using a D-Command Faderpack also, add the following:
- Click on Add again to bring up a new window:
- Select the following in the Control Surface Settings Window to add the 2nd bank:
- Control Surface Mode: Mackie Control Extender
- MIDI Input: V-Control XT2
- MIDI Output: V-Control XT2
- Surface Offset (Tracks): 8
- Click on Add again to bring up a 3rd new window:
- Select the following in the Control Surface Settings Window to add the 3rd bank:
- Control Surface Mode: Mackie Control Extender
- MIDI Input: V-Control XT3
- MIDI Output: V-Control XT3
- Surface Offset (Tracks): 16
Functions
Here is a list of the functions available with Reaper.
Mixer:
- Fader: Adjust channel fader. Flip to control knob parameters with Fader.
- Knob: Controls currently asigned bank mode selection.
- Mute: Mutes channel.
- Solo: Solos Channel.
- Select: Selects Channel.
Transport:
- Play: Start Playhead
- Stop: Stop Playhead
- Record:Toggles Record
- Rewind: Rewinds Playhead
- Fast Forward: Fast Forward Playhead
Back to top
Using D-Command with Steinberg
Setting Up D-Command with Steinberg
In the Steinberg top menu bar go to: Studio / Studio Setup...
In the Studio Setup window, click on the "+" sign.
- Select Digidesign/AVID D-Command from the drop down list.
If using additional D-Command Fader Pack with the main unit, select the Track count in the Bank drop down menu that matches your setup.
Open the V-Control Pro Setups window to select which bank the D-Command Fader Pack controls by selecting it under the Steinberg group and changing its Bank from the Bank drop down menu.
Click Ok to close the Studio Setup Window.
Functions
Here is a list of the functions available with Steinberg.
Mixer:
- Fader: Adjust channel fader. Flip to control knob parameters with Fader.
- Knob: Controls currently asigned bank mode selection.
- Mute: Mutes channel.
- Solo: Solos Channel.
- Select: Selects Channel.
- Pan: Assigns knobs to control pan position.
- Send: Assigns knobs to control Send levels
- Insert: Assigns knobs to control plug-in editor.
- Flip: Flips knob control to faders.
Automation:
- Write: Toggles Write automation for all channels.
- Read: Toggles Read automation for all channels.
- Touch: Enables Touch automation.
- Latch: Enables Auto-Latch automation.
- Off: Enables Cross-Over automation.
Transport:
- Play: Start Playhead
- Stop: Stop Playhead
- Record:Toggles Record
- Rewind: Rewinds Playhead
- Fast Forward: Fast Forward Playhead
Navigation:
- Play: Start Playhead
- Stop: Stop Playhead
- Record:Toggles Record
- Rewind: Rewinds Playhead
- Fast Forward: Fast Forward Playhead
Back to top
Using with D-Command with Studio One
This is how you set up Studio One with D-Command
- Launch V-Control Pro
- Launch Studio One
- In the Studio One top menu bar select: Studio One / Preferences...
- Select External Device on the preferences window
- Select "Add Device" and choose the following:
- Mackie/Control
- Receive From: V-Control
- Send To: V-Control
Studio One is now ready to use with D-Command.
Here is a list of the functions available with Studio One.
Mixer:
- Fader: Adjust channel fader. Flip to control knob parameters with Fader.
- Knob: Controls currently asigned bank mode selection.
- Mute: Mutes channel.
- Solo: Solos Channel.
- Select: Selects Channel.
- Pan: Assigns knobs to control pan position.
- Send: Assigns knobs to control Send levels
- Insert: Assigns knobs to control plug-in editor.
Transport:
- Play: Start Playhead
- Stop: Stop Playhead
- Record:Toggles Record
- Rewind: Rewinds Playhead
- Fast Forward: Fast Forward Playhead
- Back to top
ProControl
Using ProControl with Digital Performer
This is how you set up Digital Performer with ProControl
- Launch V-Control Pro
- Launch Digital Performer
- In the Digital Performer top menu bar go to: Setup / Control Surface Setup...
- Configure the Control Surface Setup Window as followed:
- Driver: Mackie Control
- Unit: Mackie Control
- Input Port: V-Control
- Output Port: V-Control
- Click "Ok" to close the Control Surface Setup Window.
- Back to top
Using ProControl with Live
Setting Up ProControl with Live
- In the Ableton Live top menu bar select: Ableton/Preferences...
- In the preferences window, select MIDI/Sync
- Select the following for the Control Surface Setup:
- Control Surface: MackieControl
- Input: V-Control
- Output: V-Control
- Toggle On for Remote for the following:
- Input: MackieControl Input (V-Control)
- Output: MackieControl Output (V-Control)
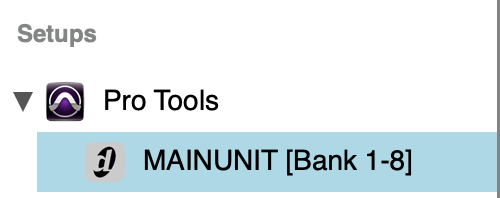
The ProControl Main Unit and Faderpacks can be assigned to which bank they control in the V-Control Pro Setups window:
- Click on the V-Control Pro icon and select Setups..
- In the Setups window select the ProControl Main Unit or Faderpack paired with Live.
- With the controller selected, Click on the Bank selection.
- Select either Bank 1-8, Bank 9-16, Bank 17-24, or Bank 25-32 to assign it to the selected controller.

Using ProControl with Live
Assign Modes: Use assign buttons to change knob mode for channel strips.
- Pan: Assigns Pan Mode to knobs.
- Sends A-E:Assigns Sends Mode. Send mode displays the sends for the selected channel.
- Ins/Edt:Assigns Plug-in Mode. Plug-In Mode displays the plug-ins for the selected channel. Use the knob button to select the plug-in for editing.
- Input/Ouput: Assigns Input/Output Mode. Press multiple times to cycle between different modes: Audio Input, Input Channel, Output Channel, Output Configuration.
Cursor Modes: There are different modes available for the cursor keys depending on the mode.
- Normal: Starts in Normal mode by default, cursor keys allow track navigation and clip selection.
- Zoom: Press the zoom key to access Zoom mode, left and right cursor keys zoom in and out in the arrangement window. Live must be the application in focus to function properly. Pressing the zoom key again will assign cursor keys to Marker mode.
- Marker: Press the Zoom key when in Zoom mode to access Marker Mode. The left and right cursor keys jump between previous marker and next marker. The down cursor key creates a marker at the current playhead position. Pressing the Zoom key again will return to Normal mode.
Wheel Modes: There are different modes available for the wheel functionality depending on the mode.
- None: When no wheel mode is selected, the wheel does not function.
- Scene: Press the Scrub button to access Scene Mode. In scene mode, the wheel navigates up and down between different scenes. Use the Punch button in the transport to trigger the scene.
- Shuttle: Press the Shuttle button to access Shuttle mode. In shuttle mode, the wheel moves the playhead forward or back.
Transport Keys: Use these keys for the transport.
- In: Toggles Punch-in
- Out: Toggles Punch-out
- Pencil: Toggles Draw function.
- Grab: Toggles Follow function.
- Loop Play: Toggles Loop.
Window keys: Use the Window buttons to display different windows in Live.
- Mix/Edit: Toggles between Session and Arrangement view.
- Transport: Toggle the Browser window.
- Status: Toggles the Detail window.
- Plug-in: Toggles the Clip window.
Utility keys: Use these keys for specific functions.
- Undo: Undo the last action.
- Undo+Shift: Redo the last action undone.
Softkeys: There are function keys that can be mapped using the Live MIDI Mapper. Use the first 16 keys in the Channel matrix as the function keys.
- Back to top
Using ProControl with Logic
Setting Up ProControl with Logic
- Launch Logic Pro X
- Ensure "Automatic Installation" is enabled in the Control Surface setup in Logic.
- Logic automatically detects any controller setup through V-Control Pro. Click Connect when the automatic setup window pops up.
- Select "Add" when the window pops up saying it has detected ProControl
ProControl and Logic Pro X should now have bidirectional communication.
Using ProControl with Logic
AUTOMATION
- Press the Auto button on the channel strip to change the automation on that track.
- With the track Select button, automation can also be changed with the Automation buttons on the side for that selected track.
SENDS
Sends can be edited in either the channel strip or in the DSP/Edit Section.
- Editing Sends on the Channel Strip
- Use the Send Assignment buttons A-E to select between the first 5 sends. Pressing the corresponding button will assign the knobs on the channel strips to control the send level for that send on each channel.
- The Pre/Post buttons change the sends between Pre Fader and Post Fader.
- Press the Send Mute button to enable the Pre/Post buttons to mute the selected Sends on the channel.
- Editing Sends in the DSP/Edit Section
- Press the Sends button in the DSP/Edit section to change it to Sends Mode.
- Press the Select button the channel strip of the channel Sends that you wish to edit.
- Sends 1-8 will be listed in the DSP/Edit section for the selected channel. Use the knobs to adjust send levels.
- The bypass buttons in the DSP/Edit section will toggle between Pre-Fader/Post Fader for the Send.
PLUG-IN EDITING
Using the DSP Edit section of ProControl. Plug-ins can be assigned and edited on a selected track.
- First select the track using the the Select button on the channel strip.
- Press the Inserts/Params button to enable the Plug-In Editor
- Press the Assign button in the DSP Edit section to Assign plug-ins. Use the Knobs to cycle through the list of plug-ins. Press the Assign button once finished with selection.
- Press the Select button on the plug-in to select it for editing. Use the knobs to edit the parameters of the plug-in.
- Use the first two buttons in the Matrix section to cycle between pages in the plug-in parameters.
MARKER NAVIGATION
Press the Go To in the Matrix section to enable the Matrix to be marker navigation. Press a corresponding number in the Matrix section to jump to that marker in the timeline.
Solo Clear
Press the Solo Clear button to clear all Soloed tracks. Press it again to enable all the tracks previously soloed.
Back to top
Using ProControl with Luna
V-Window Plug-In Control: Simply hover the mouse pointer above a plug-in parameter, enable V-Window mode (tap the Master button twice), and now the fader remotely controls the mouse up and down for smooth, accurate control. The touch-sensitive fader makes it work perfect with LUNA touch and latch mode automation. For horizontal sliders, press the CTRL button on your keyboard.
Transport: Here is a list of the Transport commands available with Luna.
- Play: Starts playback.
- Stop: Stops playback.
- Rewind: Moves playhead backward.
- Fast Forward: Go To End.
- Record: Starts Recording of session.
- Loop Play: Start Looped playback.
- Audition: Toggles Metronome
- Marker: Creates Marker at playhead.
- Counter Mode: Toggles Counter Display Bars/Beats or Min/Sec.
Automation: Here is a list of the Automation commands available with Luna.
- Read: Toggles between Off and Read Automation Modes.
- Touch: Toggles Touch Automation Mode.
- TRIM: Toggles TRIM Automation Mode.
Matrix: Here is a list of the Matrix button functionality with Luna.
- 1: Toggles winddow view of timeline and mixer.
- 2: Toggles Spill on Main Bus.
Utility: Here is a list of utility commands available for Luna.
- Undo: Undo the last command.
- Cancel: Acts as the Escape key.
- Enter: Acts as the Enter key.
Cursor keys: Here is a list of the Cursor commands available for Luna.
- Zoom: Toggles between Zoom and Nav mode.
- Up: In Nav mode press to select previous track. In Zoom mode increases all track heights.
- Down: In Nav mode press to select next track. In Zoom mode decreases all track heights.
- Left: In Nav mode press to scroll to previous marker. In Zoom mode press to Zoom out.
- Right: In Nav mode press to scroll to next marker. In Zoom mode press to Zoom In.
Using ProControl with MixBus
Setting Up ProControl with MixBus
Follow the steps to setup ProControl with MixBus.
- Launch V-Control Pro
- Open the V-Control Pro Setups window
- Click on +Add New in the Controllers section and click on Add Ethernet Device...
- Select the ProControl unit and click Add
- Launch Mixbus
- In the Mixbus top menu bar go to: Mixbus / Preferences
- In the Preferences window, click on Control Surfaces and then click on the box next to Mackie Control to enable it.
- Click on Show Protocol Settings with Mackie Control selected to open the protocol setup window.
- For Device type select Mackie Control and setup the ports as shown:
- Main surface at position 1 sends via: V-Control
- Main surface at position 1 receives via: V-Control
- If using more than one ProControl unit select Mackie Control with One Extender or Mackie Control with Two Extenders depending on setup. Add the following ports for one or two extenders:
- Main surface at position 2 sends via: V-Control XT2
- Main surface at position 2 receives via: V-Control XT2
- Main surface at position 3 sends via: V-Control XT3
- Main surface at position 3 receives via: V-Control XT3
The ProControl Main Unit and Faderpacks can be assigned to which bank they control in the V-Control Pro Setups window:
- Click on the V-Control Pro icon and select Setups..
- In the Setups window select the ProControl Main Unit or Faderpack paired with MixBus.
- With the controller selected, Click on the Bank selection.
- Select either Bank 1-8, Bank 9-16, Bank 17-24, or Bank 25-32 to assign it to the selected controller.
- ProControl is now setup with MixBus
Using ProControl with MixBus
Assign Modes: Use the Assign buttons or Channel Strip buttons to change modes for the knobs.
- Pan: Assigns knobs to control Stereo Panning on channel strips
- Sends A-E: Assigns knobs to edit sends for Selected Tracks.
- Input/Output: Assigns knobs to edit selected track parameters.
- EQ (Channel Strip): Assigns knobs to edit EQ parameters for Selected Track.
- Dyn (Channel Strip): Assigns knobs to edit Dynamics paramteres for Selected Track.
- Ins/Sends (Channel Strip): Assigns knobs to edit sends for Selected Track.
Transport: Here is a list of the functionality available with Mixbus.
- Play: Starts playback.
- Stop: Stops playback.
- Rewind: Moves playhead backward.
- Fast Forward: Moves playhead forward.
- RTZ: Returns playhead to start.
- GTE: Moves playhead to end.
- Record: Starts Recording of session.
- Ext Trans: Toggles Metronome.
- Loop Play: Start Looped playback.
- Loop Rec: Punch In.
- Punch: Punch Out.
- In: Mark In.
- Out: Mark Out.
- Pre Roll: Sets Punch from selection.
- Post Roll: Sets Session Start/End from selection.
- Audition: Sets Loop from Range Selection.
- Counter Mode: Changes Counter display.
Automation: Use the Automation buttons to change the automation mode for the selected tracks.
- Read: Enables Read/Play Automation
- Write: Enables Write Automation
- Touch: Enables Touch Automation
- Off: Enables Off/Manual Automation
Mixer Views: Use the DSP Edit Assign buttons to change which tracks are viewed in the mixer.
- MIDI: Press this button to show all MIDI Tracks. Press again to show all tracks.
- Audio: Press this button to show all Audio Tracks. Press again to show all tracks.
- Busses: Press this button to show all bus tracks. Press again to show all tracks.
- Aux: Press this button to show all Aux tracks. Press again to show all tracks.
- User: Pres this button to only show selected tracks. Press again to show all tracks.
Utility Buttons: Mixbus uses the following Utility functions.
- Undo: Press to undo the last action.
- Shift+Undo: Press to redo the last action.
- Save: Press to save the session.
- Enter: Acts as Enter key.
- Escape: Acts as ESC key.
- F3: Select All Tracks.
- F4: Deselect All Tracks.
Matrix Buttons: Use the Matrix Buttons to access the softkeys. The Softkeys can be assigned in the Mackie Control protocol settings in Mixbus.
- Matrix Buttons 1-8: Act as Soft key buttons 1-8.
Navigation: Use the navigation buttons for control of markers and zooming on the edit window.
- Wheel: Moves playhead across timeline.
- Zoom: Press once to enter zoom mode. Press twice to enter Navigation mode. Press a third time to go back to normal cursor mode.
- Down Arrow: Creates Marker at playhead position when in Marker Mode. Zoom Out Vertically when Zoom mode is active.
- Up Arrow: Deletes Marker at playhead position when in Marker Mode. Zoom in Vertically when Zoom mode is active.
- Left Arrow: Goes to Previous Marker when in Marker Mode. Zoom Out Horizontally when Zoom mode is active.
- Right Arrow: Goes to Next Marker when in Marker Mode. Zoom in Horizontally when Zoom mode is active.
Back to top
Using ProControl with Pro Tools
Setting up ProControl with Pro Tools
Launch Pro Tools.
In the Pro Tools top menu bar select: Setup / Peripherals
Select the MIDI Controllers tab
For Controller #1, setup as shown.
- Type: "HUI" Receive From: "V-Control" Send To: "V-Control"
For Controller #2 if connecting with a faderpack for 16 channels total, setup as shown.
- Type: "HUI" Receive From: "V-Control XT2" Send To: "V-Control XT2"
For Controller #3 if connecting with a 2nd faderapacks for 24 channels total, setup as shown.
- Type: "HUI" Receive From: "V-Control XT3" Send To: "V-Control XT3"
For Controller #4 if connecting with 3 faderapacks for 32 channels total, setup as shown.
- Type: "HUI" Receive From: "V-Control XT4" Send To: "V-Control XT4"
The ProControl Main Unit and Faderpacks can be assigned to which bank they control in the V-Control Pro Setups window:
- Click on the V-Control Pro icon and select Setups..
- In the Setups window select the ProControl Main Unit or Faderpack paired with Pro Tools.
- With the controller selected, Click on the Bank selection.
- Select either Bank 1-8, Bank 9-16, Bank 17-24, or Bank 25-32 to assign it to the selected controller.
ProControl is now connected and ready to use with Pro Tools.
Troubleshooting with ProControl with Pro Tools.
- As V-Control Pro uses the HUI protocol to communicate with Pro Tools. One way to resolve most issues when receiving the "Pro Tools is not able to communicate with HUI.." dialog is to open the MIDI peripherals setup window in Pro Tools and click Okay. Doing so will resync the connection between Pro Tools and V-Control Pro.
- If using multiple and there is no control when selecting an extended bank (9-16, 17-24, 25-32) check the V-Control Pro "Preferences" to make sure the DAW Track count is set to the desired number of tracks available to control.
- If the ProControl/Control24 unit temporary loses connection with V-Control Pro and the faders and track names are not in sync. Double tap the Flip button on the control surface to refresh and update the Faders/Track names.
- If all control units are controlling the same bank, go into the V-Control Pro "Setups.." menu to assign each unit to a specific bank.
Back to top
Using ProControl/Control|24 with Pro Tools
V-Control Pro uses the HUI protocol to communicate with Pro Tools so there are some differences to take into account when using ProControl/b>.
Press the Master Fader button to enable the V-Window feature for the last fader on the surface. Simply hover the mouse over the parameter you want to control. When you touch and move the fader, the mouse is remotely controlled to click and drag for precise control.
- While you can assign plug-ins on the extra banks (V-ControlXT2, V-ControlXT3, V-ControlXT4), plug-in editing is only available on the first bank. This is a restriction of the HUI protocol.
- To assign Automation on a channel, hold down the AUTO button while selecting the Automation Mode. Release the AUTO button when done.
- Automation on a track can also be changed by holding down the AUTO button on the channel strip and touching the Select button on the channel. This will cycle through Automation modes.
- The Automation indicator leds in the channel strip can not distinguish WR, TC, and LT, so all three will light up when one is selected.
- When editing Insert plug-ins only rows 5-8 in the DSP EDIT/ASSIGN section are usable.
- Certain functions are not available. This will be indicated by a Function not available. message appearing in the scribble text.
Metering in Pro Tools with ProControl
HUI metering uses just 12 segments where ProControl has 15 segments so V-Control Pro has to adapt 12 to 15. HUI metering behaves differently for Pro Tools 11 and later than it did with previous versions of Pro Tools. Peak hold is never active no matter what the Pro Tools metering preferences are set to. Also, clip indication is only used for record-enabled tracks that are metering audio input. This is probably because of the newer mixer's headroom where audio does not clip (even though the Mixer window does indicate a clip.)
Click HERE to view the V-Control Pro Users Guide
Back to top
Back to top
Using ProControl with Reaper
Functionality is currently limited with Reaper
This is how you set up Reaper with ProControl
- Launch V-Control Pro
- Add ProControl to V-Control Pro Setups if not done already.
- Launch Reaper
- In the Reaper top menu bar go to: Reaper / Preferences...
- Navigate to the Control/OSC/Web section of the Preferences window.
- Click on Add to bring up the Control surface setup window.
- Select the following in the Control Surface Settings Window:
- Control Surface Mode: Mackie Control Universal
- MIDI Input: V-Control
- MIDI Output: V-Control
If using additional ProControl Faderpacks, follow the steps below to add additional banks.
- Click on Add again to bring up a new window:
- Select the following in the Control Surface Settings Window to add the 2nd bank:
- Control Surface Mode: Mackie Control Extender
- MIDI Input: V-Control XT2
- MIDI Output: V-Control XT2
- Surface Offset (Tracks): 8
- Open the V-Control Pro Setups window and select the 2nd controller paired with Reaper to assign it to bank 9-16.
- Click on Add again to bring up a 3rd new window:
- Select the following in the Control Surface Settings Window to add the 3rd bank:
- Control Surface Mode: Mackie Control Extender
- MIDI Input: V-Control XT3
- MIDI Output: V-Control XT3
- Surface Offset (Tracks): 16
- Open the V-Control Pro Setups window and select the 3rd controller paired with Reaper to assign it to bank 17-24.
Back to top
Using ProControl with Steinberg
Setting Up ProControl with Steinberg
In the Steinberg top menu bar go to: Studio / Studio Setup...
In the Studio Setup window, click on the "+" sign.
- Select Digidesign ProControl from the drop down list.
If using additional ProControl Fader Packs with the main unit, select the Track count in the Bank drop down menu that matches your setup.
Open the V-Control Pro Setups window to select which bank the Pro Control Fader Pack controls by selecting it under the Steinberg group and changing its Bank from the Bank drop down menu.
Click Ok to close the Studio Setup Window.
Using ProControl with Steinberg
INSERT
- Use the insert buttons on the channel strip to edit plug-ins for that channel.
- Use the F4 and Default buttons to scroll through pages and access plug-in parameters.
EQ
- Use the EQ buttons on the channel strip to edit the EQ for that selected channel. The parameters can be edited using the knobs.
- Use the F4 and Default buttons to scroll through pages available for EQ editing.
SENDS
- Use the DYN buttons on the channel strip to edit the sends for the selected channel.
- Use the F4 and Default buttons to scroll through pages available for Send editing.
- The first page is for adjusting Send Levels.
- The Second Page is for assigning Pre or Post fader for the sends.
- The third page is for Send assignment
AUTOMATION
- Press the AUTO on the channel strip to cycle through Automation modes on the track.
- Use the buttons in the automation section of ProControl to affect all tracks:
- Read All
- Write All
- Trim
- Touch: Set Automation mode to Touch
- Latch: Set Automation mode to Latch
- Off: Set Automation mode to X-Over
Back to top
Using ProControl with Studio One
Here is how to use ProControl with Studio through V-Control Pro.
Bank Assignments
Use the Bank assignments to change the assignment of the channel strips:
- Pan: Assigns V-Pots to channel pan.
- Sends: Press the Send A button to assign the V-Pots to Sends. Pressing it continuously will cycle through different send modes.
- SE: When in SE mode, all sends for the selected channel will be displayed across the channel strips.
- S1-8: When in this mode, the selected send assignment will be displayed across for all channels. For example, when showing S1, all channels will show it's send assignment for Send 1.
- Track: Press the Input or Output assignment buttons to display Track mode for the selected track across the channel strips.
- FX Bypass: Press the Ins/Byp button to access the FX Bypass 1-8 for the selected channel.
- Plug-In: Press the Ins/Send button on any of the channel strips to select the channel and assign plug-in mode.
- Plug-in parameters can be assigned by using the Control Link window in Studio One.
Global Views
Use the Assign buttons in the DSP Edit section to filter which tracks appear in the channel strips.
- Global: Shows all available tracks. (Send, Console, and Outputs)
- Inputs: Shows only available Inputs.
- Audio: Shows only Audio Tracks.
- Instrument: Shows only Instrument tracks.
- FX: Shows only FX tracks.
- Busses: Shows only Busses.
- Outputs: Shows only Outputs.
- Remote: Shows all remote bank channels.
Automation
Use the automation buttons to assign automation to the currently selected track. To toggle Automation off press the currently selected mode for the selected track.
Markers
Press the Mem Loc button in the Windows section of ProControl to toggle Marker mode.
With Marker Mode enabled the transport has the following functions:
- Record: Create Marker at playhead position.
- Rewind: Move to previous Marker.
- Fast Forward: Move to Next Marker.
Function Keys
The Matrix buttons 1-8 act as the function keys for Studio One. These can be customizable using the Mackie Control Device editor in Studio One.
The ProControl Main Unit and Faderpacks can be assigned to which bank they control in the V-Control Pro Setups window:
- Click on the V-Control Pro icon and select Setups..
- In the Setups window select the ProControl Main Unit or Faderpack paired with Studio One.
- With the controller selected, Click on the Bank selection.
- Select either Bank 1-8, Bank 9-16, Bank 17-24, or Bank 25-32 to assign it to the selected controller.
- Back to top
- Back to top