V-Console runs on tablets, phones, and browsers to control software applications such as Pro Tools, Cubase, Logic Pro X and many others.
Features
- Control Fader Level and Stereo Panning per channel
- Control of Mute, Solo, and Track Arming per channel
- Edit Auxiliary Send Volume, including send muting and pre/post status
- Flip mode inverts functions of channel faders and rotary controls
- Select specific automation modes separately for each channel.
- Full Transport controls, jog wheel, and control of common transport related functions (loop, punch, online, etc.)
- Detailed time counter, small and large-sized versions (V-Console)
- Full editing commands panel, with large amount of shortcut controls completely customized for each specific D.A.W. platform.
- Quick access to Mark In and Mark Out points, and Marker creation and recall
- Automation write enable/disable for volume, pan, mute and send
- Multi-device use for up to 32 channels of control simultaneously.
- Assignable functions to hardware MIDI controllers for even more access
- Works seamlessly with Raven MTi/MTx thanks to V-Control Pro’s ability to allow the use of MIDI controllers and mobile devices simultaneously.
- Use a second computer such as a laptop or notebook to control your D.A.W. through a web browser.
Back to top
Quick Start Guide
- Launch V-Control Pro on your main computer with your D.A.W.
- Go to vcontrolpro.com on your device and install V-Console on it.
- Open the V-Console app on your device and connect to your host computer.
Installation And Setup
For information on Installation and Setup for the V-Control Pro App go to the V-Control Pro Users Guide.
Setting Up V-Console on an iOS device.
- Open the Safari app on the iOS device and go to vcontrolpro.com
- Go to V-Console in the Mobile Apps section.
- Touch install and Add V-Console to Homescreen when asked.
- Open V-Console from the homescreen and name the device.
Setting Up V-Console on an Android device.
- Open the browsing app on the Android device and go to vcontrolpro.com
- Go to V-Console in the Mobile Apps section.
- Touch "Install" and add V-Console to the Homescreen.
- Open V-Console from the Homescreen and name the device.
Back to top
Setting Up V-Console on a Web Browser
- Open your web browser on your computer and go to vcontrolpro.com
- Go to V-Console in the Mobile Apps section.
- Go to "Install" and then name the device.
- In the settings section of V-Console for the "Connection", select the host computer that is running V-Control Pro and the D.A.W.
Using the V-Console Web App with No Internet
When using V-Control Pro and the V-Console web app on a network with no internet connection, the computer will not show up in the "Connections" of the V-Console Settings tab. The IP address must be entered manually.
- Open the Settings in V-Console by touching the gear in the lower left hand corner.
- Select "Connection" from the Settings menu.
- Touch "Change" and enter IP Address
- You can easily see what your IP Address is by clicking on the V-Control Pro app icon in the system tray and selecting "About V-Control Pro".
- Touch the IP Address on the "Connection" page of V-Console to connect to the computer.
V-Console should now be connected with V-Control Pro on the host computer.
Back to top
Using the Wired Connection with V-Console
The native iPad version of V-Console has the capability of a hardwired connection to the computer with a USB cable.
Here is how to connect V-Console with a wired connection.
- Launch V-Control Pro
- Launch V-Console on the iPad
- Connect the iPad directly to the computer with a USB cable
V-Console will now be connected automatically in Wired Connection mode.
NOTE: For Wired Connection on Windows PC, iTunes must be installed for iPad detection.
Back to top
General Troubleshooting
- Verify the device running V-Console is on the same network as the host computer running V-Control Pro.
- Verify that you have the host computer selected running V-Control Pro in the Connection section of the V-Console settings.
- Verify the host computer running V-Control Pro has a Computer name setup such as "John's Mac" in System Preferences / Sharing
- Verify that V-Control Pro sees the device running V-Console in the list of available devices.
Back to top
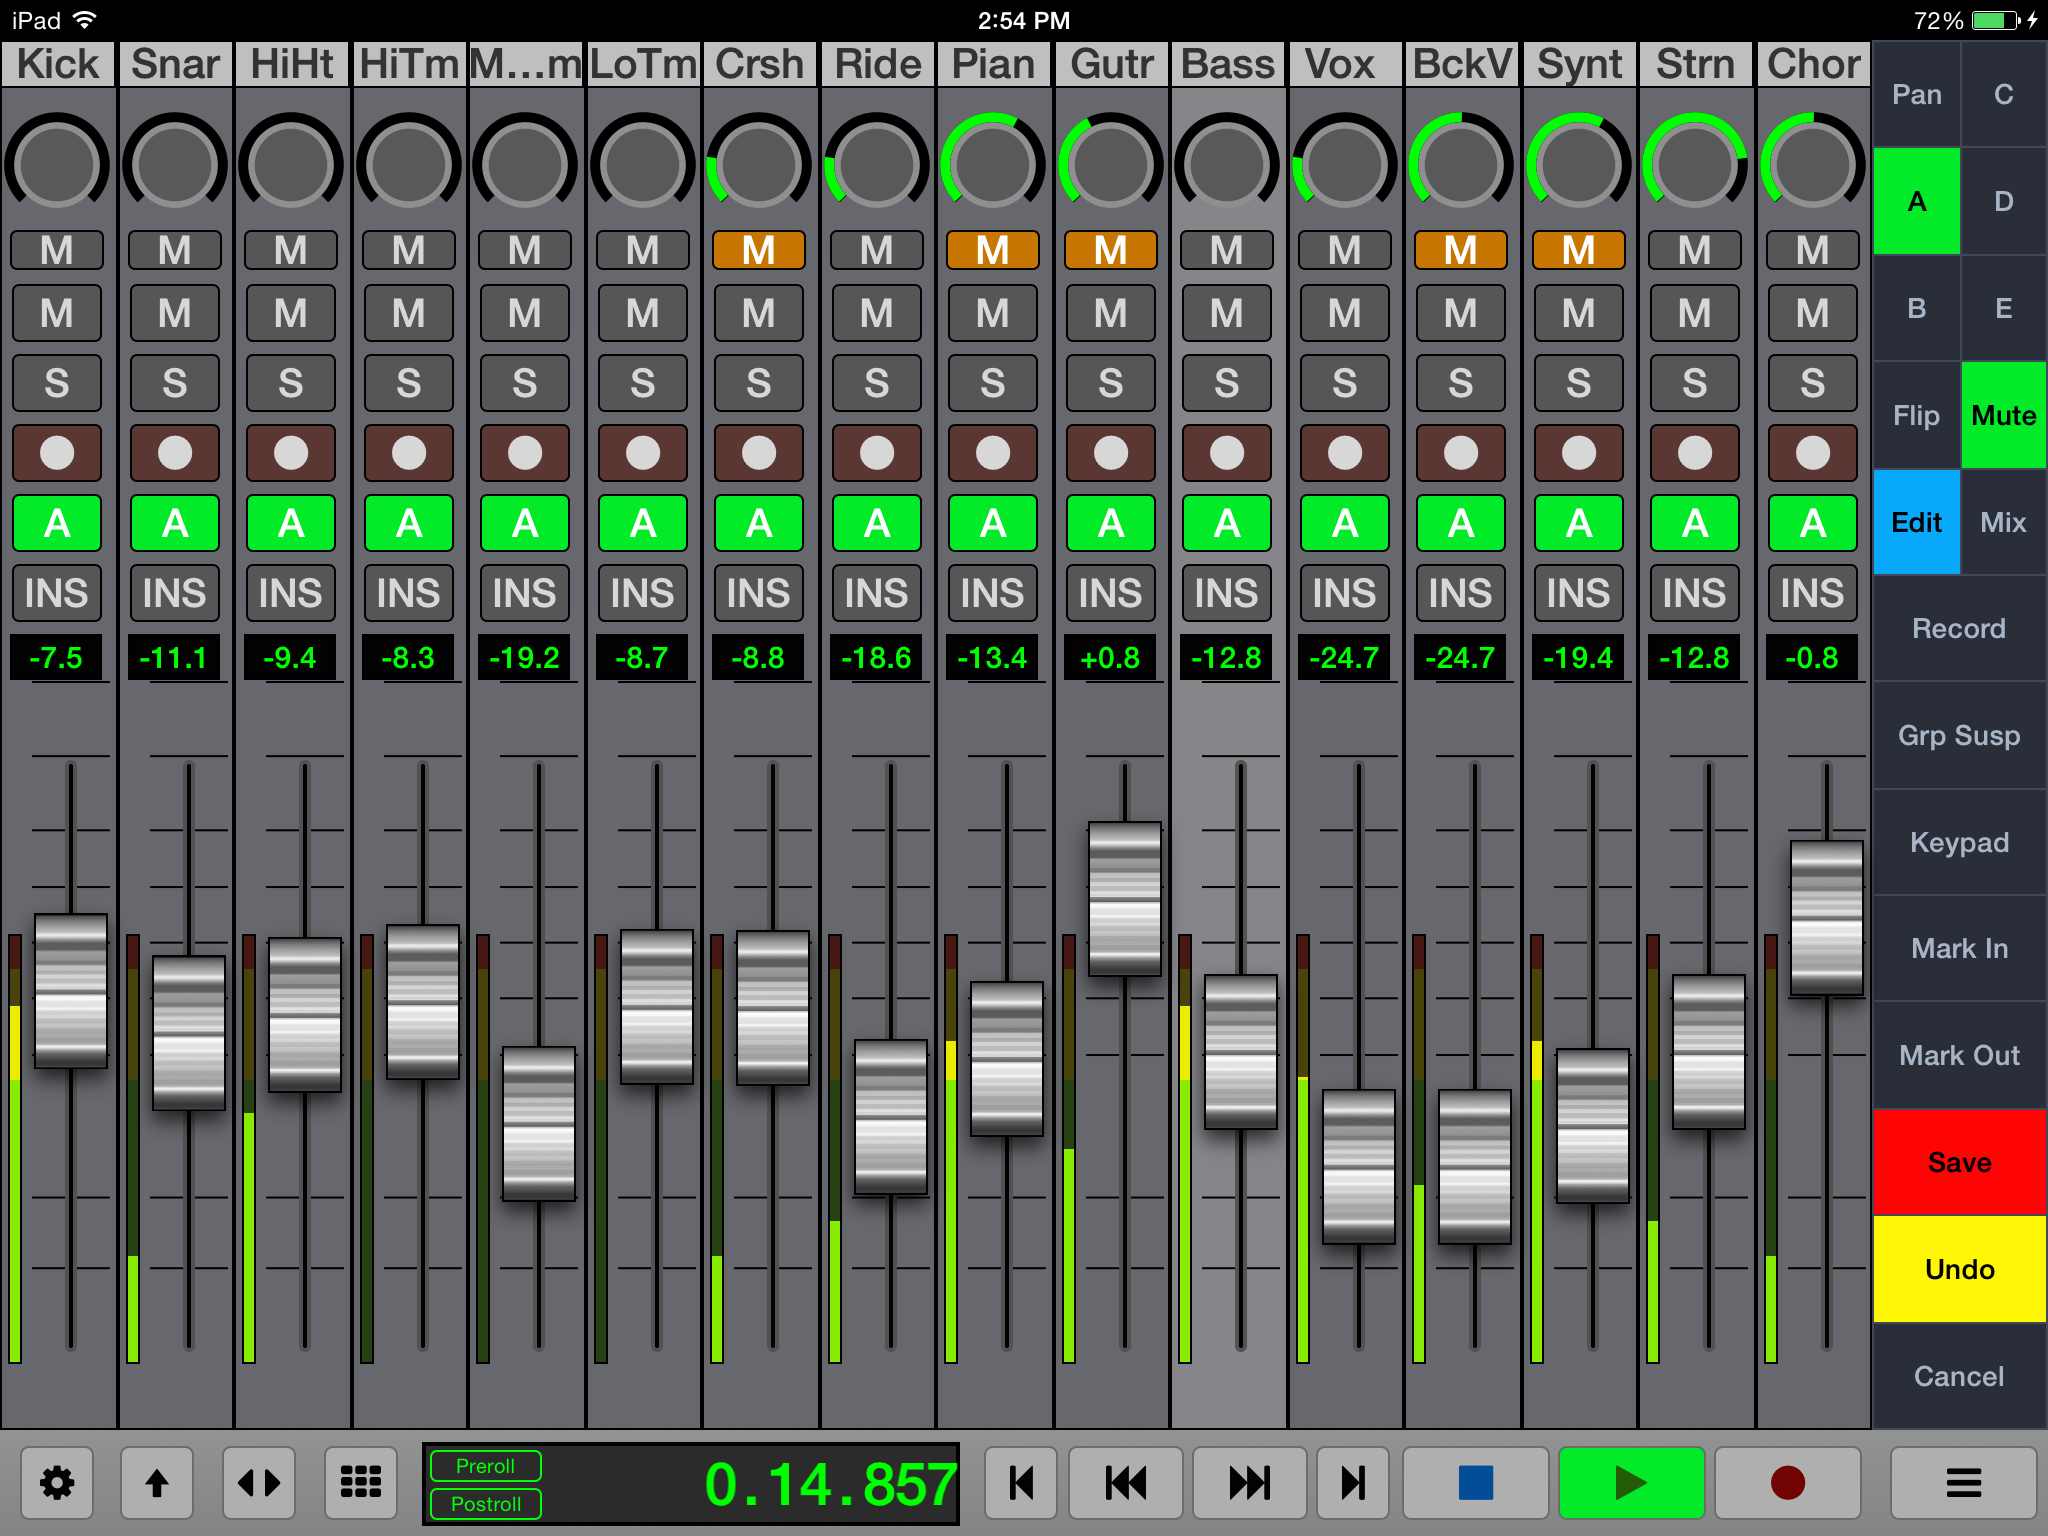
V-Console 16
With certain DAWs such as Pro Tools, Logic, and Cubase it is possible to control 16 tracks on a single screen with V-Console. This way you get double the amount of channel strips than you do in the regular mode.
Here is how to set up V-Console for 16 Tracks
- Launch V-Console
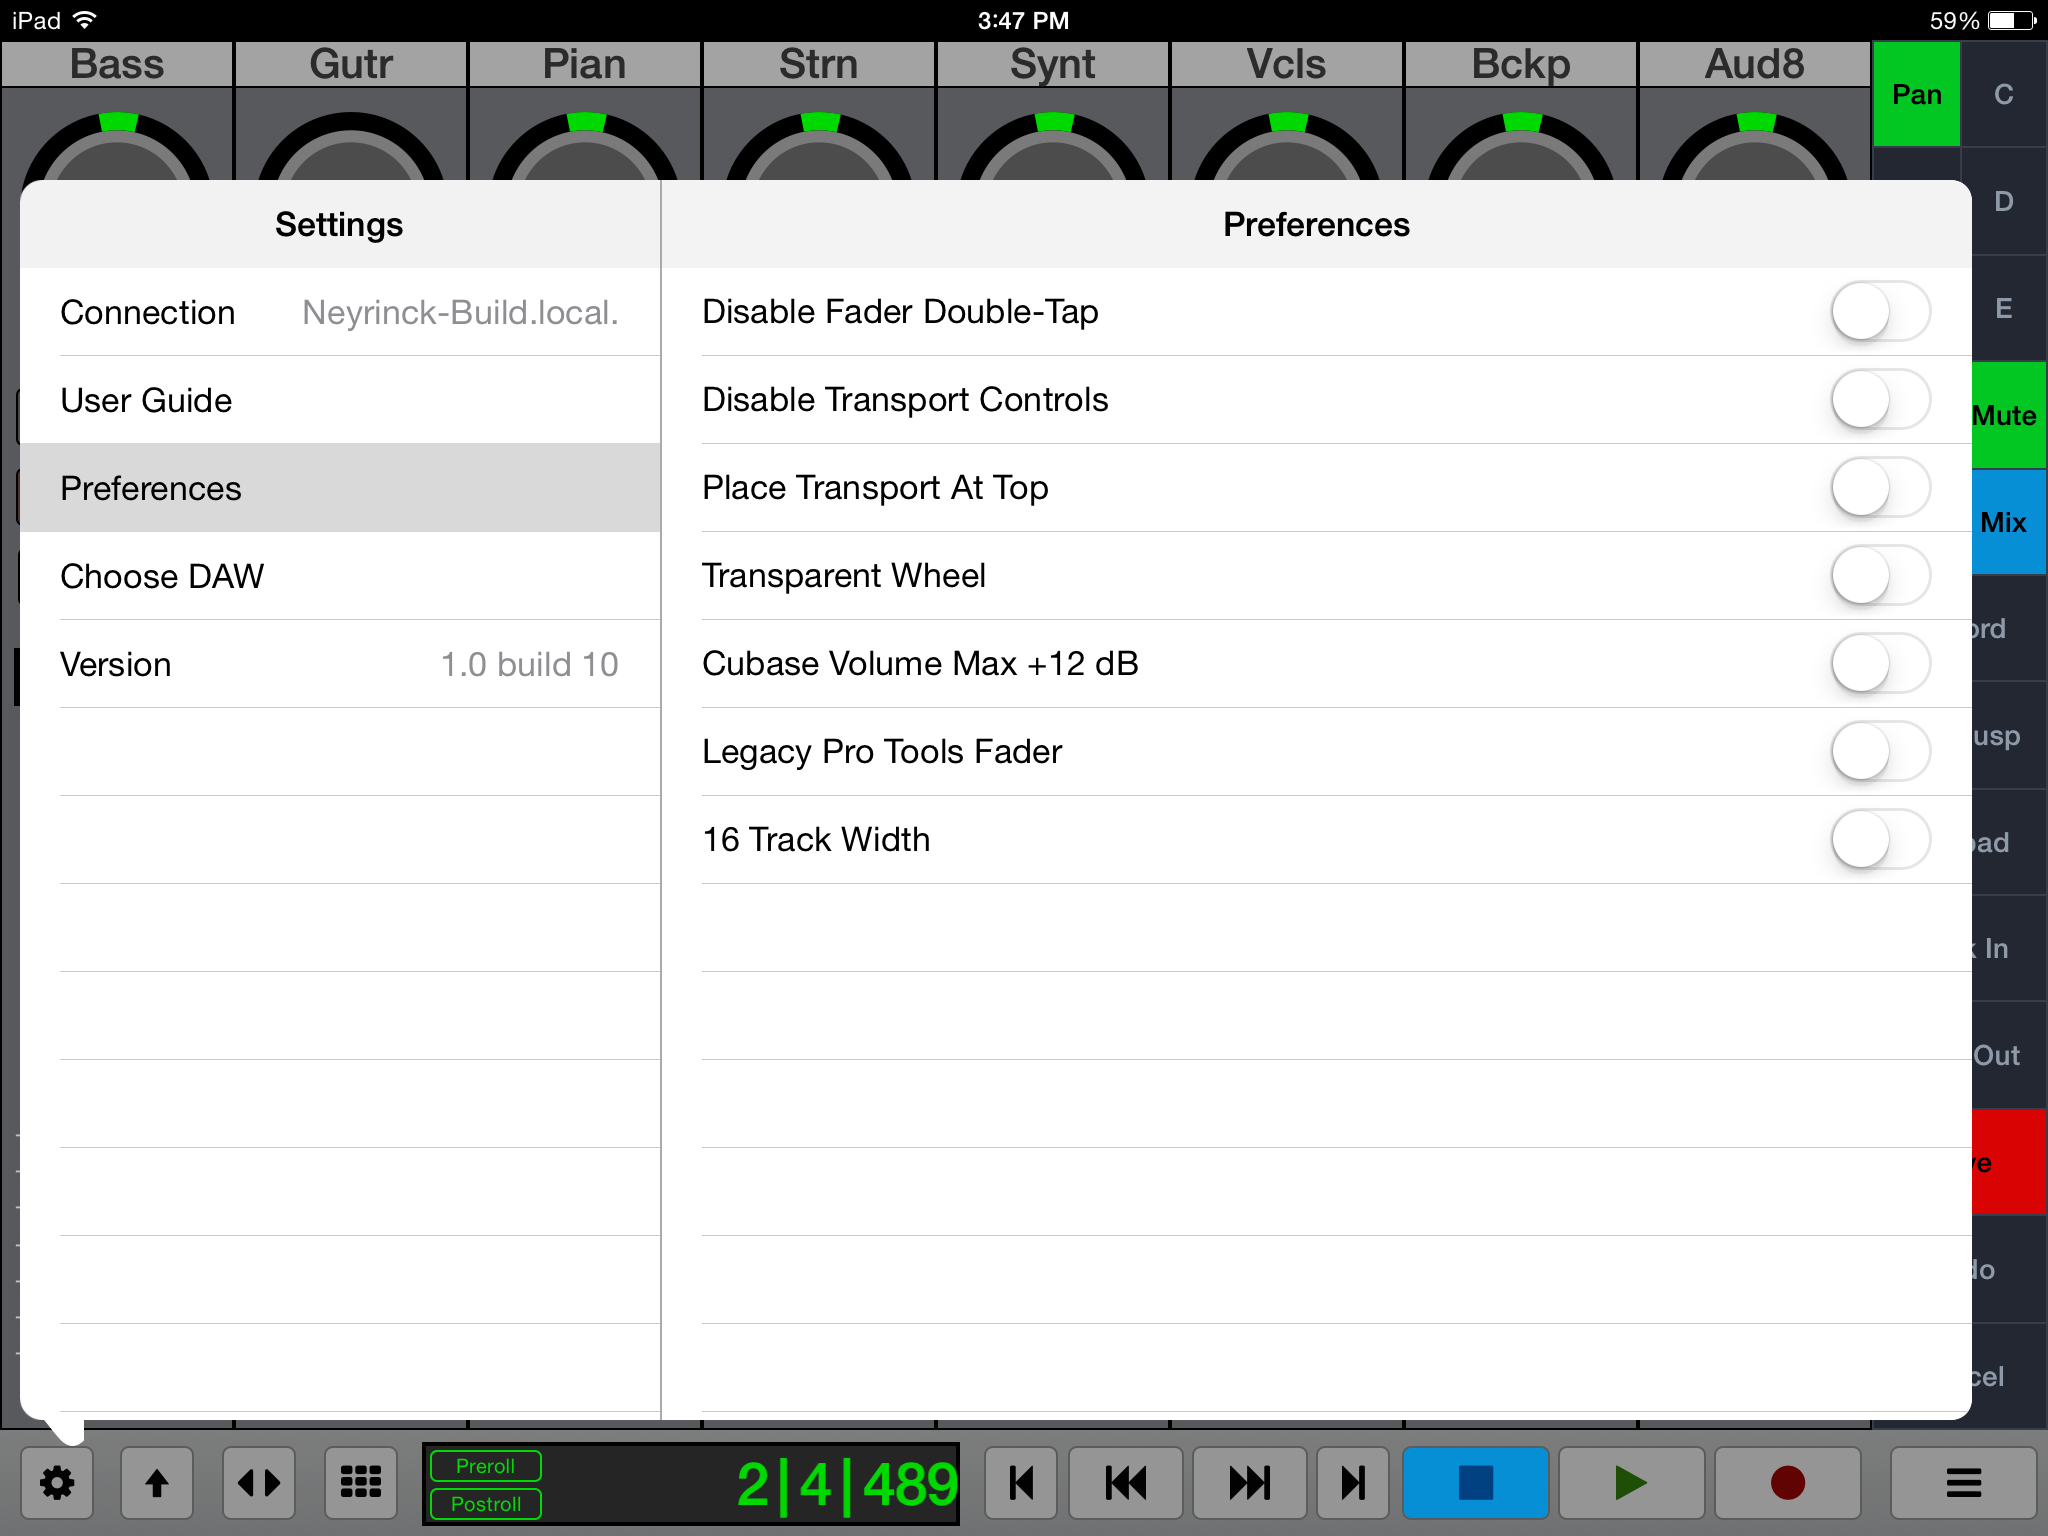
- Open the V-Console Settings Window
- Go to Preferences and turn on the "16 Track Width"
V-Console should now open with a 16 track layout instead of the standard 8.
NOTE: Adobe Audition and Premiere do not have 16 track view mode while in short fader mode.
Back to top
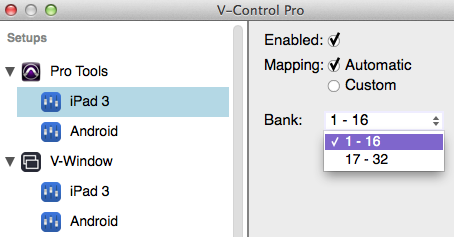
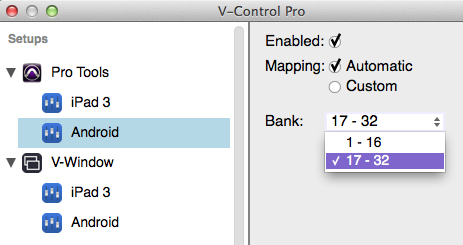
Setting Up Banks for Multiple Devices
When using multiple devices, each device can be assigned to different banks.
Extended banks currently not available for Steinberg applications.
For V-Console in 8-track mode, the controller can be assigned to the following banks:
For V-Console in 16-track mode, the controller can be assigned to the following banks:
Here is how to assign different banks to a controller:
The controller will now control the selected bank. Please ensure you have properly setup your DAW for use with multiple controllers. You can see the setups for V-Control Pro and DAWs HERE.
NOTE: When using multiple controllers, banking or moving channels left and right will affect all controllers. For example, if you have two controllers setup with one controlling banks 1-16, and the other controller 17-32, banking to the left or right on one controller will bank both simultaneously.
Back to top
V-Console iPhone
V-Console on the iPhone features a one track display with command buttons and transport control. Swipe left and right on the channel to navigate between tracks. Open the channel navigation pop-up to jump to a specific track by tapping on the track name.
V-Window
V-Window has the ability to natively display and control D.A.W. plug-in windows, as well as other computer application windows, directly within V-Console.
Using this function, users are free to adjust an effect or instrument plug-ins directly from within V-Control, using a finger to drag and/or tap the assorted controls.
This process offers powerful new capabilities for adjusting a mix and tweaking effects, since it allows for plug-ins to be adjusted comfortably with one’s fingers, all while retaining the native plug-in interface carefully designed by the plug-in’s software authors.
Using V-Window
To use V-Window follow these steps.
- Open the MultiPanel window, then select “V-Window” in the list of choices on the left side of the window.
- Press the “select” button in the upper right hand corner off Window, to choose among all available computer windows to display and control.
- The choices are organized first by computer application, and then from within the various windows within each application.
- Select the specific window you wish to control, which in many cases would be the floating window of an effect or instrument plug-in.
- The V-window interface will display a copy of the specifically selected computer window.
- Touch the controls in the window, which will have the same effect as adjusting those controls with a mouse.
V-Window Operational Notes
- In some cases, V-Window will see a new plug-in window automatically. However, it will occasionally go dark. If this occurs, simply tap the select button and re-select the specific window you wish to control.
- V-Window is designed to be as responsive as possible to a mouse drag operation. This means that it does not respond to iPad-specific gestures such as pinch, drag, and double tap.
- To adjust the area of the virtual window that can be seen and controlled, touch the “Adjust” button, which allows you to:
- Drag the window in V-Control to see the desired content.
- Pinch to enlarge or reduce the size of the window display.
- When this action has been completed, touch the “Done” button.
- Note that, when using V-Window, not only is the selected window displayed, but also all windows "above" it, allowing windows such as popup messages to be seen can be seen. This means that sometimes you may select a window, but will actually see a different window above.
- If this occurs, simply tap on a section of the desired window to bring it forward in the V-Window.
- V-Window can be viewed in full screen mode, letting you work with as much screen real estate as possible. This is done by tapping the diagonal arrows in the menu bar of V-Window.
NOTE: For optimal performance, V-Window should be used on only one device at a time.
NOTE: In the web app version of V-Console, the zoom function is not available.
Back to top
DAW Modes
For setting up the D.A.W. to communicate with V-Control Pro go to the V-Control Pro Users Guide.
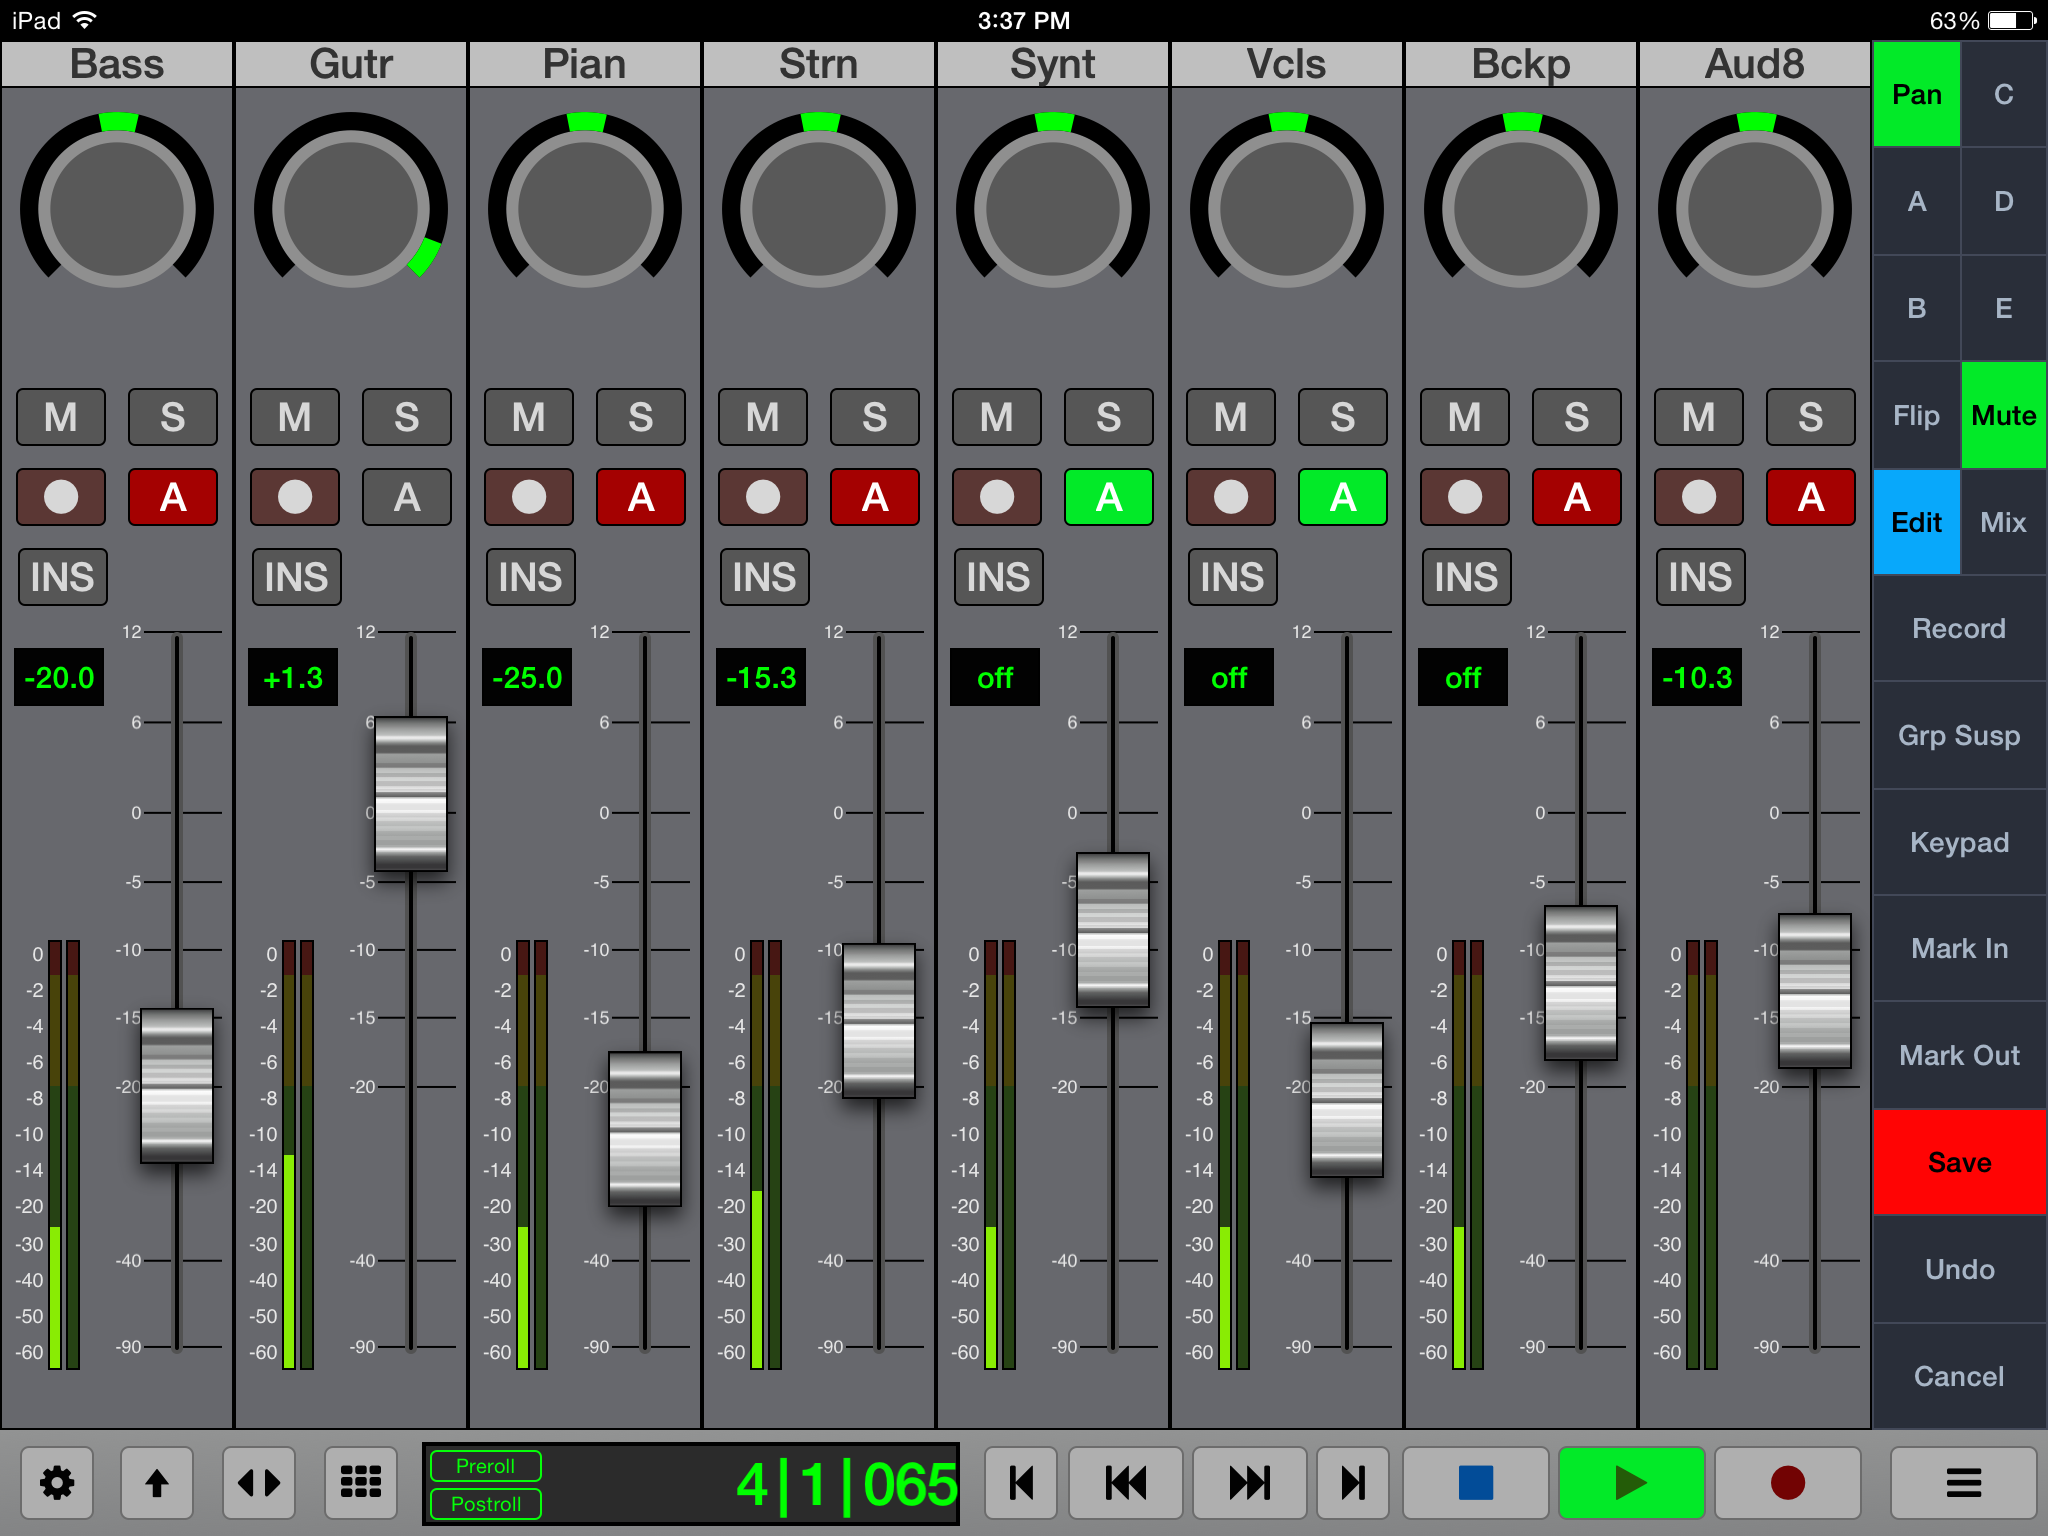
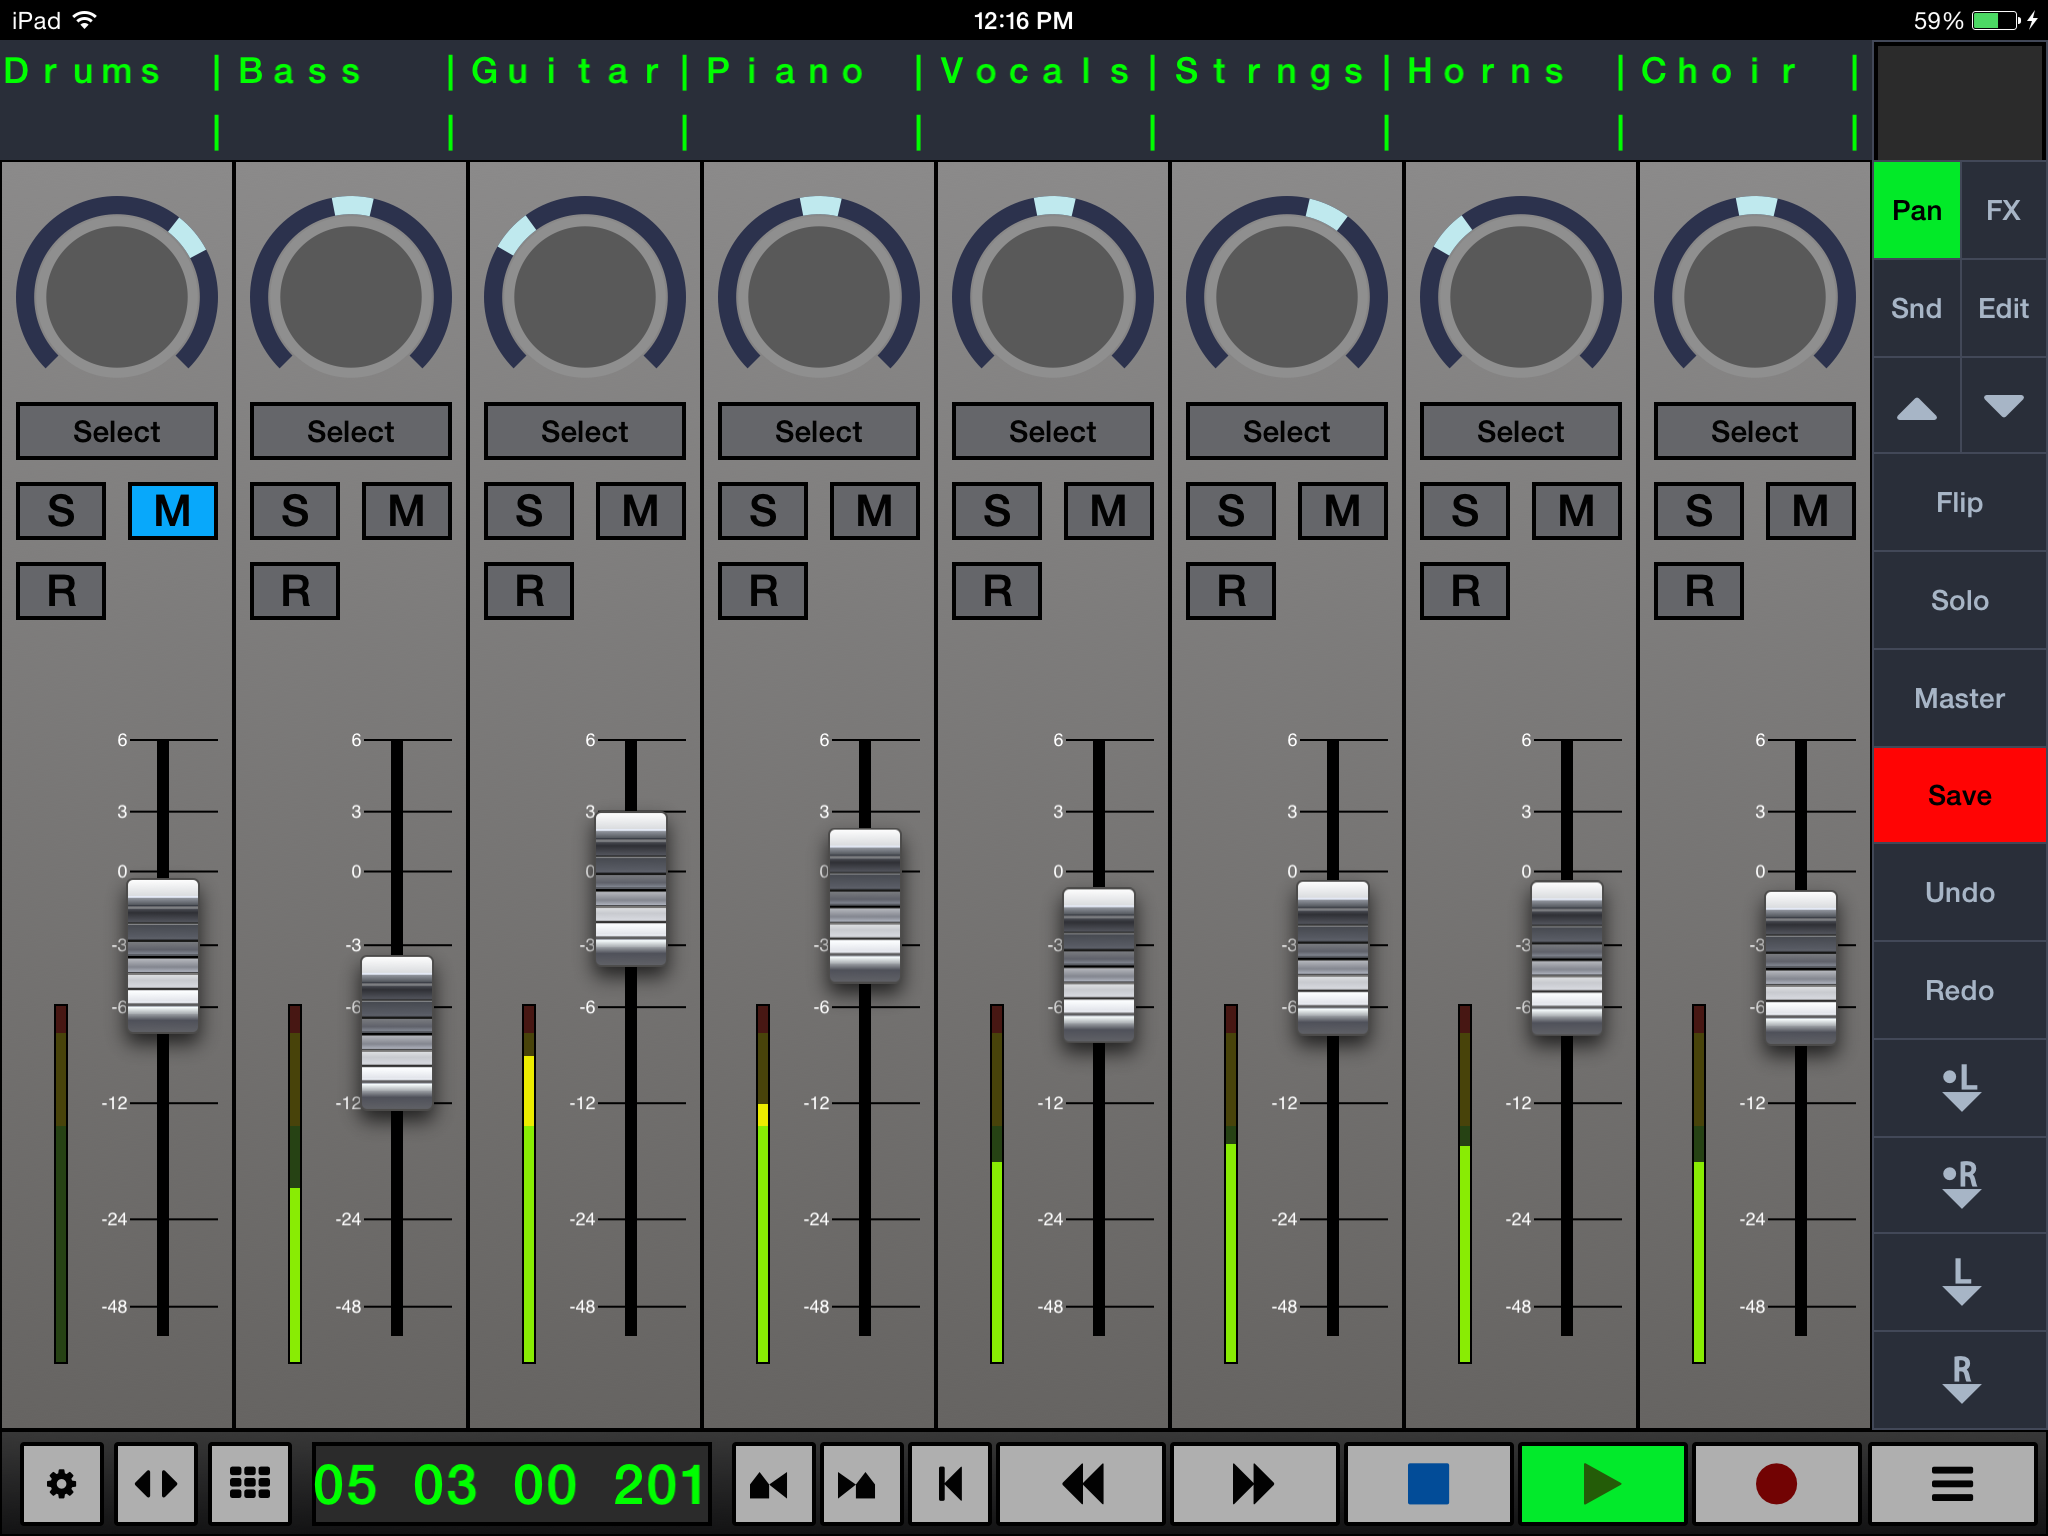
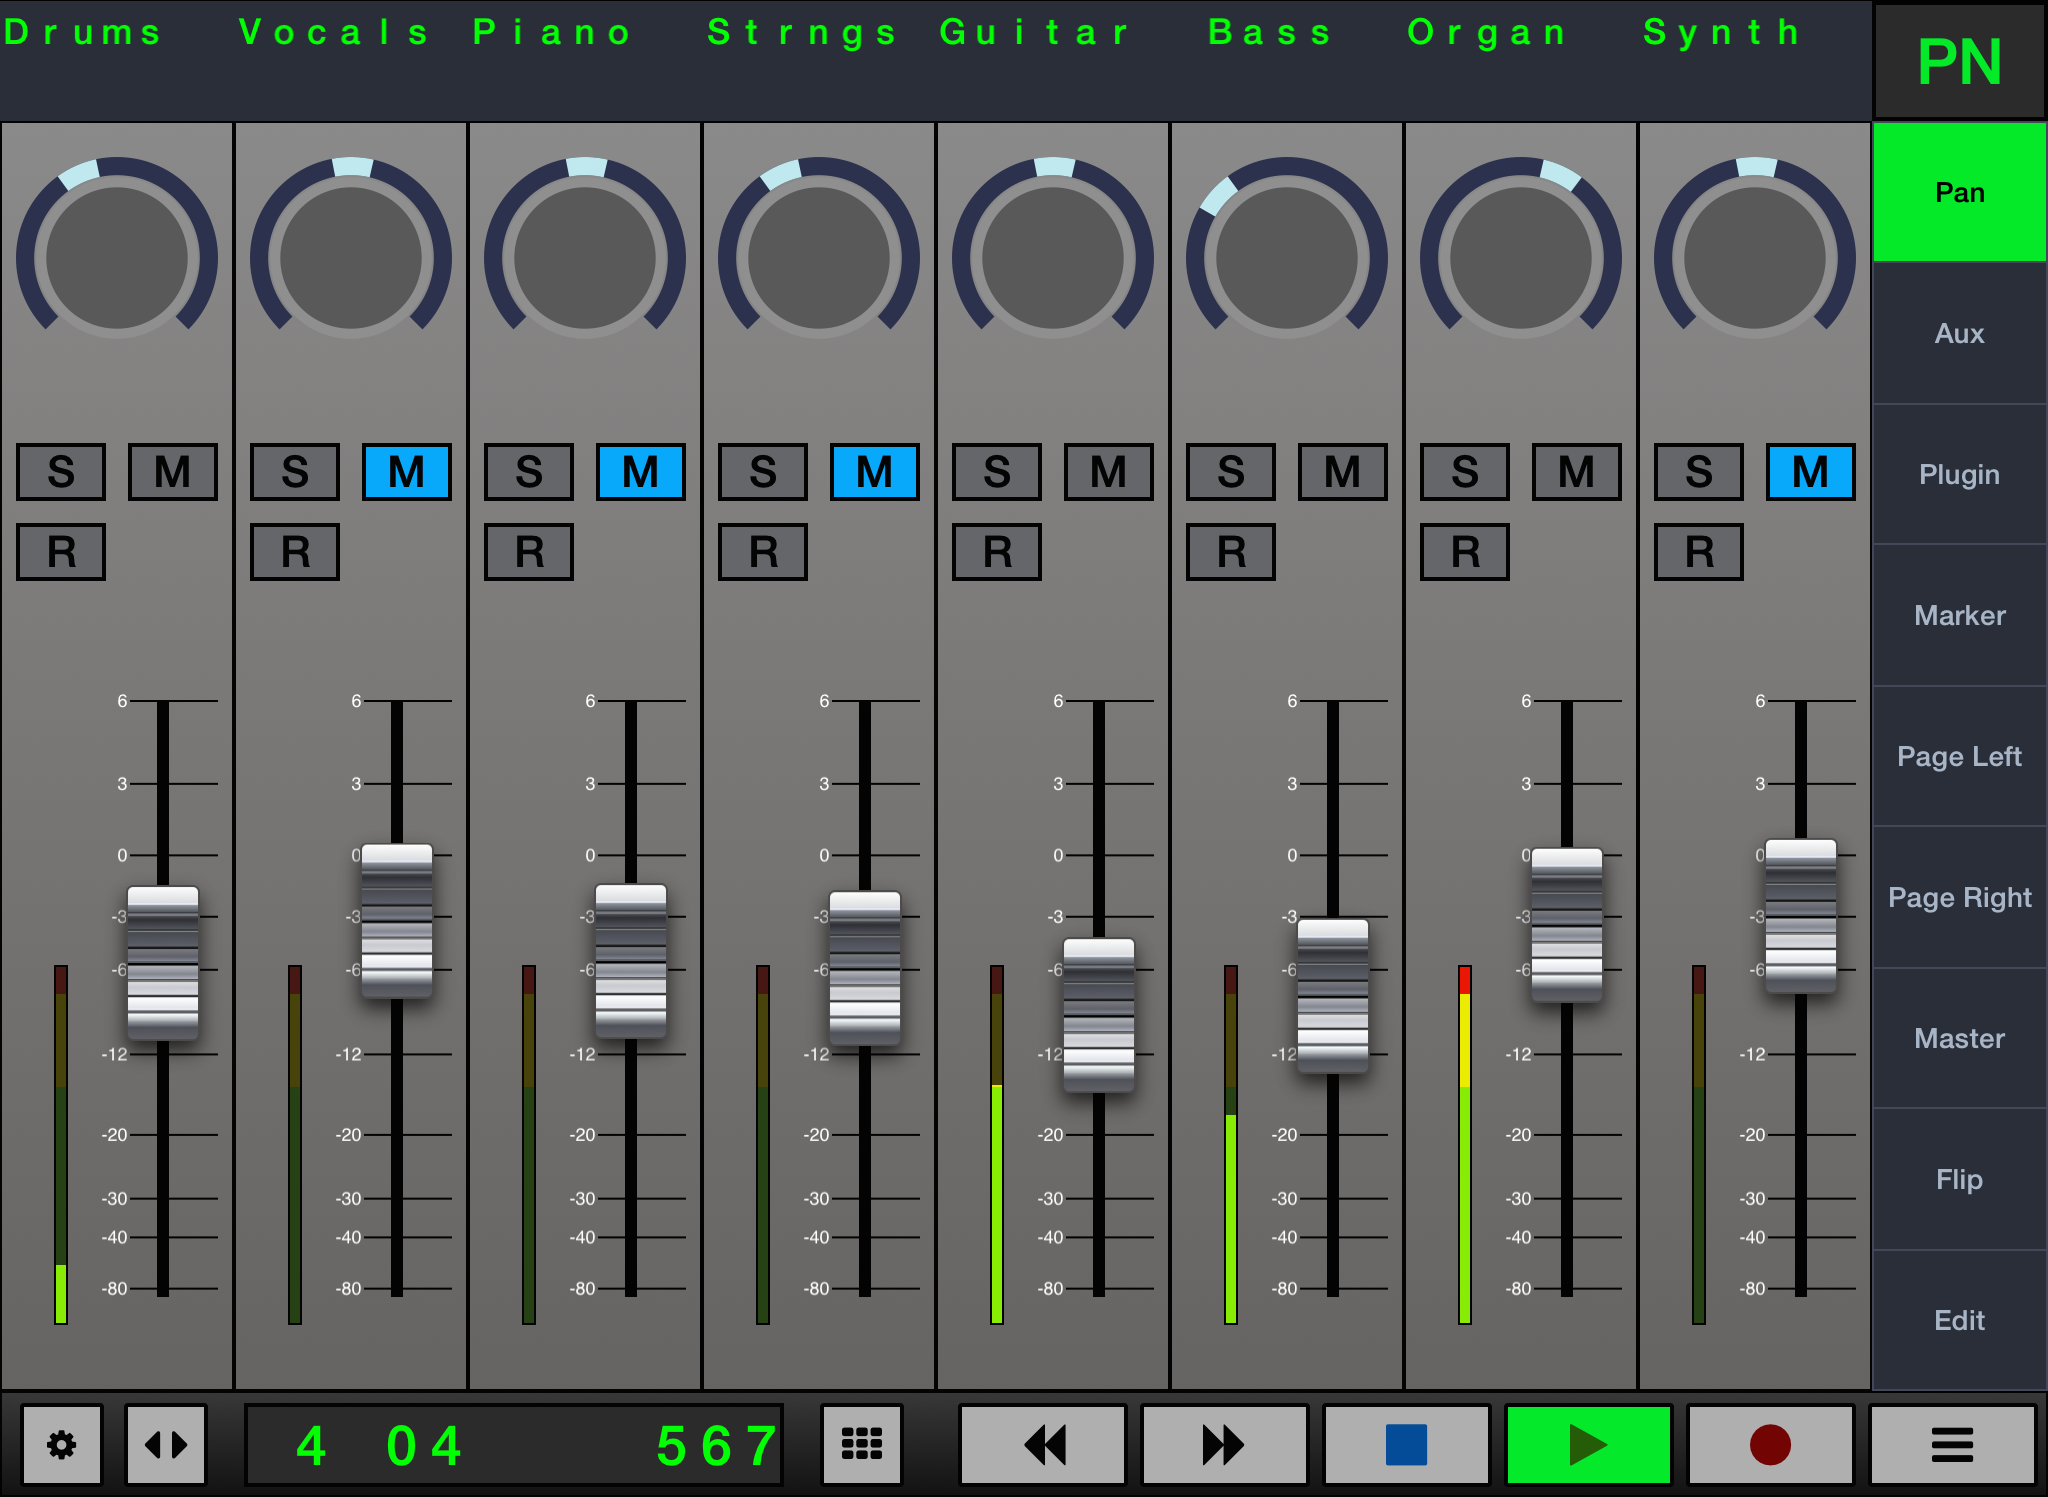
Pro Tools
Pro Tools Channel Strip
Here is a listing of the controls and functions of the channel strip going from top to bottom.
- Channel Name: V-Console will automatically display the name of your Pro Tools track at the top of the channel, it will automatically abbreviate the track name down to 4 characters if more than 4.
- Channel Select: Touching the top of the channel will select that channel. Use the modifier buttons to manage selection and operations on multiple channels.
- Rotary: Touch the rotary and drag clockwise to increase the value and counter-clockwise to decrease. The rotary is used mainly for Pan position and Aux Send levels.
- Pre/Post: When controlling sends A-E, a button (Pre) will appear under the rotary. Tapping it will toggle between Pre and Post mode for Aux Sends.
- Mute Send:When controlling sends A-E, and enabling the "Mute" button on the command bar, a button (m) will appear under the rotary. Tapping it will mute the Aux send for the channel. Tap again to unmute.
- Mute(M): Touch the mute button to mute the selected channel. Touch it again to unmute the channel.
- Solo(S):: Touch the solo button to solo the selected channel. This will mute all other channels. Touch the solo button again to unsolo the channel.
- Record: Touch the record button to record-arm the channel. Press it again to record-safe the channel.
- Automation(A): Touch the Automation button to open the automation popup window for the selected channel.
- Insert(INS): Touch the Insert button to select a the plug-in on the selected track. Press the Insert button again to cycle through plug-ins when more than one are inserted on the same track.
- Fader: Touch the fader and drag it up or down to adjust the signal level of the channel. With multi-touch devices, multiple faders can be adjusted at once just like on a real hardware control surface.
- Level Meter: Each channel strip contains a multi-segment meter display that displays the signal level of the channel’s audio.
Pro Tools Side Bar
Here is a listing of the controls and functions of the Side Bar going from top to bottom.
- Pan: Touch to enable the rotaries to control pan position. Touch again to alternate between channels in a Stereo (2-channel) track.
- A-E: Touch to enable the rotaries to control the respective Send Levels for Aux Send A-Aux Send E.
- Flip: Touch to enable 'Flip' mode to adjust Aux Send levels with the Fader. This will also enable the rotary to adjust the pan position of the Sends.
- Mute: Touch to enable the mute function for Aux Sends. Touch on any of the rotaries in the mixer window to mute the corresponding Aux Send for that Channel.
- Edit: Touch to bring the Edit Window into view.
- Mix: Touch to bring the Mix Window into view.
- Record: Touch to Record Enable all tracks available. Touch again to Record Safe all tracks.
- Grp Susp: Touch to enable Group Suspend. Touch again to disable Group Suspend.
- Keypad: Touch to open the Keypad Popup Window.
- Mark In: Touch to Mark In a position on the timeline.
- Mark Out: Touch to Mark Out a position on the timeline.
- Save: Touch to Save the session at its current state.
- Undo: Touch to Undo the last action in Pro Tools. Use the Modifier keys Shift+Command with Undo to use the Redo function.
- Cancel: Touch to Cancel or close a dialog window. Similar to pressing the escape key on the keyboard.
Pro Tools Transport Bar
Here is a listing of the controls and functions of the transport bar going from left ot right.
- Settings: Touch here to open the Settings pop up window to change daw modes and preferences.
- Modifier Window: Touch here to open the Modifier Keys Pop-Up window.
- Bank Window: Touch here to open the Banking Pop-Up window.
- Marker Window: Touch here to open the Marker Pop-Up window.
- PreRoll: Touch here to toggle PreRoll On/Off.
- PostRoll: Touch here to toggle PostRoll On/Off.
- Counter: This is the Counter and will display time in the specified unit chosen.
- RTZ: Touch here to have the playhead go to the beginning of the session.
- Rewind: Touch here to have the playhead move backwards from it current position.
- Fast Forward: Touch here to have the playhead move forward from its current position.
- GTE: Touch here to make the play go to the end of the current session.
- Stop: Touch here to stop the playhead.
- Play: Touch here to start the playhead.
- Record: Touch here to record arm the session.
- Utilities Pop-up Window: Touch here to open the utilities Pop-up Window for quick access to the V-Window/Edit Window/Surround Panner.
Pro Tools Automation Window
The automation pop-up window can be accessed by touching the (A) icon in the channel strips.
Automation Modes
- Off: Touch here to set the automation mode to Off on the selected track.
- Read: Touch here to set the automation mode to Read on the selected track.
- Touch: Touch here to set the automation mode to Touch on the selected track.
- Latch: Touch here to set the automation mode to Latch on the selected track.
- Write: Touch here to set the automation mode to Write on the selected track.
- Trim: Touch here to set the automation mode to Trim on the selected track.
Write Enable
- Plug-in: Touch here toggle the write enable for Plug-in Parameter Automation On/Off
- Volume (Vol): Touch here to toggle the write enable for Volume Automation On/Off.
- Send Volume (S Vol): Touch here to toggle the write enable for Aux Send volume Automation On/Off.
- Pan: Touch here to toggle the write enable for Panning Automation On/Off.
- Mute: Touch here to toggle the write enable for Mute Automation On/Off.
- Send Mute (S Mute): Touch here to toggle the write enable for Send Mute Automation On/Off.
Pro Tools Plug-in Pop Up Window
The channel's plug-in pop-up window can be opened by touching the "INS" button.
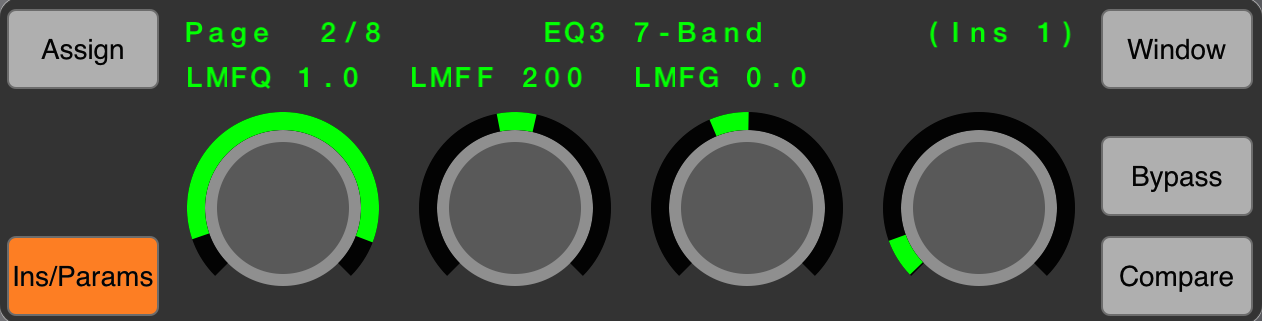
Plug-in parameters can only be edited on the first 8 tracks. This is a limitation of the HUI protocol that V-Control Pro 2 uses to interact with Pro Tools.
- Assign: Touch here to assign a plug-in to an available slot. Select the slot by tapping on the knob in the plug-in popup.
- Ins/Params: Touch here to edit parameters the selected plug-in. Two-finger swipe about plug-in knobs to access more pages for plug-in parameters.
- Compare: Touch here to compare the original settings of the plug-in to the new setting.
- Window: Touch here to open the plug-in window on the main computer screen.
Pro Tools Keypad Window
The Keypad can be accessed from the side bar. It behaves exactly like the keypad does on the keyboard.
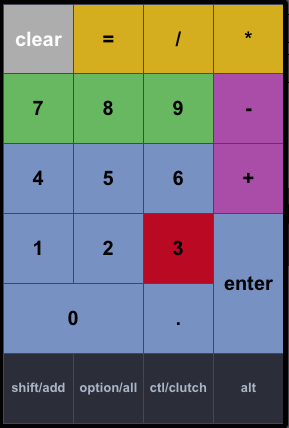
- Clear: Touch here to clear any previously entered values from the Counter.
- =(Capture Time Code): Touch here to capture the value of any time code currently entering the session, and enter it into the session’s time code window.
- /(Enter Start/End Length): Touch here in conjunction with the number keys to assign a start and end time to the session.
- *(Enter Main Counter): Touch here in conjunction with the number keys, to enter a time code value into the main session counter window.
- -(Nudge Back): Touch here to nudge a selected audio clip backwards in time, by the designated nudge value.
- +(Nudge Forward): Touch here to nudge a selected audio clip forwards in time by the designated nudge value.
- Enter(Create Memory Location): Touch here to create a new memory location at the current location of the play head.
- 1(Rewind): Touch here to move the playhead backward in the timeline.
- 2(Fast Forward): Touch here to move the playhead forward in the timeline.
- 3(Record): Touch here to record in the current session.
- 4(Loop Playback): Touch here to toggle Loop Playback On/Off.
- 5(Loop Record): Touch here to toggle Loop Record On/Off.
- 6(Quick Punch): Touch here to toggle “Quick Punch” function on/off.
- 7(Metronome): Touch here to toggle the metronome On/Off.
- 8(Count Off): Touch here to toggle On/Off the PreCount when recording.
- 9(Merge/Replace): Touch here to toggle between MIDI Merge and MIDI Replace.
Pro Tools Edit Window
Here is a listing of the controls and functions of the Edit Window for each section.
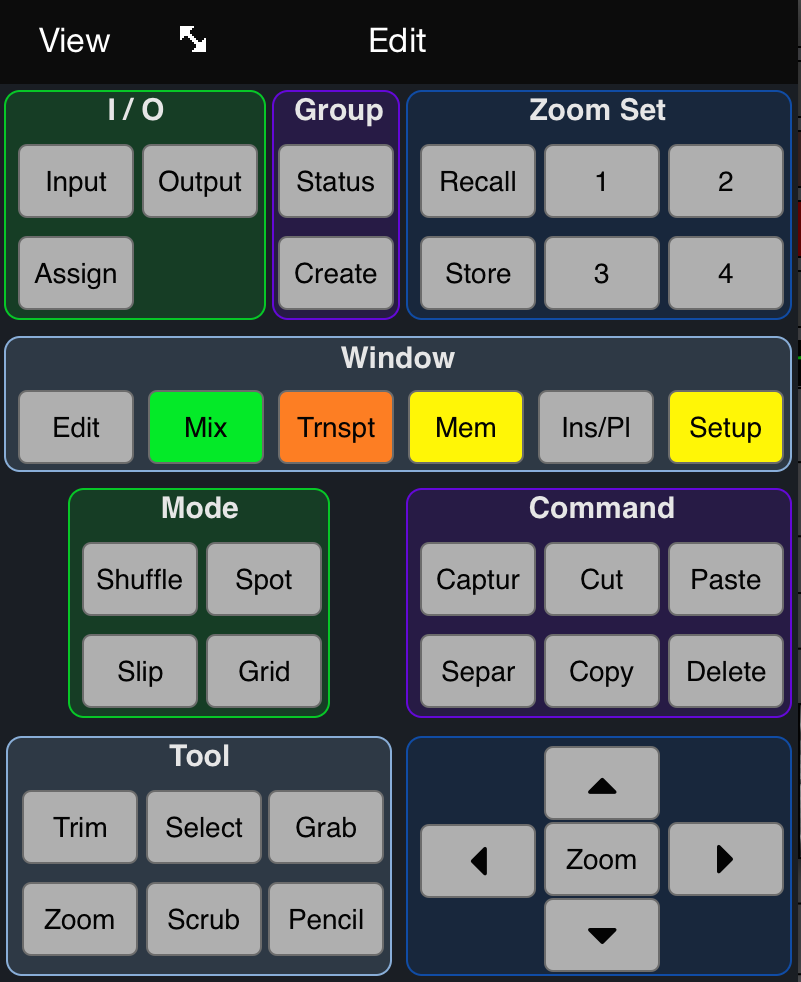
- I/O
- Input: Touch to view the currently assigned Input on each channel.
- Output: Touch to view the currently assigned Output on each channel.
- Assign: Touch this button to use each channel’s rotary control to assign an input or output to the appropriate channel.
- Group
- Status: Touch to view the status of each channel's group.
- Create: Touch to create a new group.
- Zoom Set
- Recall: Touch here to recall a zoom preset. Use in conjunction with 1-4 to recall that specific preset.
- Store: Touch here to store the current zoom settings into a zoom preset. Use in conjunction with 1-4 to recall that specific preset.
- 1-4: Use with the store and recall buttons to store/recall zoom settings.
- Window
- Edit: Touch to open the Edit Window.
- Mix: Touch to open the Mix Window.
- Trnspt: Touch to open the Transport Window.
- Mem: Touch to open the Memory Locations Window.
- Ins/PI: Touch to open the Instrument/Plug-in Window.
- Setup: Touch to open the Setup Window.
- Mode
- Shuffle: Touch here to change the Editing Grid to Shuffle Mode.
- Spot: Touch here to change the Editing Grid to Spot Mode.
- Slip: Touch here to change the Editing Grid to Slip Mode.
- Grid: Touch here to change the Editing Grid to Grid Mode.
- Command
- Captur: Touch here to Capture a Clip Selection.
- Cut: Touch here to Cut a clip selection.
- Paste: Touch here to Paste a clip selection at the playhead location.
- Separ: Touch here to Separate a Clip Selection at the playhead location.
- Copy: Touch here to Copy a Clip Selection.
- Delete: Touch here to Delete a Clip Selection.
- Tool
- Trim: Touch here to change to the Trim Tool.
- Select: Touch here to change to the Select Tool.
- Grab: Touch here to change to the Grab Tool.
- Pencil: Touch here to change to the Pencil Tool.
Pro Tools Modifier Keys
Touch the Modifier pop-up on the transport to select activate modifier keys with other control surface commands. Here is a list of possible commands:
- Shift + Play(Transport): Initiates Half speed playback.
- Shift + Stop(Transport): Aborts the current record pass.
- Shift + Channel Select(Channel Strip): When multiple channels are selected, touch the top of the channel strip to deselect that channel.
- Shift + Command + Undo(Command Bar): Use this combination to Redo.
- Option + Solo(Channel Strip): Displays levels of each component of a multi-channel output control.
- Control + Record(Transport): Cycles through Record Modes.
- Control + Loop: Enables/Disables Loop Record.
Back to top
Pro Tools Surround Panner
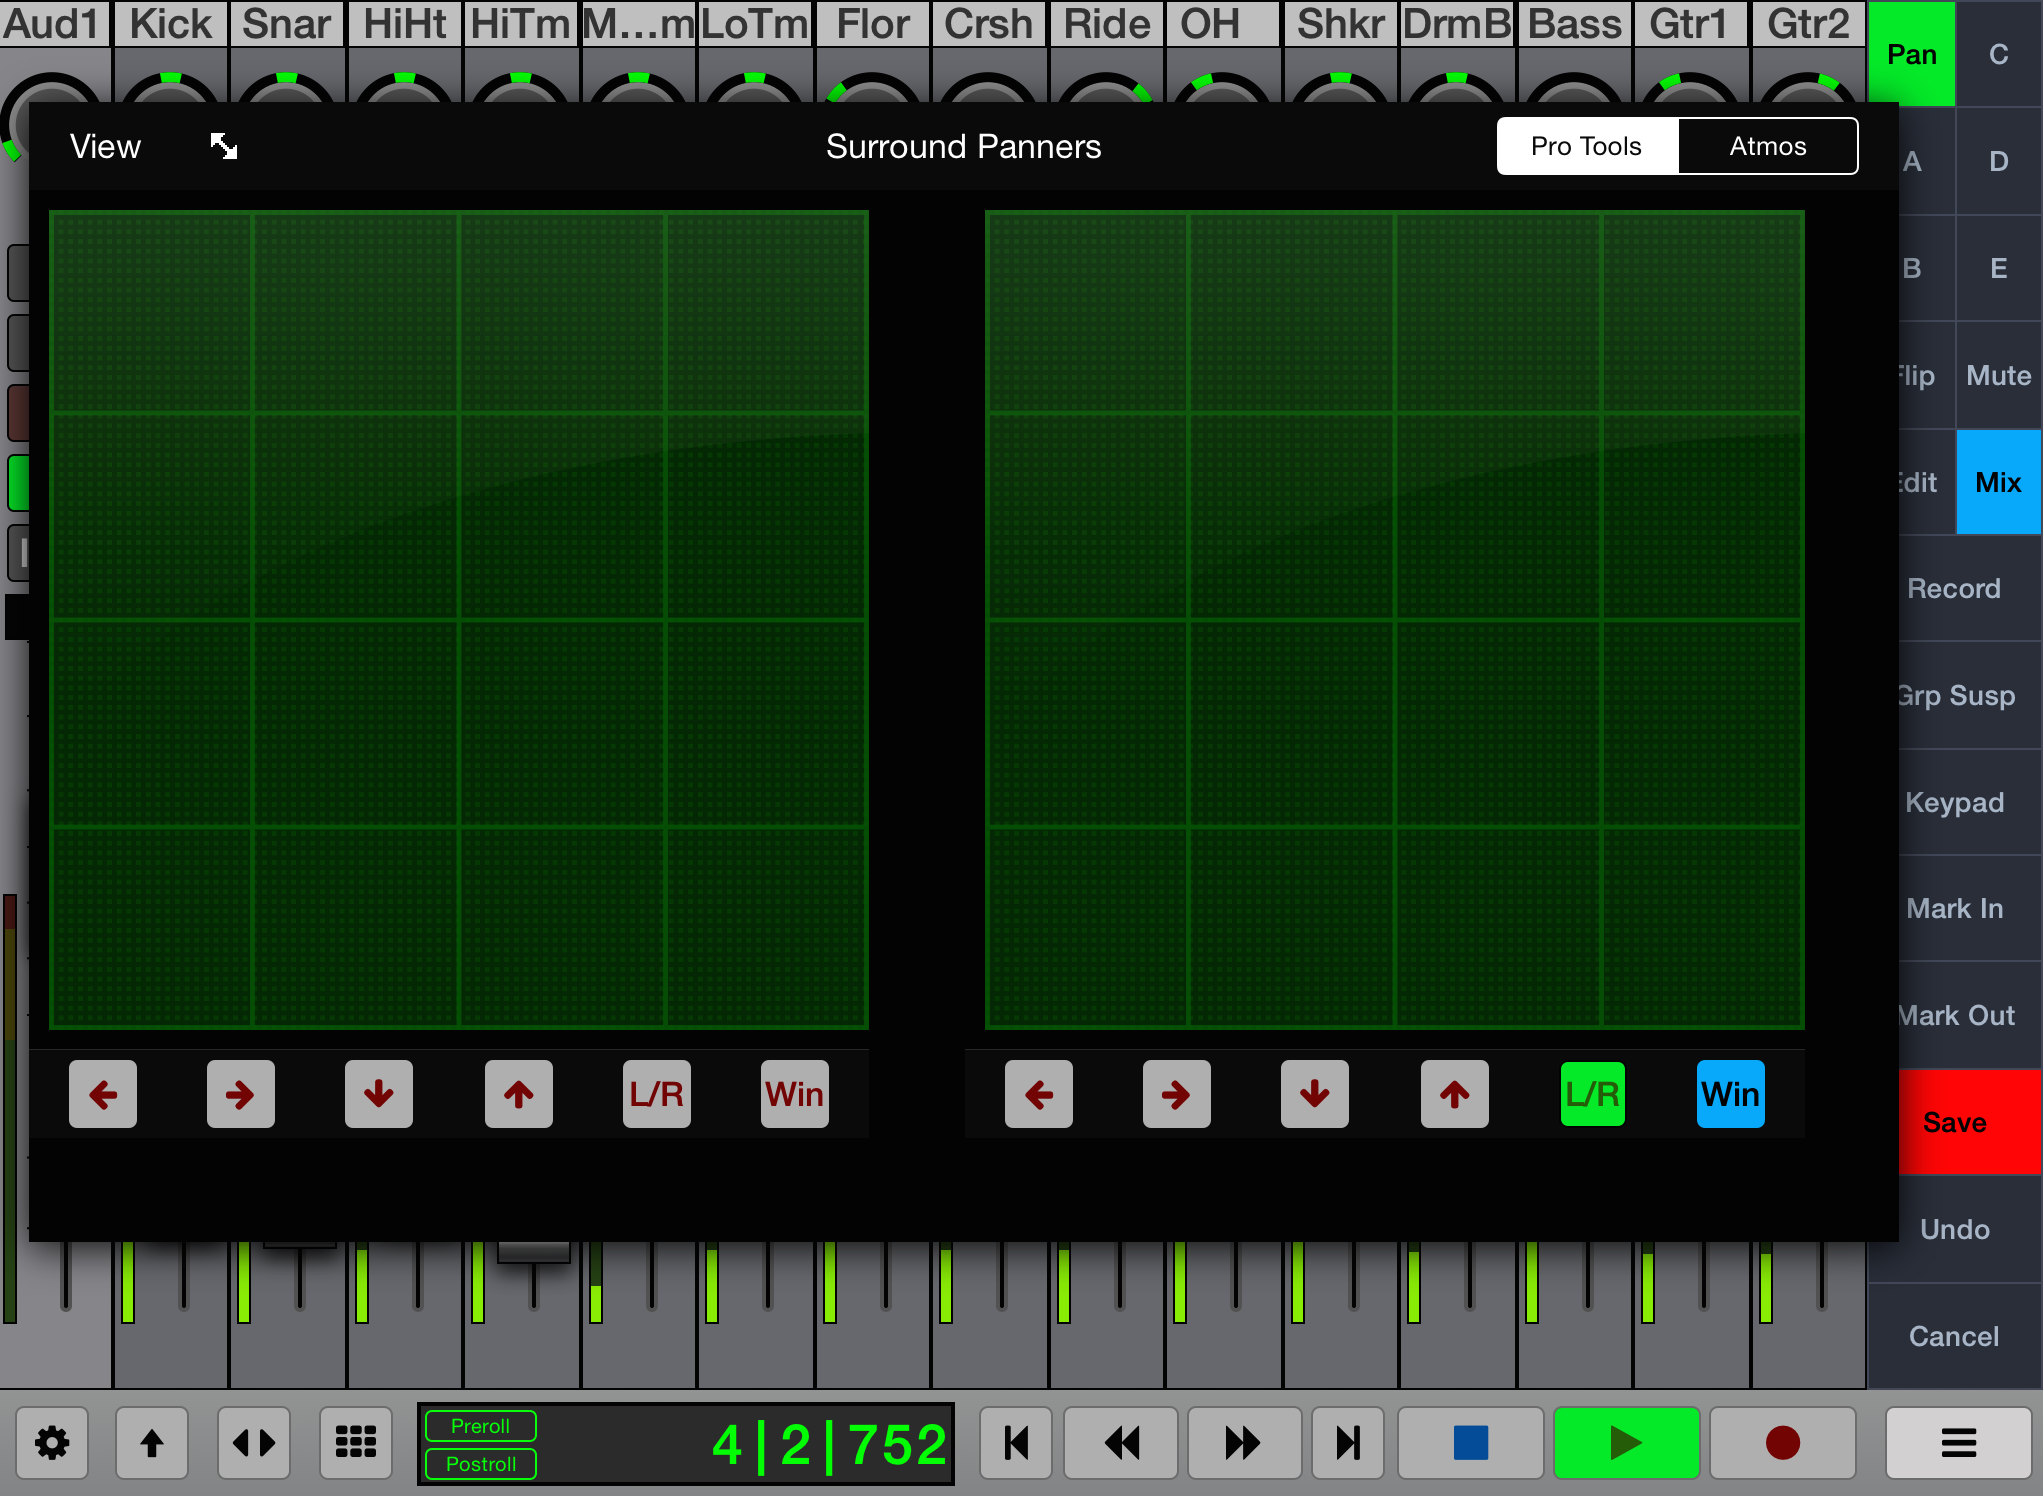
V-Console has an accesible surround panner when using Pro Tools.
To open the Surround Panner do the following:
- Touch the Utilities Pop-Up Window button in the transport bar
- Touch the top View on the pop-up window and select Surround Panner
Here is the list of the controls for the Surround Panner when in Pro Tools Mode.
- Pro Tools: Touch here to switch V-Panner to Pro Tools Mode.
- Atmos: Touch here to switch V-Panner to Atmos Mode.
- Navigation Bar
- Left Arrow: Touch here to move the track selector one track to the left.
- Right Arrow: Touch here to move the track selector one track to the right.
- Up Arrow: Touch here to move the track selector up to cycle through available Aux Sends and Output on the track.
- Down Arrow: Touch here to move the track selector down to cycle through available Aux Sends and Output on the track.
- L/R: Touch here to switch the panner to the right pan controller in a stereo track. Touch again to switch back to the left.
- When on a stereo track, open the panner window in Pro Tools and disable "Link" mode for independent control of the left and right panner.
- Window: Touch here to toggle the panner window in Pro Tools.
Dolby Atmos Panner Plug-in
Setting Up V-Panner with the Dolby Atmos Panning Plug-in
V-Console can be used to control the Dolby Atmos Panning plug-in in Pro Tools with the Surround Panner. Here is how to set it up.
- Launch V-Control Pro
- Launch Pro Tools
- When using the Atmos panner, make sure the Surround Panner is disabled in the Pro Tools Peripherals section. It will conflict with the Atmos panner if enabled during control.
- Launch V-Console on the iPad
- Open the Surround Panner in V-Console
- Touch the Atmos button to switch to Atmos Mode.
- Insert Dolby Atmos Panner on a Mono or Stereo track in Pro Tools.
- Open Dolby Atmos Panner plug-in window.
- Select the Gear icon in the plug-in window to open the Settings.

- In the Joystick Device box do the following:
- Input: V-Pan 1
- Output: V-Pan 2

- You can setup a separate mono dolby panner plug-in as well:
- Input: V-Pan 2
- Output: V-Pan 2
NOTE: As it stands, only one panner plug-in can be active at a time. To activate the panner for control, click in the the plug-in panning window in Pro Tools to select and activate it. The background color of the window will be blue to indicate it is active. It will be dark grey if inactive.
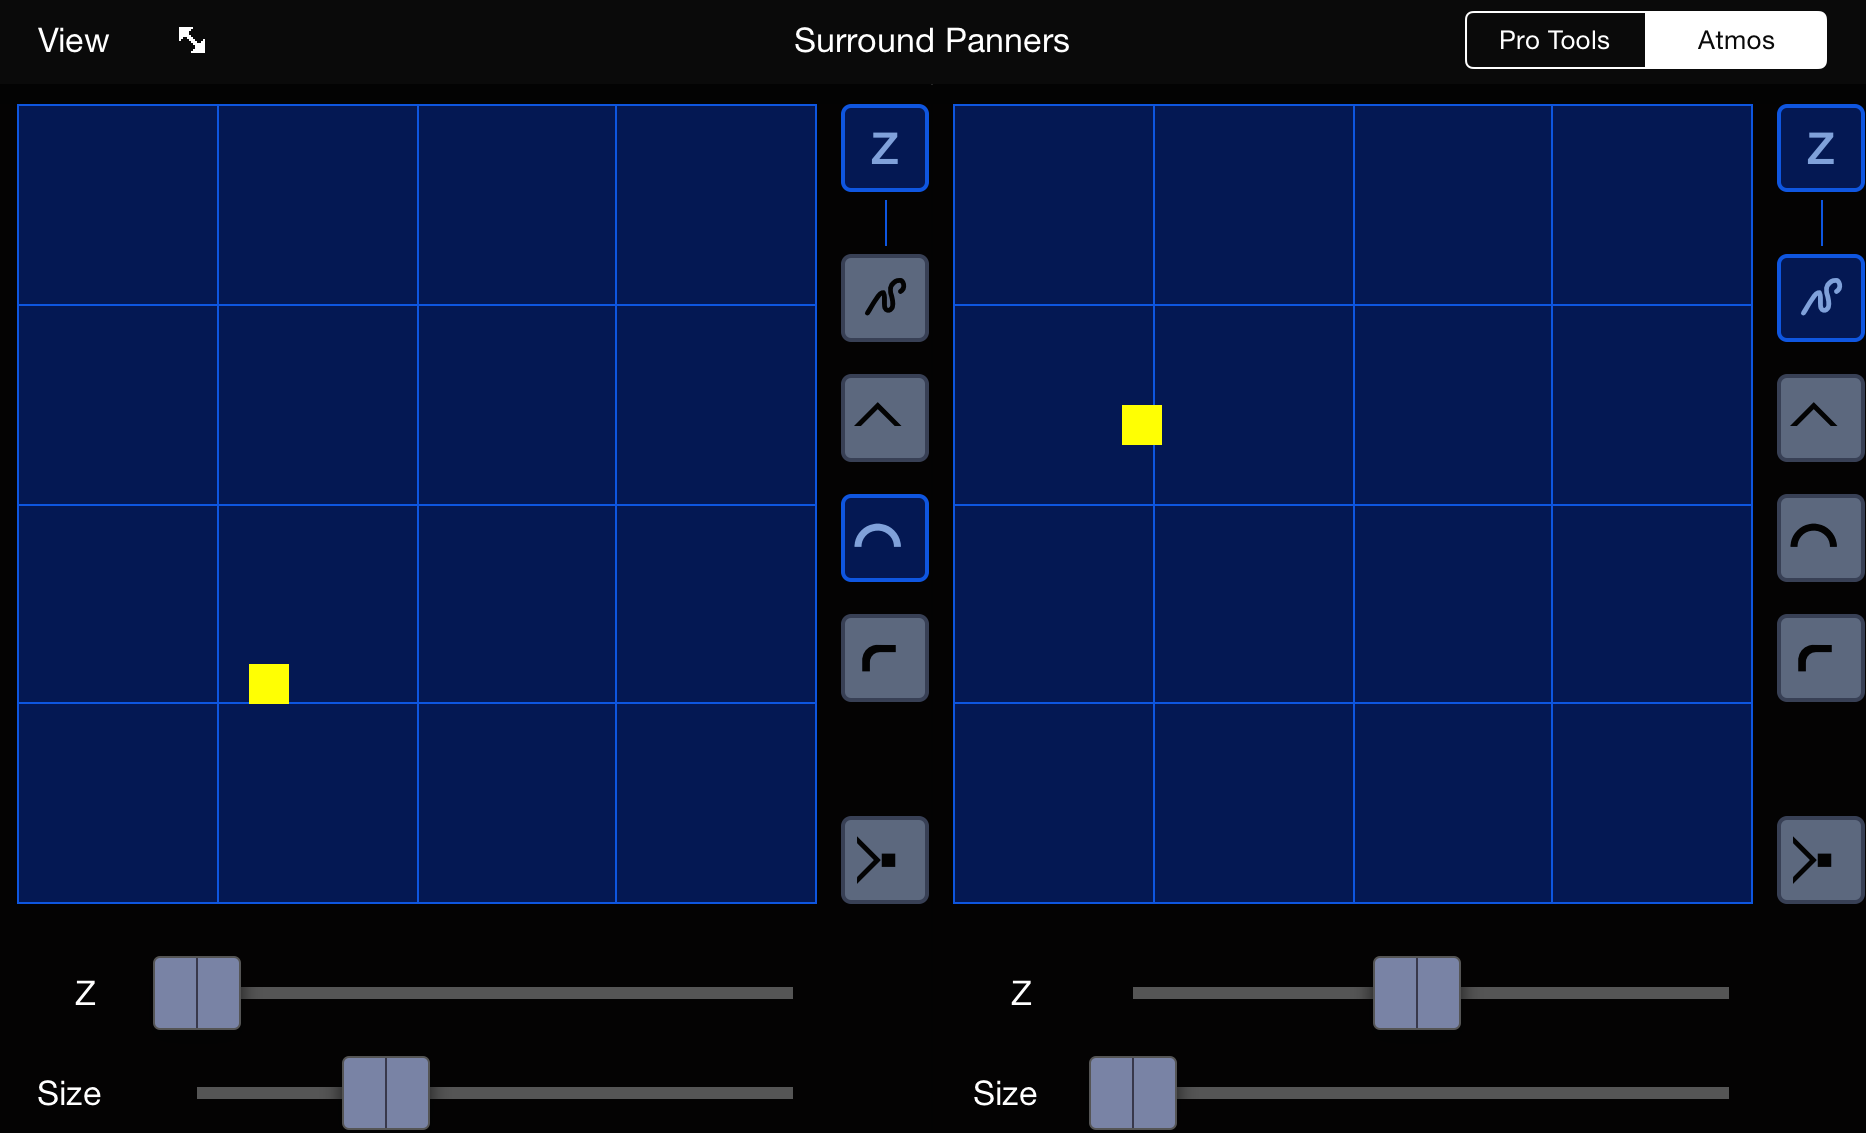
Using the Surround Panner with Dolby Atmos Panning Plug-In
Here is a list of functions for the buttons going from top to bottom.
- Pro Tools: Touch here to switch V-Panner to Pro Tools Mode.
- Atmos: Touch here to switch V-Panner to Atmos Mode.
- Z Toggle: Touch here to toggle Elevation Mode On/Off.
- Default Elevation Mode: Touch here to switch to Default elevation Mode.
- Wedge Elevation Mode: Touch here to switch to Wedge Elevation Mode.
- Sphere Elevation Mode: Touch here to switch to Sphere Elevation Mode.
- Ceiling Elevation Mode: Touch here to switch to Ceiling Elevation Mode.
- Z Fader: Touch and drag the Z Fader to adjust Z Axis. Can be used with Default Elevation Mode only.
- Size Fader: Touch and drag the size fader to adjust the object size.
NOTE: When the Dolby Atmos Panner Plug-in is not active, you can use the INS button on the channel strip in V-Console to bring up the Dolby Atmos Plug-in Panner to activate it again by touching the Window button.
Back to top
Logic Pro
Logic Pro Channel Strip
Here is a listing of the controls and functions of the channel strip going from top to bottom.
- Channel Name Display: The display at the top of the channel strip displays the name as set in Logic X.
- Channel Select: Touch the Channel Name Display to select that channel. It will light up the channel strip when selected.
- Automation Mode: Touch here to open the Automation pop-up window for that selected channel.
- Rotary Encoder: Touch the rotary and drag clockwise to increase the value and counter-clockwise to decrease. This can be used to adjust the pan position or levels for Aux Sends 1-8 depending on what is selected in the side bar.
- Mute(M): Touch here to Mute the selected Channel. Touch again to unmute the channel.
- Solo(S): Touch the solo button to solo the selected channel. This will mute all other channels. Touch the solo button again to unsolo the channel.
- Record(R): Touch here to Record Arm the selected Channel. Touch again to Record Safe the Channel.
- Input Monitor(I): Touch here to enable Input Monitoring for the selected Channel. Touch again to disable Input Monitoring.
- Fader: Touch the fader and drag it up or down to adjust the signal level of the channel. With multi-touch devices, multiple faders can be adjusted at once just like on a real hardware control surface.
- Level Meter: Each channel strip contains a level meter display that displays the signal level of the channel’s audio.
Logic Pro Side Bar
Here is a listing of the controls and functions of the Side Bar going from top to bottom.
- Pan: Touch here to set all the rotary encoders in the channel strips to control panning.
- 1-8: Touch here to set all the rotary encoders to the respective Aux Send for the channels. Aux Send 1 to Aux Send 8.
- Mute Clear(|M|): Touch here to clear all mutes currently enables on any channel.
- Solo Clear(|S|): Touch here to clear all Solos currently enabled on an channel.
- Group Suspend(Grp Susp): Touch here to disable all track groups. Touch it again to enable normal group function.
- Set L: Touch here to set a Mark In point at the current location of the playhead in the timeline.
- Set R: Touch here to set a Mark Out point at the current location of the playhead in the timeline.
- Set L Drop: Touch here to set an Auto Punch-In point at the current location of the playhead in the timeline.
- Set R Drop: Touch here to set an Auto Punch-Out point at the current location of the playhead in the timeline.
- Save: Touch here to Save the the Session in its current state.
- Undo: Touch here to Undo the last action done in the session.
- Redo: Touch here to Redo the last action that was undone in the session.
Logic Pro Transport Bar
Here is a listing of the controls and functions of the transport bar going from left ot right.
- Settings: Touch here to open the Settings pop up window to change daw modes and preferences.
- Bank Window: Touch here to open the Banking Pop-Up Window.
- Counter: This displays the current time in the session in the units designated in Logic.
- Transport/Markers Window: Touch here to open the Transport/Markers Pop-up Window.
- Cycle: Touch here to enable Cycle Mode.
- Metronome: Touch here to enable the audible Metronome. Touch it again to disable the metronome.
- Go To Left: Touch here to move the playhead to the current Mark In position on the timeline.
- Go To Right: Touch here to move the playhead to the current Mark Out Position on the timeline.
- Rewind: Touch here to Rewind the playhead on the timeline.
- Fast Forward: Touch here to advance the playhead on the timeline.
- Stop: Touch here to stop the transport of the current Session.
- Play: Touch here to start playback of the current session.
- Pause: Touch here to Pause playback of the current session. Touch it again to un-pause and resume playback.
- Record: Touch this button to punch-in to record, in the current session. Touch the play button to punch out of record.
- Utilities Pop-up Window: Touch here to open the utilities Pop-up Window for quick access to the V-Window/Edit Window/Plug-Ins Window.
Logic Pro Transport/Marker Window
Here is a listing of the controls and functions of the Transport/Marker Window popup.

- Transport
- Bars: Touch here to switch the counter to Bars Mode.
- SMPTE: Touch here to switch the counter to SMPTE Mode.
- Punch: Touch here to toggle Auto Punch On/Off.
- Wheel: Touch here to open the wheel pop-up.
- Big: Touch here to open the Big Counter on V-Console.
- Replace: Touch here to use the replace function.
Markers
- 1-10: Touch 1-10 to jump to that marker point on the timeline.
- Create: Touch here to create a marker at the current position of the playhead on the timeline.
- Previous: Touch here jump to the previous marker in the timeline.
- Next: Touch here to jump to the next marker in the timeline.
Logic Pro Edit Window
Here is a listing of the controls and functions of the Edit Window for each section.
NOTE: For the Environment Window, you must first go to the 'Advanced Tools' in Logic X's preferences and enable MIDI. For the Transform and Sample Windows you must first have an event selected in the Arrange window of Logic X.
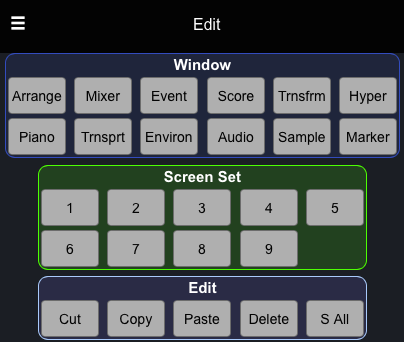
- Window
- Arrange: Touch here to toggle the Arrange Window On/Off.
- Mixer: Touch here to toggle the Mixer Window On/Off.
- Event: Touch here to toggle the Event Window On/Off.
- Score: Touch here to toggle the Notation Scoring Window On/Off.
- Transform: Touch here to toggle the Transform Window On/Off.
- Hyper: Touch here to toggle the Hyper Editor Window On/Off.
- Environment: Touch here to toggle the Environment Window On/Off.
- Audio: Touch here to toggle the Audio Pool Window On/Off.
- Sample: Touch here to toggle the Sample Editor Window On/Off.
- Marker: Touch here to toggle the Marker Window On/Off.
- Screen Set
- 1-9: Touch buttons 1-9 to select between different Screen Set Presets.
- Edit
- Cut: Touch here to use the Cut function.
- Copy: Touch here to use the Copy function.
- Paste: Touch here to use the Paste function.
- Delete: Touch here to use the Delete function.
- Select All: Touch here to use the Select All function.
Logic Pro Plug-In Window
The Plug-In window can be accessed by tapping on the V-Window/Edit Panel pop up and tapping View. Select Plug-In from the drop down menu.
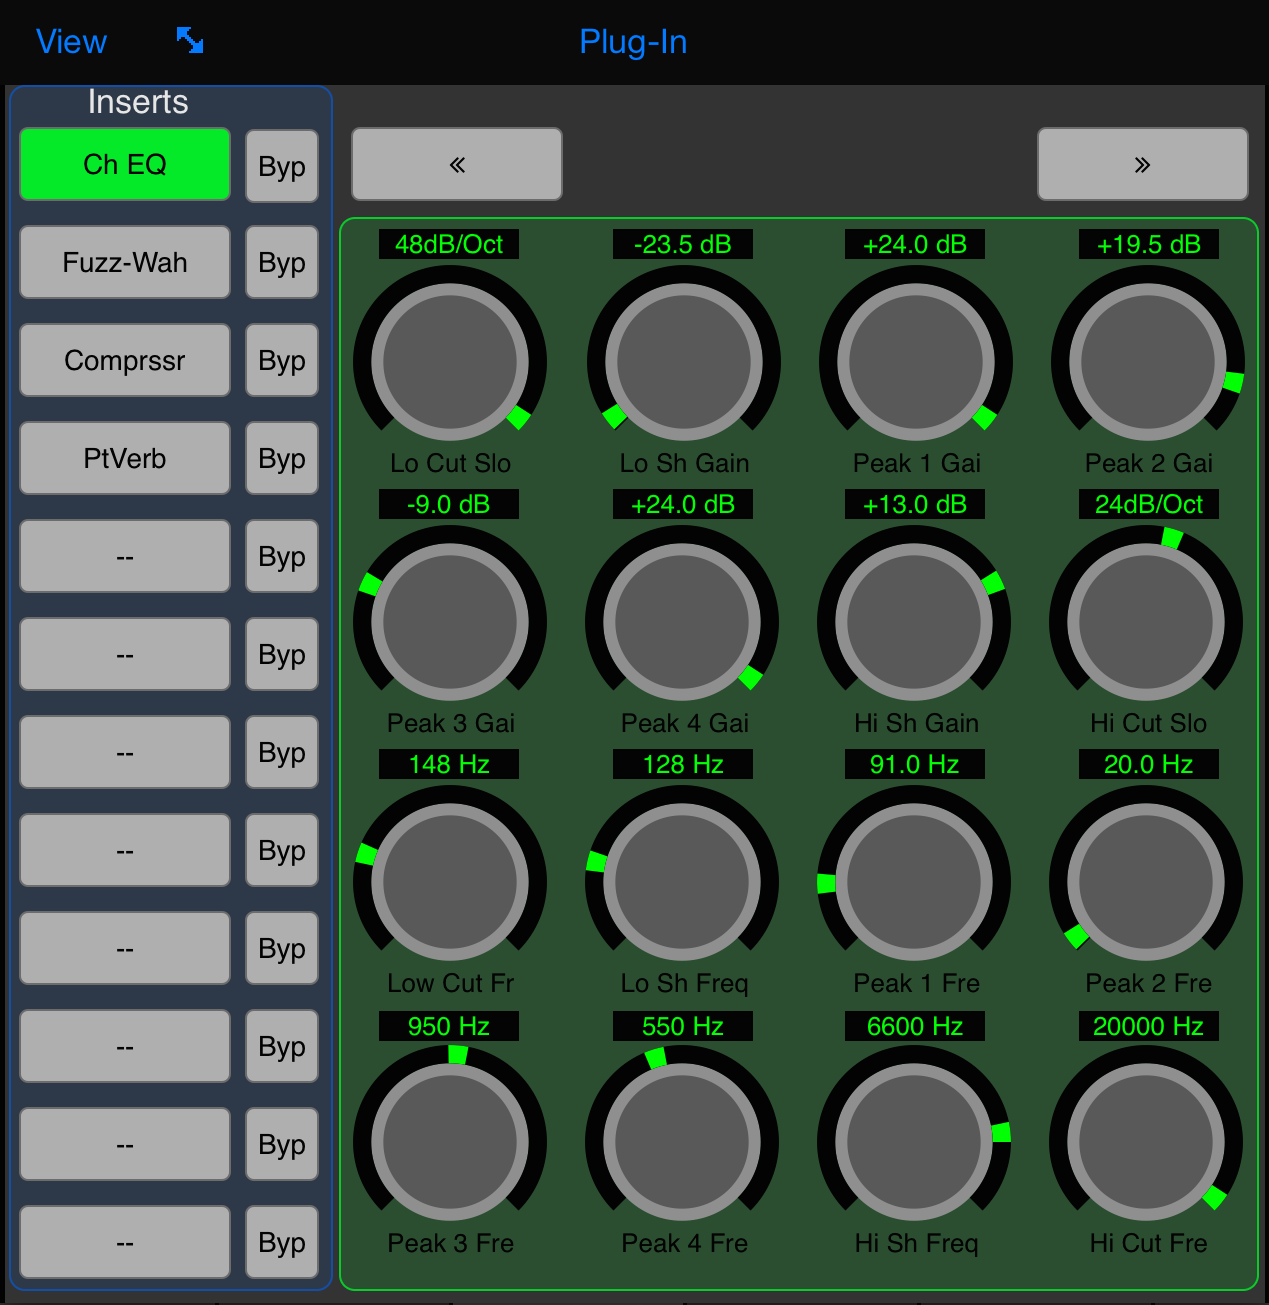
- The Inserts column displays the active plug-ins on the selected track. Touch the plug-in name to select it and adjust the parameters.
- Touch the Bypass(Byp) button next to the plug-in name to bypass that selected plug-in.
- Touch the Page Left (<<) or Page Right (>>) buttons to cycle through the pages of parameters for the selected plug-in.
- The current value of each plug-in parameter is displayed above the knobs.
- Touch and drag a knob to change the current value.
- The parameter name is displayed below the knobs.
Logic Pro Instrument Window
The Instrument window can be accessed by tapping on the V-Window/Edit Panel pop up and tapping View. Select Instrument from the drop down menu.
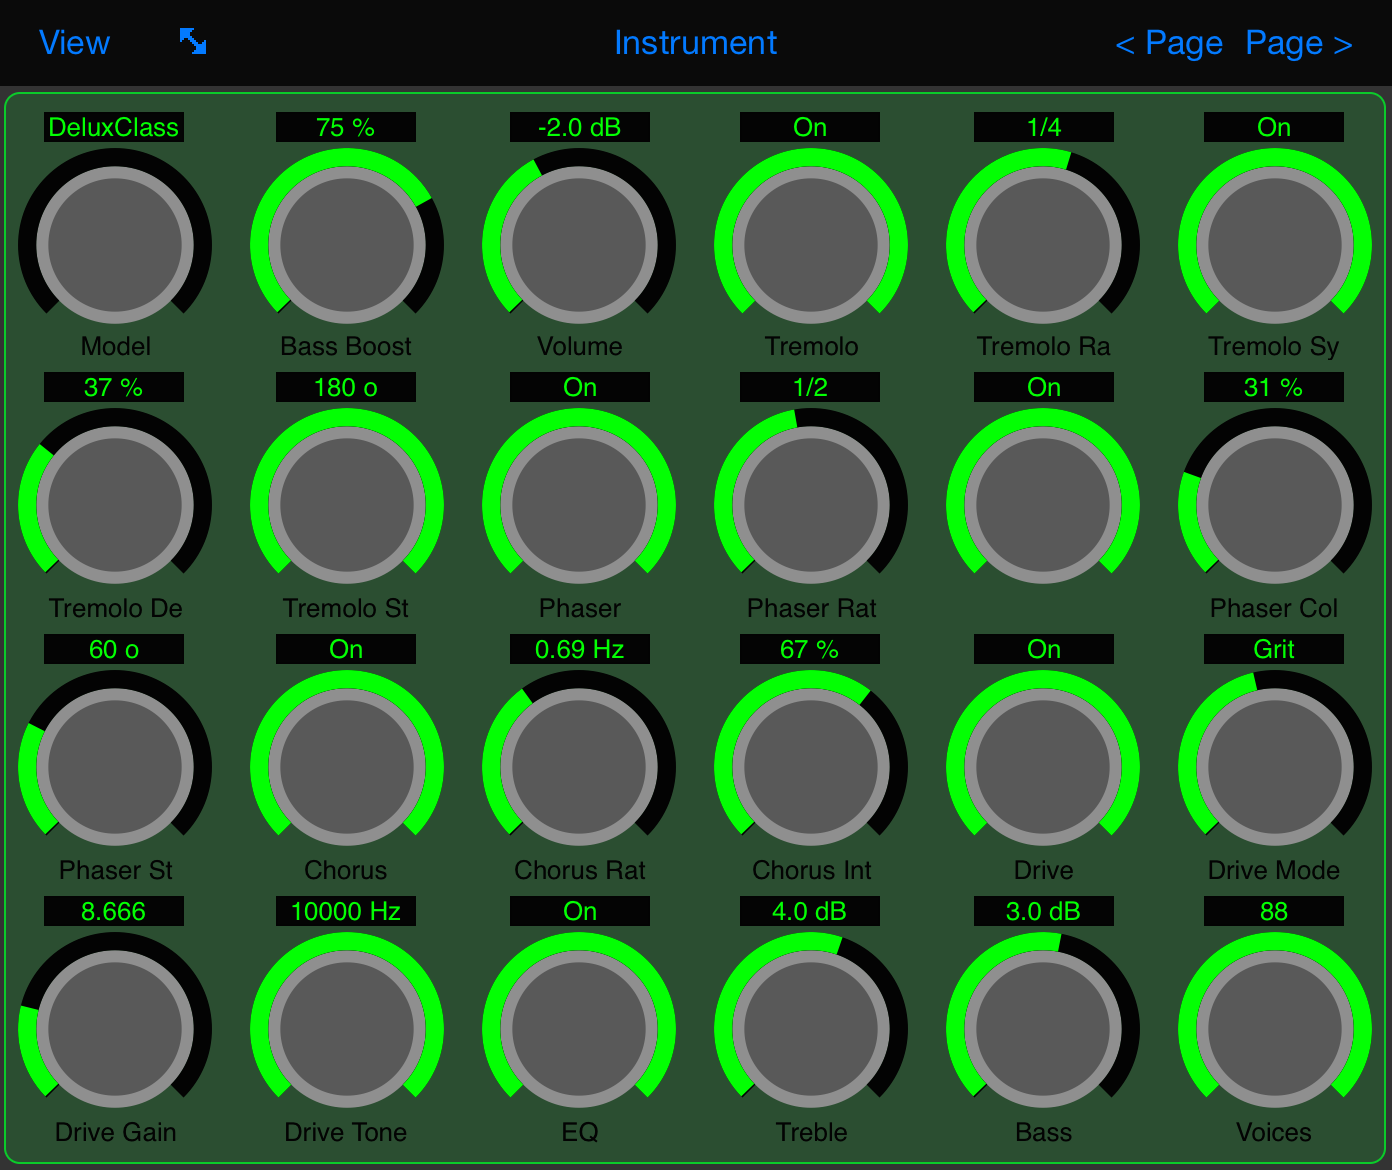
- The text above each knob displays the current value of the parameter.
- The parameter name is listed below each knob.
- Touch and drag a knob to change the current value.
- Tap the Page buttons to cycle through more parameters available for each plug-in.
Back to top
Cubase
Cubase Channel Strip
Here is a listing of the controls and functions of the channel strip going from top to bottom.
- Name: Displays the track name for the selected channel. Touch this area to select that channel.
- Dial: Touch and drag to left/right to increase/decrease the value. Can be used for Pan or for any of the 8 Aux sends.
- Mute(M): Touch the mute button to mute the selected channel. Touch it again to unmute the channel.
- Solo(S): Touch the solo button to solo the selected channel. This will mute all other channels. Touch the solo button again to unsolo the channel.
- Fader: Touch the fader and drag it up or down to adjust the signal level of the channel. With multi-touch devices, multiple faders can be adjusted at once just like on a real hardware control surface.
- Level Meter: Each channel strip contains a level meter display that displays the signal level of the channel’s audio.
- Read(R): Touch here to enable Read Automation for the selected channel. Touch again to disable Read automation.
- Write(W):Touch here to enable Write Automation for the selected channel. Touch again to disable Write automation.
- Monitor: Touch here to enable Monitoring for the selected channel. Touch again to disable Monitoring
- Record(R): Touch here to Record Arm the selected Channel. Touch again to Record Safe the Channel.
Cubase Side Bar
Here is a listing of the controls and functions of the Side Bar going from top to bottom.
- Pan: Touch here to set all the dials in the channel strips to control panning.
- Mixer: Touch here to toggle the Mixer Window On/Off.
- 1-8: Touch 1-8 to change the dials to control aux sends 1-8.
- Read All Clear(|R|): Touch here to clear all tracks of Read Automation.
- Write All Clear(|W|): Touch here to clear all tracks of Write Automation.
- Solo Clear(|S|): Touch here to clear Solo mode for all tracks.
- Mute Clear(|M|): Touch here to clear Mute mode for all tracks.
- Set Left: Touch to Set the left locator to the playhead location on the timeline.
- Set Right: Touch to Set the left locator to the playhead location on the timeline.
- Save: Touch here to Save the session at its current state.
- Undo: Touch here to undo the last action made in the session.
Cubase Transport Bar
Here is a listing of the controls and functions of the transport bar going from left ot right.
- Settings: Touch here to open the Settings pop up window to change daw modes and preferences.
- Bank Window: Touch here to open the Banking Pop-Up Window.
- Marker Window: Touch here to open the Marker Pop-Up Window.
- Counter: This displays the current time in the session in the units designated in Cubase.
- Go To Left: Touch here to move the playhead to the current Mark In position on the timeline.
- Go To Right: Touch here to move the playhead to the current Mark Out Position on the timeline.
- RTZ: Touch here to have the playhead go to the beginning of the session.
- GTE: Touch here to make the play go to the end of the current session.
- Rewind: Touch here to have the playhead move backwards from it current position.
- Fast Forward: Touch here to have the playhead move forward from its current position.
- Cycle: Touch here to enable Cycle Mode.
- Stop: Touch here to stop the transport of the current Session.
- Play: Touch here to start playback of the current session.
- Record: Touch this button to punch-in to record, in the current session. Touch the play button to punch out of record.
- Utilities Pop-up Window: Touch here to open the utilities Pop-up Window for quick access to the V-Window/Edit Window.
Cubase Edit Window
Here is a listing of the controls and functions of the Edit Window for each section.
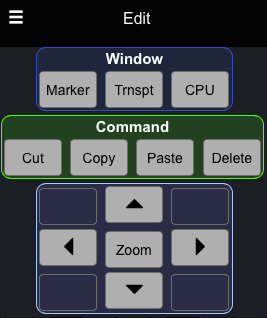
- Window
- Marker: Touch here to open the Marker Window.
- Transport: Touch here to open the Transport Window.
- CPU: Touch here to open the CPU Window.
- Command
- Cut: Touch here to use the Cut Command.
- Copy: Touch here to use the Copy Command.
- Paste: Touch here to use the Paste Command.
- Delete: Touch here to use the Delete Command.
Cubase Markers Window
Here is a listing of the controls and functions of the Marker Window popup.
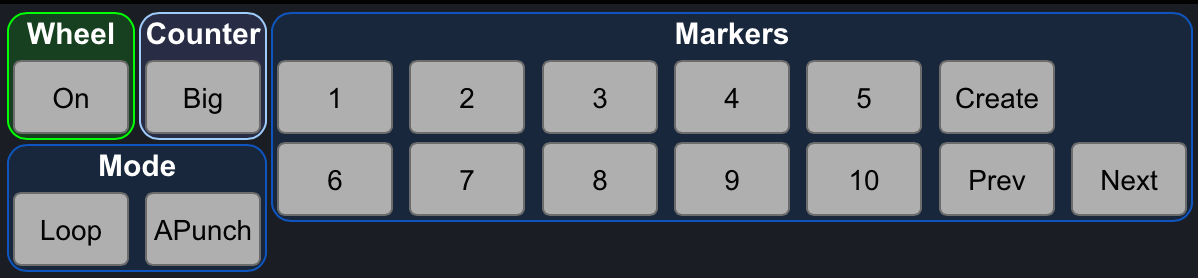
- Wheel: Touch here open the touch wheel.
- Counter: Touch here to open the Big Counter in V-Console.
- Mode
- Loop: Touch here to toggle loop mode on/off.
- Auto Punch: Touch here to toggle Auto Punch on/off.
- Markers
- 1-10: Touch 1-10 to jump to that marker point on the timeline.
- Create: Touch here to create a marker at the current position of the playhead on the timeline.
- Previous: Touch here jump to the previous marker in the timeline.
- Next: Touch here to jump to the next marker in the timeline.
Back to top
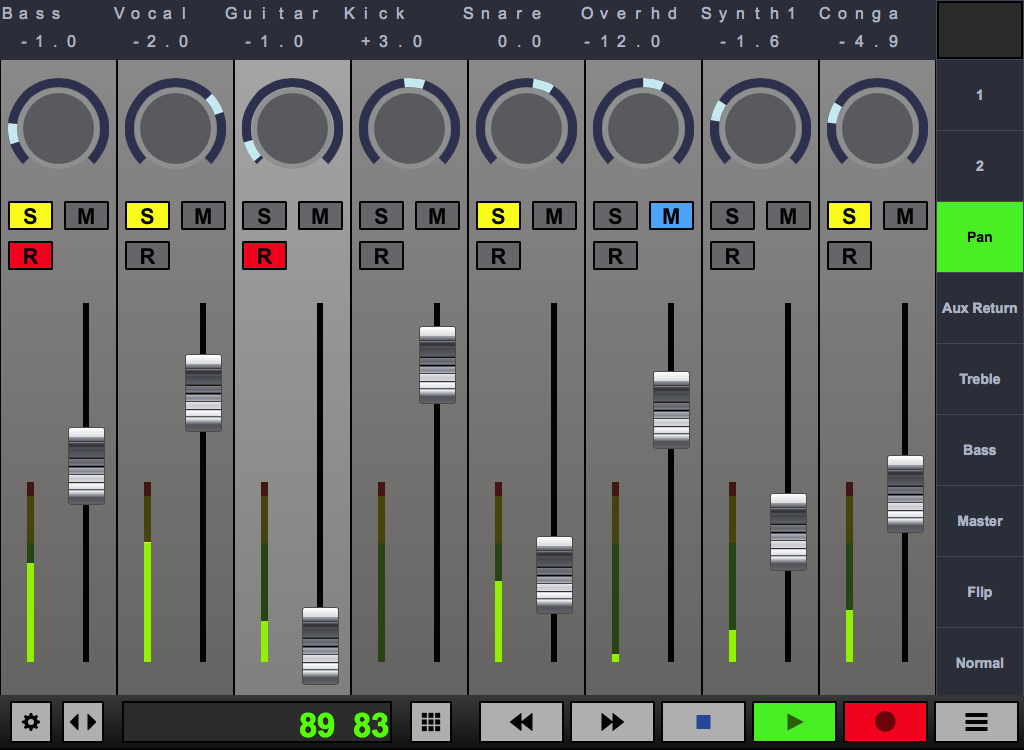
Digital Performer
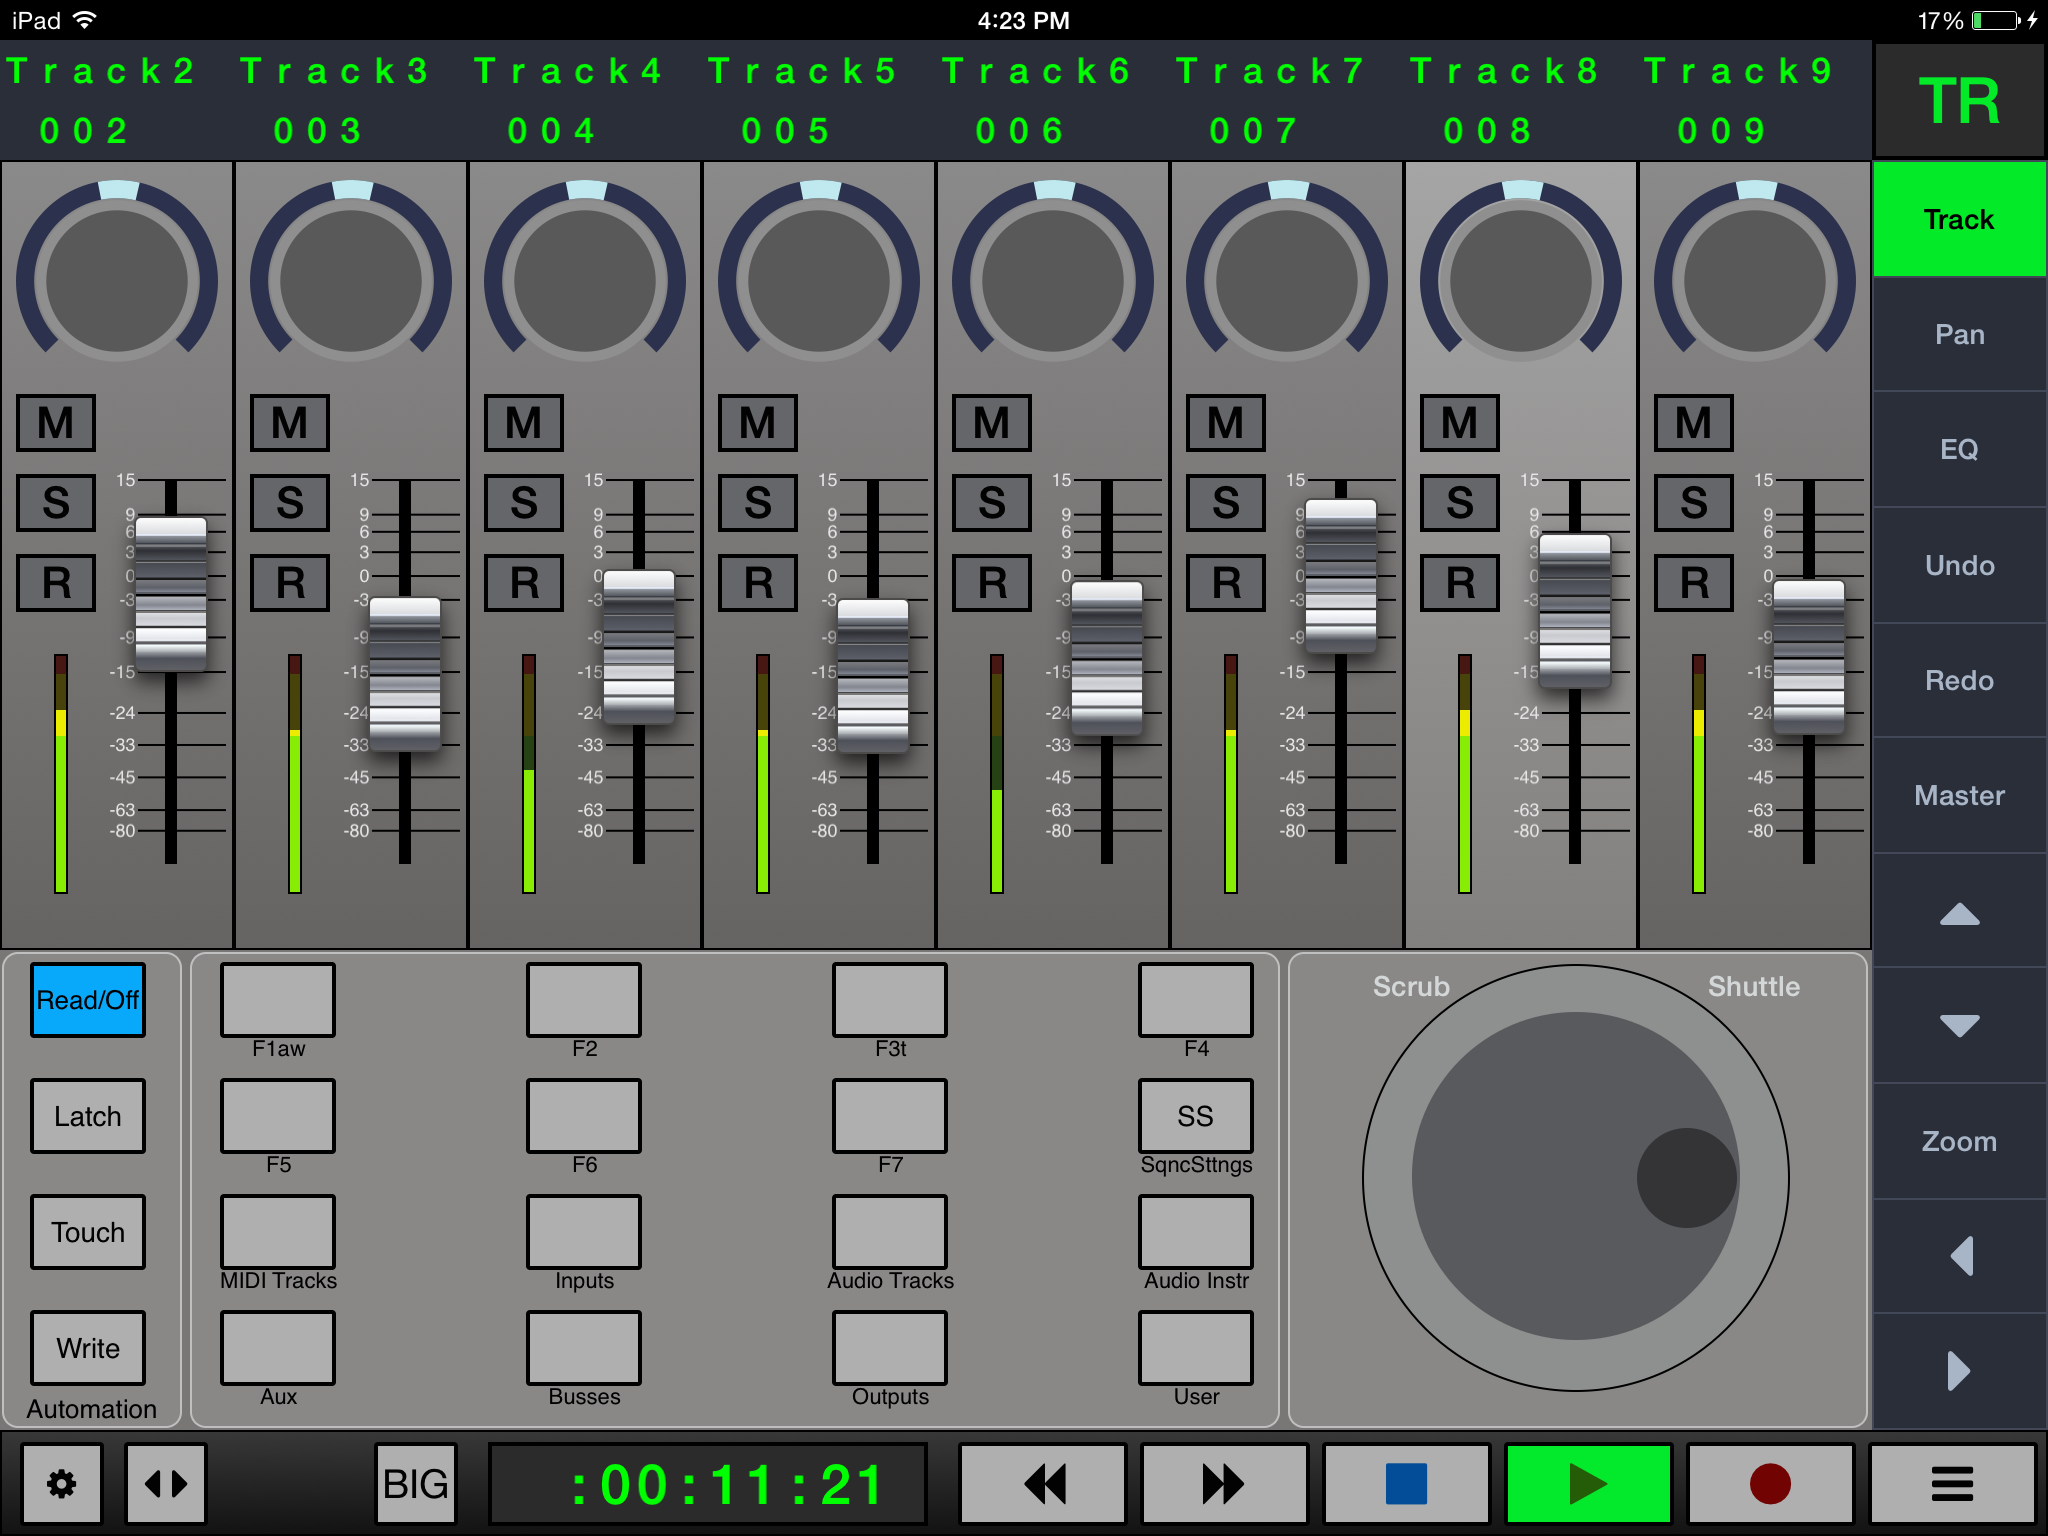
Digital Performer Channel Strip
Here is a listing of the controls and functions of the channel strip going from top to bottom.
- Name: Displays the track name for the selected channel. Touch this area to select that channel.
- Rotary Encoder: Touch the rotary and drag clockwise to increase the value and counter-clockwise to decrease. Can be used for Pan values or Aux Send levels.
- Solo(S): Touch the solo button to solo the selected channel. This will mute all other channels. Touch the solo button again to unsolo the channel.
- Mute(M): Touch the mute button to mute the selected channel. Touch it again to unmute the channel.
- Record(R): Touch here to Record Arm the selected Channel. Touch again to Record Safe the Channel.
- Fader: Touch the fader and drag it up or down to adjust the signal level of the channel. With multi-touch devices, multiple faders can be adjusted at once just like on a real hardware control surface.
- Level Meter: Each channel strip contains a level meter display that displays the signal level of the channel’s audio.
Digital Performer Side Bar
Here is a listing of the controls and functions of the Side Bar going from top to bottom.
- Pan: Touch here to set all the rotary encoders in the channel strips to control panning.
- FX: Touch here to set all the rotary encoders in the channel strips to control FX Inserts.
- When the encoders are set to FX mode you can select which specific effect to edit by holding this button and tapping the encoder of the track you want to edit.
- Send: Touch here to set all the rotary encoders in the channel strips to control Aux Sends.
- Edit: Touch here to enter "Edit" Mode.
- Up/Down Arrows: Touch here to move up or down in selection.
- When the encoders are set to “Pan” mode, they scroll the main window up and down.
- When the encoders are set to “FX mode” they change which specific insert to adjust.
- When the encoders are set to “Send” mode, they adjust which specific send to adjust.
- Flip: Touch here to flip the functionality of the rotary encoders to the channel faders. When flip mode is engaged, any parameters that are normally controlled by the rotary encoders are now controlled by the channel faders.
- Solo: Touch here to Solo Clear all channels currently in Solo Mode.
- Master: Touch here to open the Master Fader Pop-up.
- Save: Touch here to Save the session at its current state.
- Undo: Touch here to undo the last action made in the session.
- Redo: Touch here to redo the last action that was cancelled by "Undo".
- Set Drop Left: Touch here to set an Auto Punch-In point at the current location of the playhead in the timeline.
- Set Drop Right: Touch here to set an Auto Punch-Out point at the current location of the playhead in the timeline.
- Set Left: Touch here to set a Mark In point at the current location of the playhead in the timeline.
- Set Right: Touch here to set a Mark Out point at the current location of the playhead in the timeline.
Digital Performer Transport Bar
Here is a listing of the controls and functions of the transport bar going from left ot right.
- Settings: Touch here to open the Settings pop up window to change daw modes and preferences.
- Bank Window: Touch here to open the Banking Pop-Up Window.
- Counter/Wheel: Touch here to open the pop-up to enable/disable the big counter or wheel.
- Previous Marker: Touch here to go to the previous marker in the session.
- Next Marker: Touch here to go to the next marker in the session.
- RTZ: Touch here to move the playhead to the beginning of the timeline.
- Rewind: Touch here to rewind the playhead.
- Fast Forward: Touch here to advance the playhead forward in the timeline.
- Stop: Touch here to stop the playhead.
- Play: Touch here to start the playhead.
- Record: Touch here to Record.
- Utilities Pop-up Window: Touch here to open the utilities Pop-up Window for quick access to the V-Window/Edit Window.
Digital Performer Edit Window
Here is a listing of the controls and functions of the Edit Window for each section.
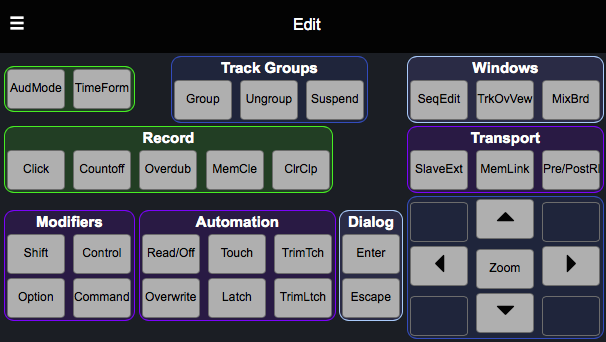
- Aud Mode: Touch here to enable Audition Mode.
- TimeForm: Touch here to change the display time between SMPTE and Bars/Beats.
- Track Groups
- Group: Touch here to create a group.
- Ungroup: Touch here to ungroup.
- Suspend: Touch here to Suspend all group functions. Touch again to enable group functionality.
- Windows
- Sequence Edit: Touch here to open the Sequence Edit Window.
- Track Overview: Touch here to open the Track Overview Window.
- Mixing Board: Touch here to open the Mixing Board Window.
- Record
- Click: Touch here to toggle the click On/Off.
- Countoff: Touch here to toggle the Countoff On/Off.
- Overdub: Touch here to toggle Overdub Mode On/Off when Recording.
- Memory Clear: Touch here to clear the selected memory.
- Clear Clip: Touch here to clear the selected clip.
- Transport
- Slave External: Touch here to Slave to External Sync.
- MemLink: Touch here to toggle the Memory Link Modes.
- Use together with the ‘Option’ Modifier to toggle just Link Memory to Selection.
- Use together with the ‘Command’ Modifier to toggle just the Link Playback to Memory.
- Pre/Post Roll: Touch here to toggle PreRoll and PostRoll together.
- Use together with the ‘Option’ Modifier to toggle just Pre Roll.
- Use together with the ‘Command’ Modifier to toggle just Post Roll.
- Modifiers
- Shift: Touch here to toggle the Shift modifier On/Off.
- Control: Touch here to toggle the Control Modifier On/Off.
- Option: Touch here to toggle the Option Modifier On/Off.
- Command: Touch here to toggle the Command Modifier On/Off.
- Automation
- Read/Off: Touch here to toggle between Automation Read/Off.
- Touch: Touch here to enable Touch Automation Mode.
- Trim Touch: Touch here to enable Trim Touch Automation Mode.
- Overwrite: Touch here to enable Overwrite Automation Mode.
- Latch: Touch here to enable Latch Automation Mode.
- Trim Latch: Touch here to enable Trim Latch Automation Mode.
Back to top
Ableton Live
Live Channel Strip
Here is a listing of the controls and functions of the channel strip going from top to bottom.
- Name: Displays the track name for the selected channel. Touch this area to select that channel.
- Rotary Encoder: Touch the rotary and drag clockwise to increase the value and counter-clockwise to decrease.
- Default: Touch the default button to reset the rotary encoder back to the default value.
- Solo(S): Touch the solo button to solo the selected channel. This will mute all other channels. Touch the solo button again to unsolo the channel.
- Mute(M): Touch the mute button to mute the selected channel. Touch it again to unmute the channel.
- Record(R): Touch here to Record Arm the selected Channel. Touch again to Record Safe the Channel.
- Fader: Touch the fader and drag it up or down to adjust the signal level of the channel. With multi-touch devices, multiple faders can be adjusted at once just like on a real hardware control surface.
- Level Meter: Each channel strip contains a level meter display that displays the signal level of the channel’s audio.
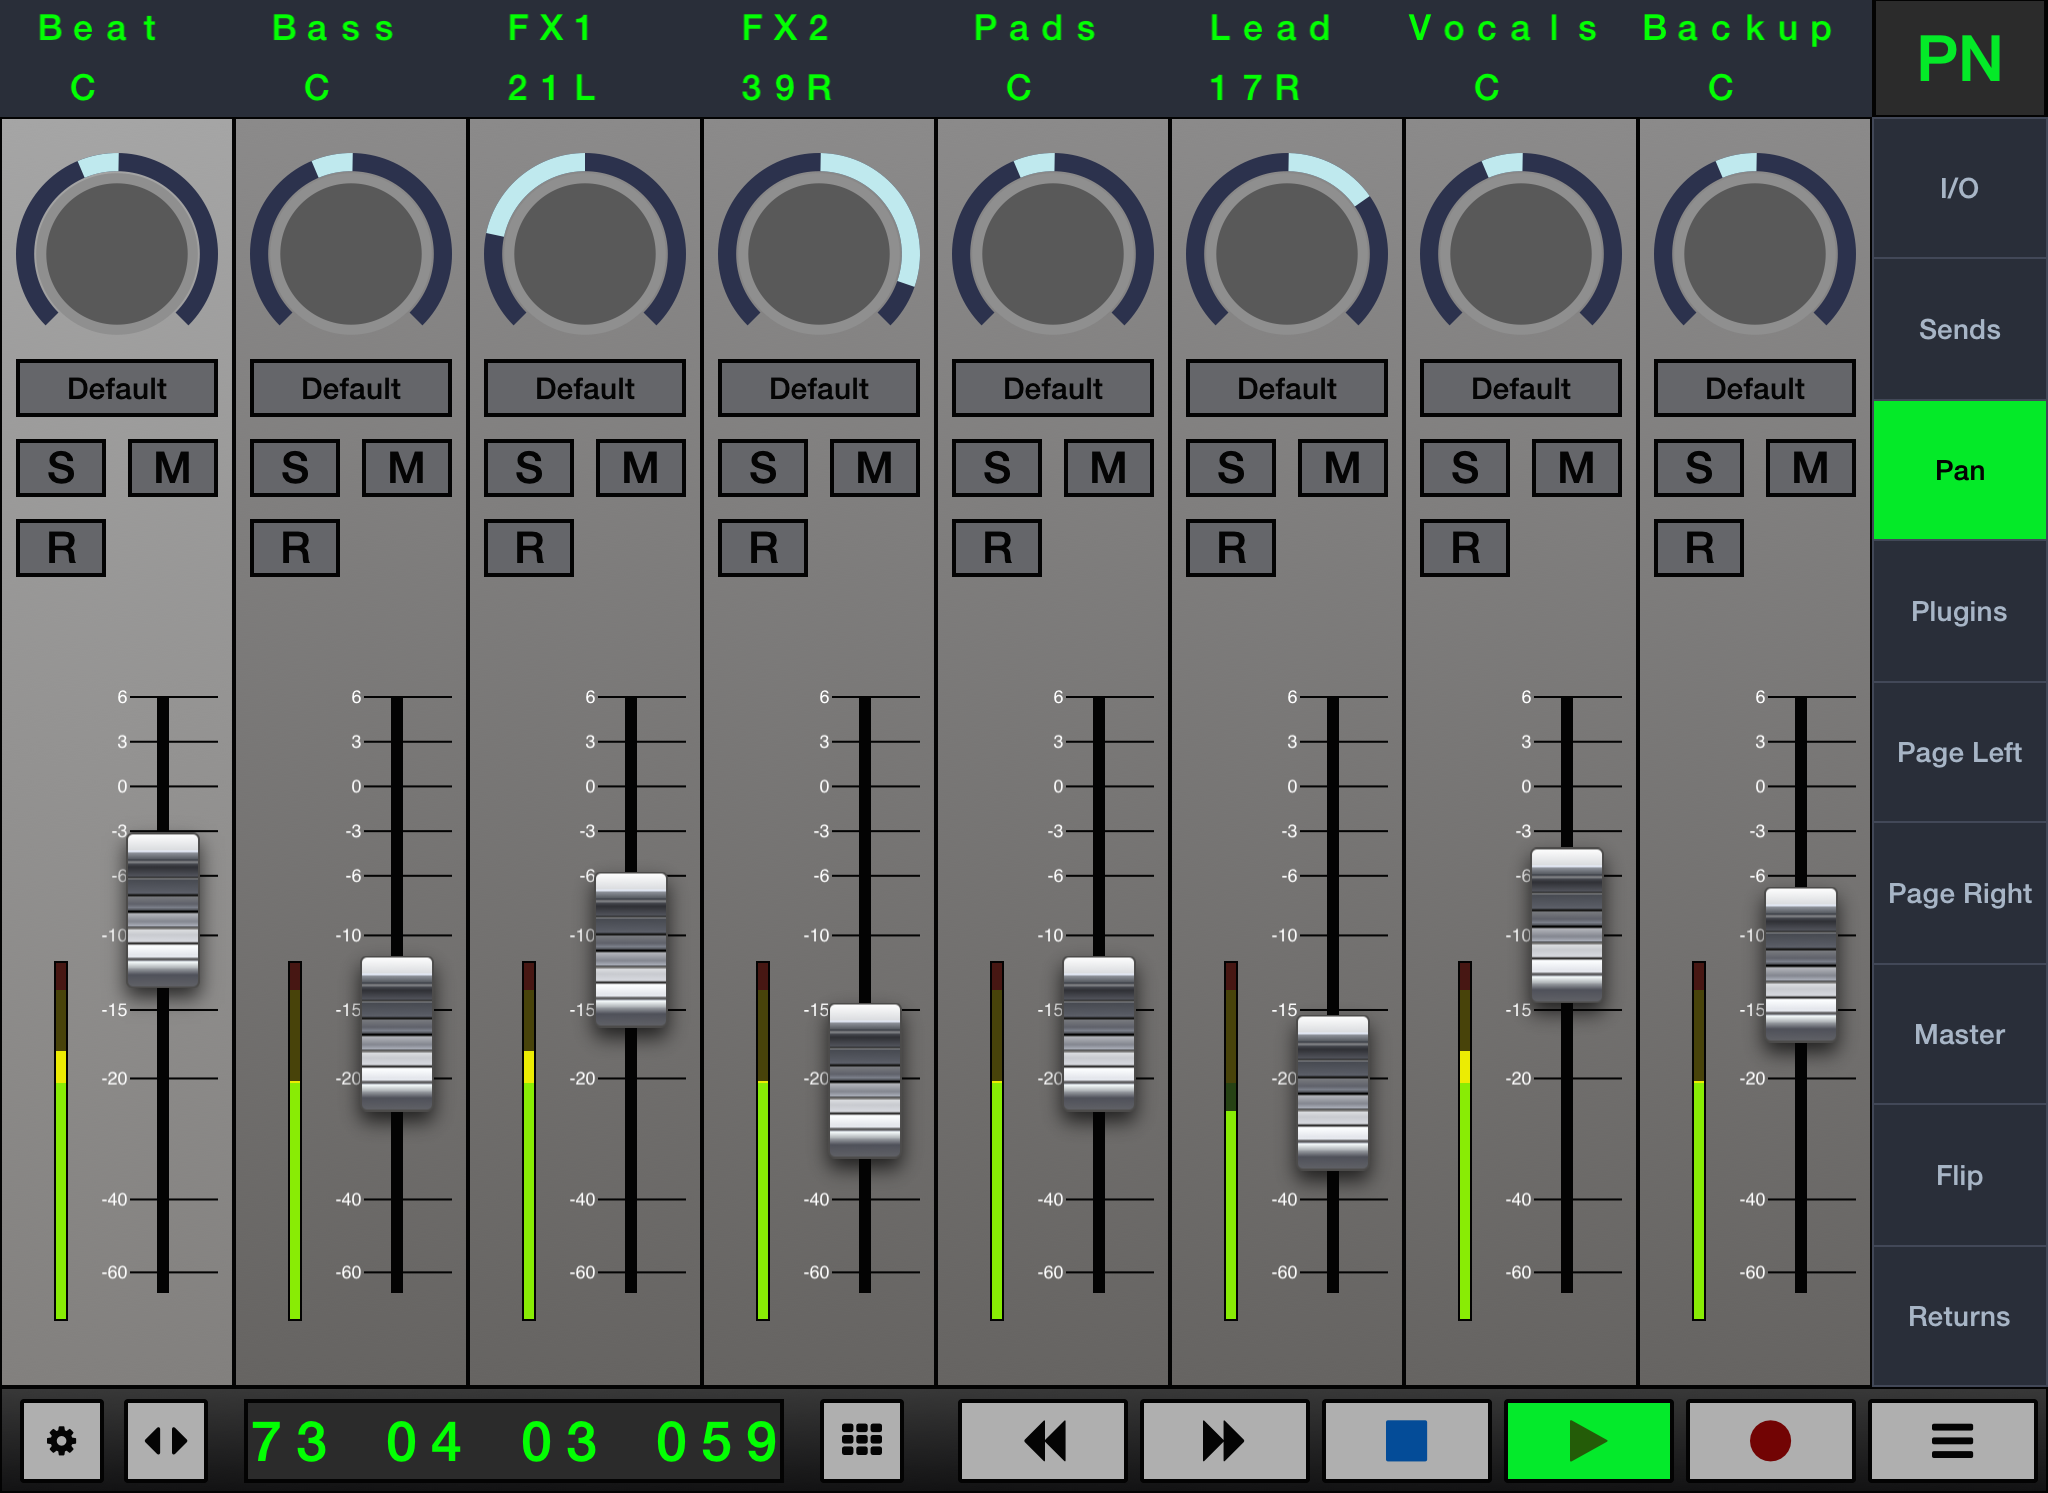
Live Side Bar
Here is a listing of the controls and functions of the Side Bar going from top to bottom.
- I/O:
- Sends: Touch here to have the Rotary Encoders control Aux Send levels.
- Pan: Touch here to have the Rotary Encoders control stereo panning position.
- Plug-ins: Touch here to have the Rotary Encoders control Plug-in Parameters.
- Page Left: Touch here to scroll left for Plug-in Parameters to control.
- Page Right: Touch here to scroll right for Plug-in Parameters to control.
- Master: Touch here to open the Master Fader Pop-up.
- Flip: Touch here to flip controls between faders and rotary encoders.
- Returns
: Touch here to adjust the Returns level for the Aux Send.
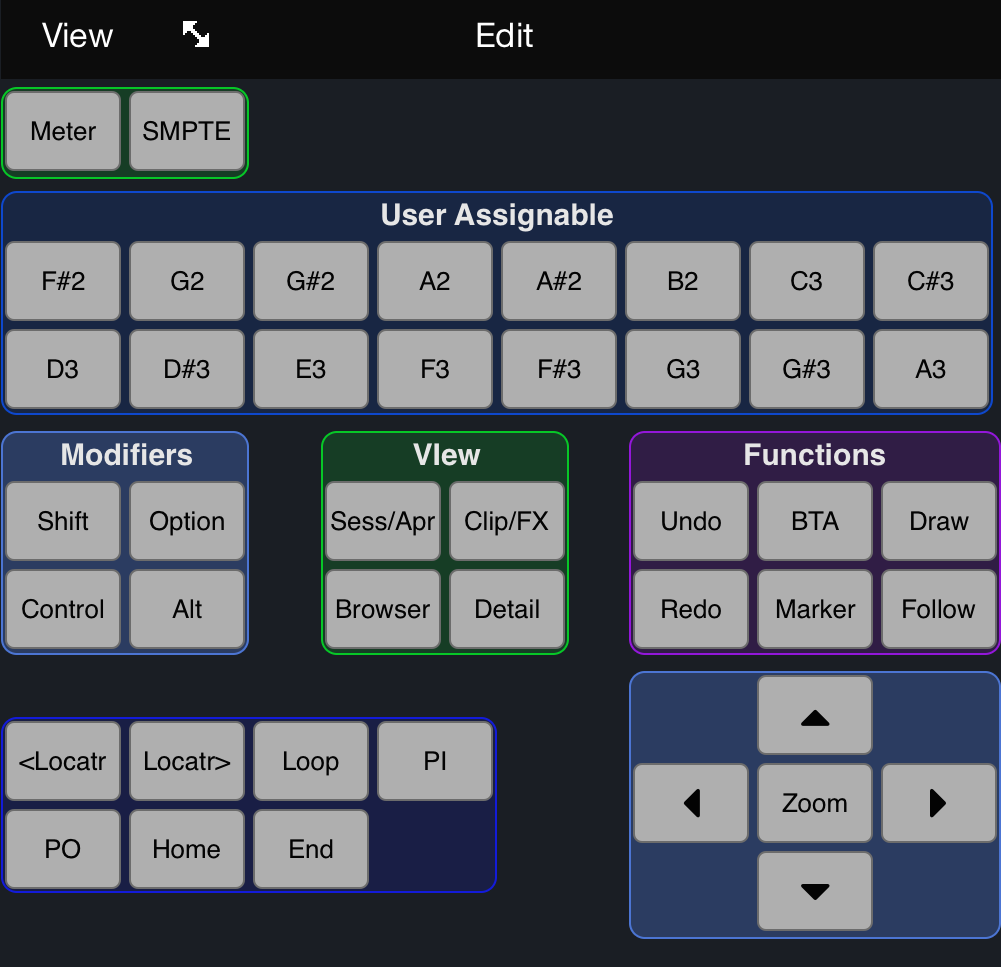
Live Edit Window
Here is a listing of the controls and functions of the Edit Window.
- Meter:
- SMPTE: Touch here to change the time display mode.
User Assignable
- F#2-A3: This are user assignable function keys that can be mapped by toggling the MIDI Map Mode Switch inside Ableton Live.
Modifiers
- Shift: Touch and hold to use the Shift modifier.
- Option: Touch and hold to use the Option modifier.
- Control: Touch and hold to use the Control modifier.
- Alt: Touch and hold to use the Alt modifier.
View
- Sess/Apr: Touch here to switch between Session view and Arrangement view.
- Clip/FX: Touch here to toggle the Clip/FX window on/off.
- Browser: Touch here to toggle the Browser window on/off.
- Detail: Touch here to toggle the Detail window on/off.
Functions
- Undo: Touch here to undo the last action.
- Redo: Touch here to redo the last action.
- BTA: Touch here to have the playhead go back to arrangement.
- Draw: Touch here to toggle the Draw function on/off.
- Marker: Touch here to play a marker at the current playhead position.
- Follow: Touch here to toggle the follow function for the playhead on/off.
Transport Functions
- Left Locator: Touch here to move the playhead to the left locator.
- Right Locator: Touch here to move the playhead to the right locator.
- Loop: Touch here to toggle loop mode on/off.
- PI: Touch here to toggle Punch In mode on/off.
- PO: Touch here to toggle Punch Out mode on/off.
- Home: Touch here to move the playhead to the start of the session on the timeline.
- End: Touch here to move the playhead end of the session on the timeline.
Navigating Session View
With Live in Session view, Use the touch wheel or arrow keys in the Edit Window to navigate and select clips to play. Scrolling with the touch wheel scrolls up and down. Tap the "Srub" button to play all scenes in the selected row. Tap the "Zoom" key to start playing the selected clip.
Back to top
MIO Console
MIO Console Channel Strip
Here is a listing of the controls and functions of the channel strip going from top to bottom.
- Name: Displays the track name for the selected channel. Touch this area to select that channel.
- Rotary Encoder: Touch the rotary and drag clockwise to increase the value and counter-clockwise to decrease.
- Solo(S): Touch the solo button to solo the selected channel. This will mute all other channels. Touch the solo button again to unsolo the channel.
- Mute(M): Touch the mute button to mute the selected channel. Touch it again to unmute the channel.
- Record(R): Touch here to Record Arm the selected Channel. Touch again to Record Safe the Channel.
- Fader: Touch the fader and drag it up or down to adjust the signal level of the channel. With multi-touch devices, multiple faders can be adjusted at once just like on a real hardware control surface.
- Level Meter: Each channel strip contains a level meter display that displays the signal level of the channel’s audio.
MIO Console Side Bar
Here is a listing of the controls and functions of the Side Bar going from top to bottom.
- Trim: Touch here to have the Rotary Encoders control the Trim level.
- Pan: Touch here to have the Rotary Encoders control stereo panning position.
- Sends: Touch here to have the Rotary Encoders control Aux Send levels.
- Master: Touch here to open the Master Fader Pop-up.
MIO Console Transport Bar
Here is a listing of the controls and functions of the transport bar going from left ot right.
- Settings: Touch here to open the Settings pop up window to change daw modes and preferences.
- Bank Window: Touch here to open the Banking Pop-Up Window.
- Counter: This displays the current time in the session.
- Wheel/Big Counter: Touch here to open the Wheel and Big Counter Window.
- Rewind: Touch here to move the playhead backwards in time.
- Fast Forward: Touch here to move the playhead forward in time.
- Stop: Touch here to stop the playhead.
- Play: Touch here to start the playhead.
- Record: Touch here to Record.
- Utilities Pop-up Window: Touch here to open the utilities Pop-up Window for quick access to the V-Window.
Back to top
Studio One
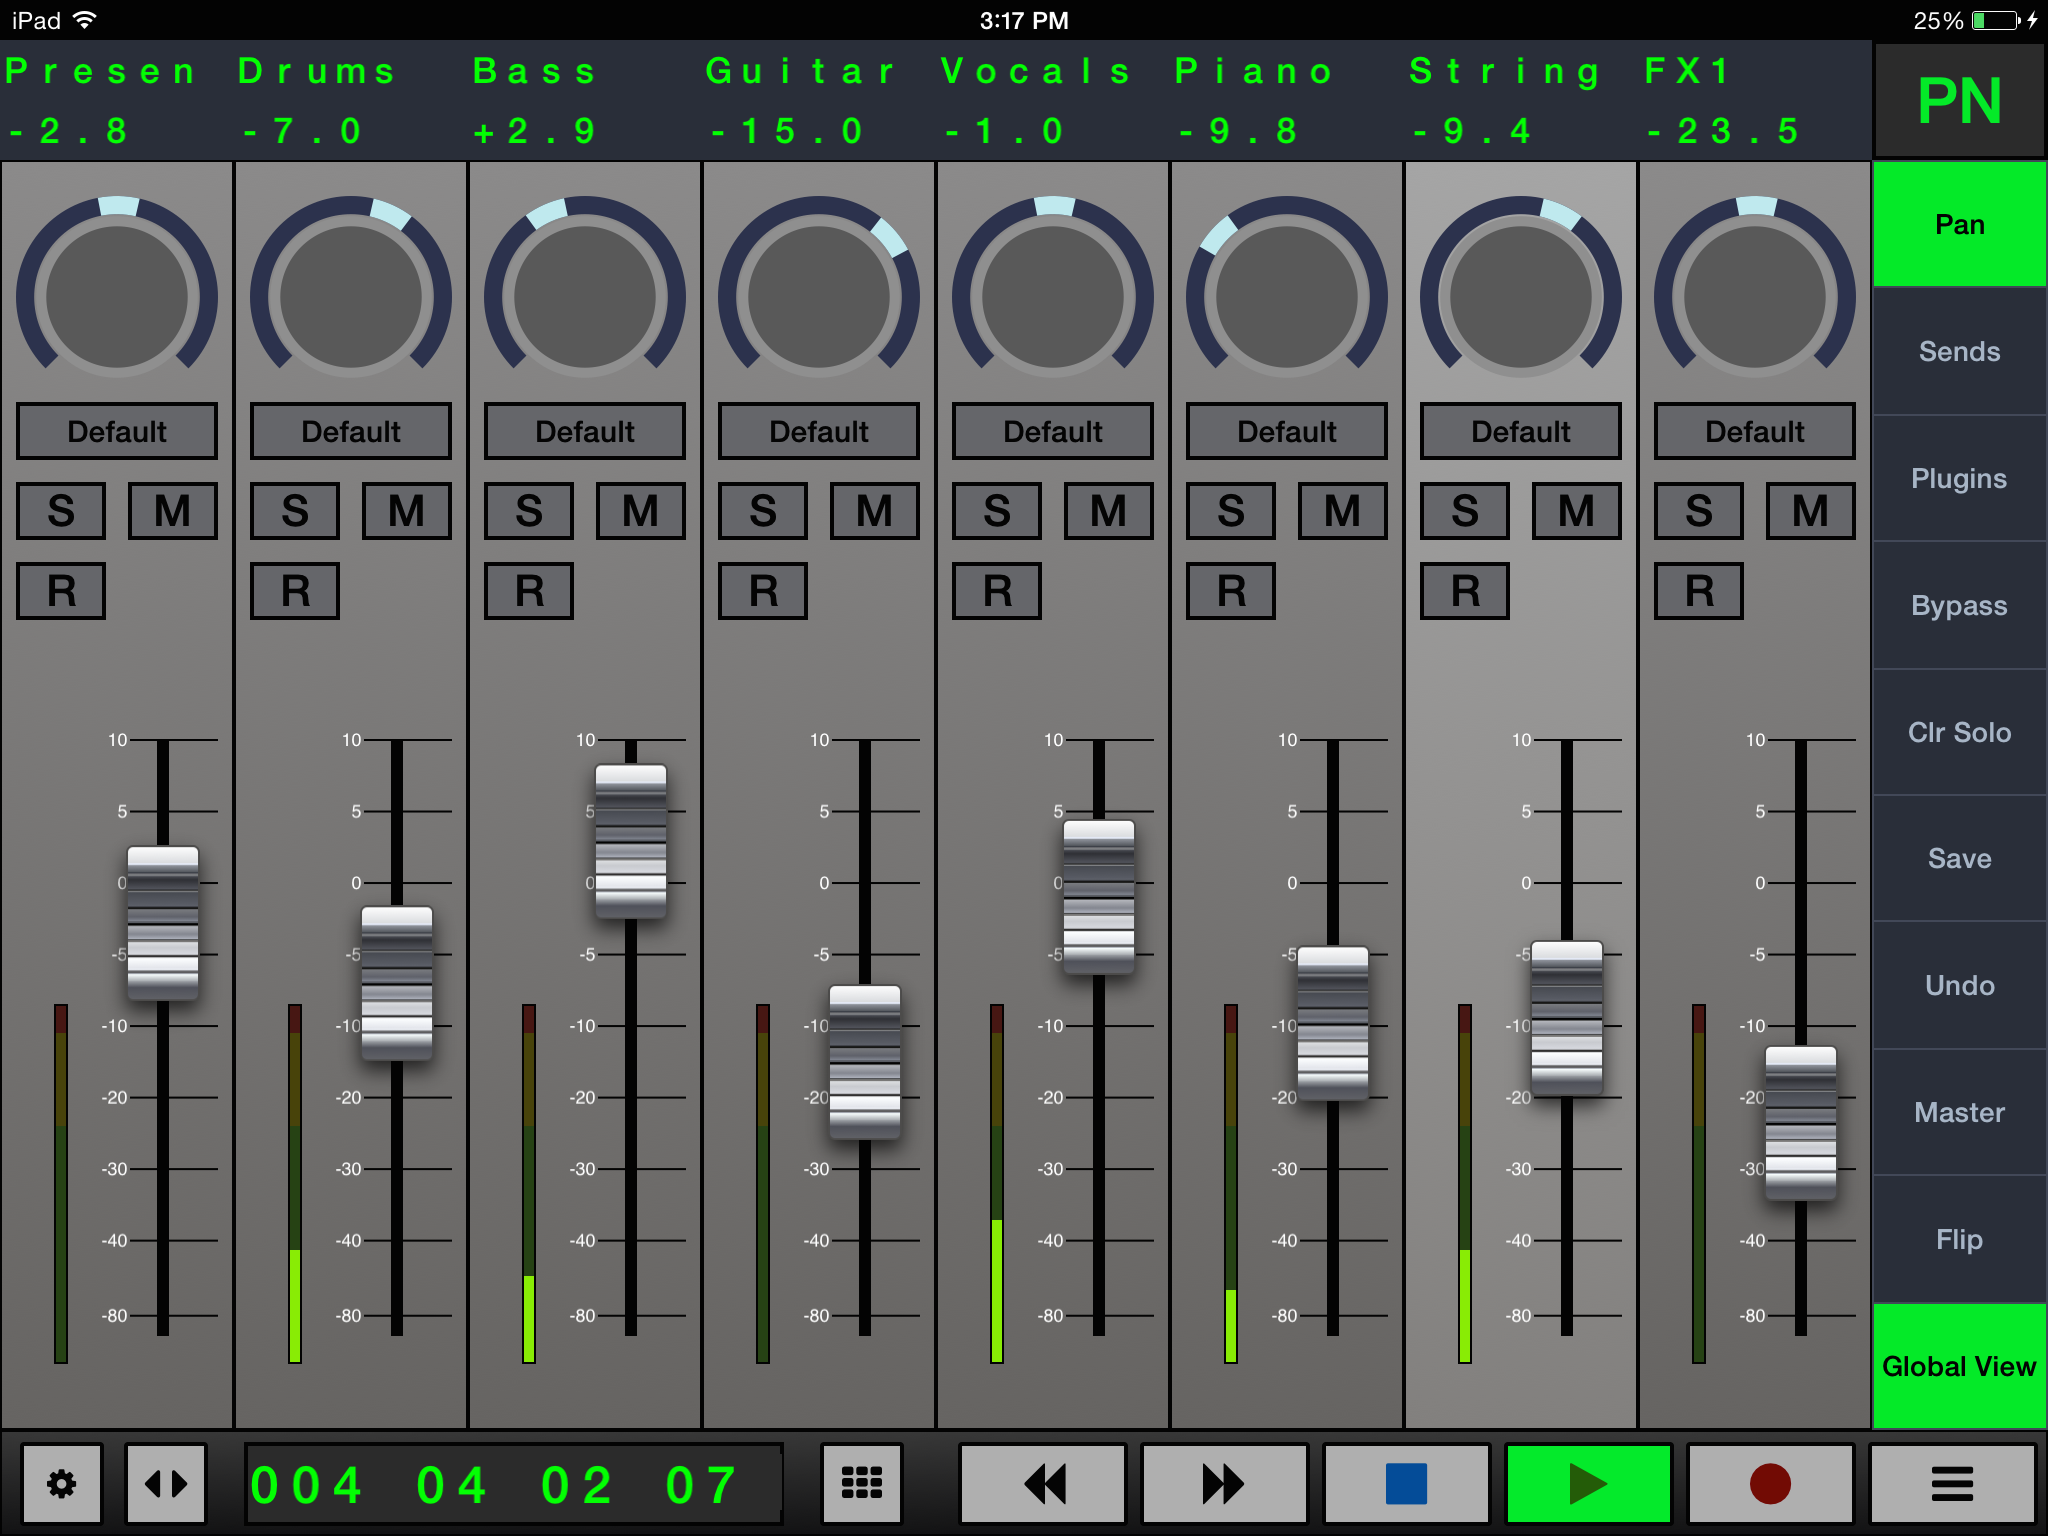
Studio One Channel Strip
Here is a listing of the controls and functions of the channel strip going from top to bottom.
- Name: Displays the track name for the selected channel. Touch this area to select that channel.
- Rotary Encoder: Touch the rotary and drag clockwise to increase the value and counter-clockwise to decrease. Can be used for Pan values or Aux Send levels.
- Default: Touch here to reset the rotary encoder to the default position.
- Solo(S): Touch the solo button to solo the selected channel. This will mute all other channels. Touch the solo button again to unsolo the channel.
- Mute(M): Touch the mute button to mute the selected channel. Touch it again to unmute the channel.
- Record(R): Touch here to Record Arm the selected Channel. Touch again to Record Safe the Channel.
- Fader: Touch the fader and drag it up or down to adjust the signal level of the channel. With multi-touch devices, multiple faders can be adjusted at once just like on a real hardware control surface.
- Level Meter: Each channel strip contains a level meter display that displays the signal level of the channel’s audio.
Studio One Side Bar
Here is a listing of the controls and functions of the Side Bar going from top to bottom.
- Pan: Touch here to switch the rotary encoders to control pan position.
- Sends: Touch here to switch the rotary encoders to control send levels.
- Plugins: Touch here to switch the rotary encoders to control plug-in parameters.
- Bypass: Touch here to switch the rotary encoders to control the FX Bypass.
- Clear Solo: Touch here to clear solo mode from all tracks.
- Save: Touch here to save the session at its current state.
- Undo: Touch here to Undo the last action done in the session.
- Master: Touch here to open the Master Fader Pop-up.
- Flip: Touch here to flip controls between faders and rotary encoders.
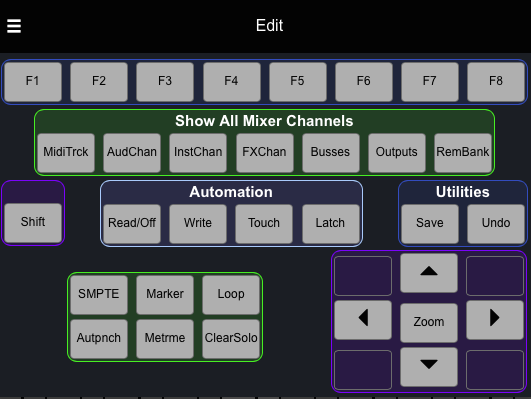
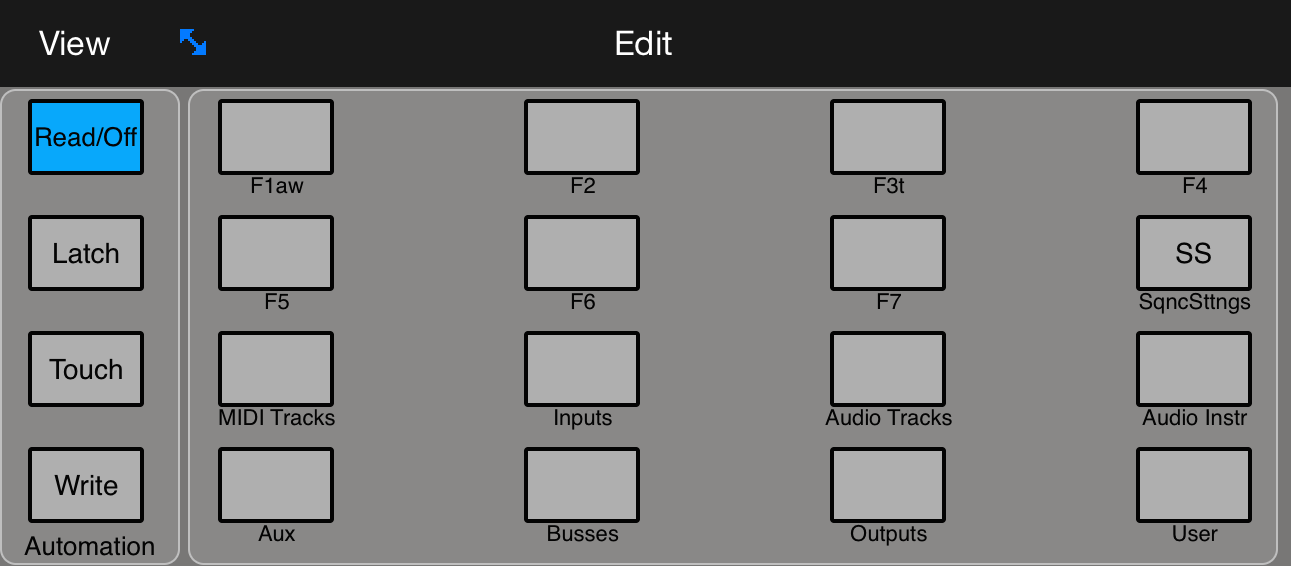
Studio One Edit Window
Here is a list of functions for the buttons in the Edit Window.
- F1: Touch here to show inputs.
- F2: Touch here to Show the track
- F3: Toggles On/Off the mix console.
- F4: Opens the channel.
- F5: Touch here to Add Inserts.
- F6: Touch here to Add Sends
- F7: Touch here to show the channel editor.
- F8: Touch here to toggle the floating window.
- Show All Mixer Channels
- MidiTrack: Touch here to display only the MIDI tracks in the channel mixer.
- Audio Channel: Touch here to display only the Audio tracks in the channel mixer.
- Instrument Channel: Touch here to display only the instrument tracks in the channel mixer.
- FX Channel: Touch here to display only the FX Channels in the channel mixer.
- Busses: Touch here to display only the busses in the channel mixer.
- Outputs: Touch here to display only the Outputs in the channel mixer.
- Remote Bank: Touch here to display the remote bank in the channel mixer.
- Utilities
- Save: Touch here to Save the current state of the session.
- Undo: Touch here to Undo the last action in the session.
- Shift: Touch here to enable the 'Shift' modifier.
- Automation
- Read/Off: Touch here to toggle Read/Off automation on the currently selected track.
- Write: Touch here to enable Write Automation on the currently selected track.
- Touch: Touch here to enable Touch Automation on the currently selected track.
- Latch: Touch here to enable Latch Automation on the currently selected track.
- SMPTE: Touch here to cycle through the different time modes for the Counter.
- Marker: Touch here to enable Marker Mode for the transport.
- Record: When Marker mode is enabled, touch the Record button to insert a marker at the current position on the timeline.
- Rewind: When Marker mode is enabled, touch the Rewind button to jump to the previous marker on the timeline.
- Fast Forward: When Marker mode is enabled, touch the Fast Forward button to jump to the next marker on the timeline.
- LOOP: Touch here to toggle Loop mode On/Off.
- Autopunch: Touch here to toggle Auto Punch On/Off.
- Metronome: Touch here to toggle the Metronome On/Off.
- Clear Solo: Touch here to clear all tracks in solo mode.
Back to top
Audition
Audition has a short fader mode in addition to the standard mode for the main V-Console screen. To enable Adobe Short Fader Mode, go into the Preferences page in the V-Console Settings.
Adobe Short Faders mode enabled.

Adobe Short Faders mode disabled.
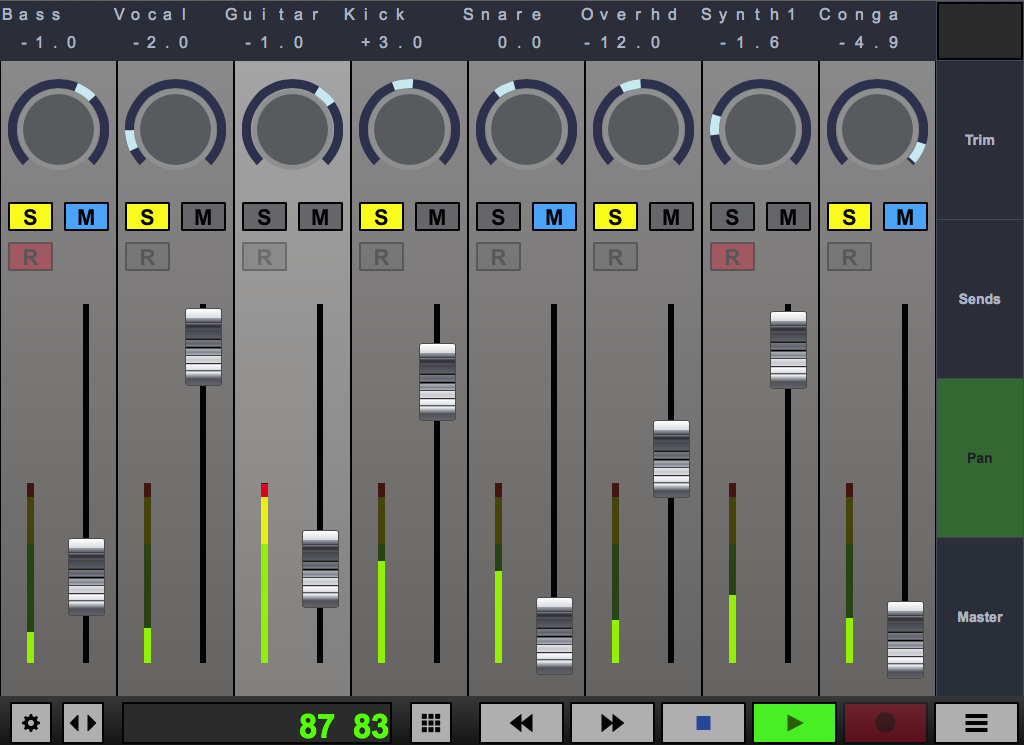
Audition Channel Strip
- Name: Displays the track name for the selected channel in Track Mode. Displays the current pan position value in Pan mode. In EQ Mode it displays the current EQ Paramater and value. Touch this area to select that channel.
- Rotary Encoder: Touch the rotary and drag clockwise to increase the value and counter-clockwise to decrease for stereo panning position. In EQ Mode it adjusts the selected EQ parameter for the channel.
- EQ Param: When in EQ Mode, touch here to cycle through the EQ Parameters on the channel to adjust with the knob. Not available when in Adobe Short Faders Mode.
- Mute(M): Touch the mute button to mute the selected channel. Touch it again to unmute the channel.
- Solo(S): Touch the solo button to solo the selected channel. This will mute all other channels. Touch the solo button again to unsolo the channel.
- Record(R): Touch here to Record Arm the selected Channel. Touch again to Record Safe the Channel.
- Fader: Touch the fader and drag it up or down to adjust the signal level of the channel. With multi-touch devices, multiple faders can be adjusted at once just like on a real hardware control surface.
- Level Meter: Each channel strip contains a level meter display that displays the signal level of the channel’s audio.
Audition Side Bar
Here is a listing of the controls and functions of the Side Bar going from top to bottom.
- Track: Touch here to have the track names be displayed in the channel strips.
- Pan: Touch here to have the current pan position be displayed in the channel strip.
- EQ: Touch here to enable EQ Mode and have the knobs control EQ parameters.
- Master: Touch here to open the Master Fader Pop-up.
- Undo: Touch here to Undo the last action done in the session.
- Redo: Touch here to Redo the last action that was undone in the session.
- Up Arrow: Touch here to cycle to the previous track. If zoom mode is enabled, it zooms out vertically in the editor window.
- Down Arrow: Touch here to cycle to the next track. If zoom mode is enabled, it zooms in vertical in the editor window.
- Zoom: Touch here to toggle the Zoom function On/Off to work with the arrow keys.
- Left Arrow: Touch here to nudge the playhead back. If zoom mode is enabled, it zooms out horizontally in the editor window.
- Right Arrow: Touch here to nudge the playhead forward. If zoom mode is enabled, it zooms in horizontally in the editor window.
Audition Transport Bar
- Settings: Touch here to open the Settings pop up window to change daw modes and preferences.
- Bank Window: Touch here to open the Banking Pop-Up Window.
- Counter: This displays the current time in the session.
- Loop/Big Counter: Touch here to open the Loop and Big Counter Window.
- Rewind: Touch here to move the playhead backwards in time.
- Fast Forward: Touch here to move the playhead forward in time.
- Stop: Touch here to stop the playhead.
- Play: Touch here to start the playhead.
- Record: Touch here to Record.
- V-Window/Edit Pop-up: Touch here to access the V-Window/Edit Pop-up window. Tap view to switch between V-Window and Edit Mode. (Edit Mode not available in Adobe Short Fader mode)
Audition Edit Window
When Adobe Short Fader mode is disabled, the command buttons can be accessed through the Edit Pop-up window on the bottom right corner.
- Automation
- Read/Off: Touch here to Toggle Read/Off Automation.
- Latch: Touch here to switch to Latch Automation mode.
- Touch: Touch here to switch to Touch Automation mode.
- Write: Touch here to switch to Write Automation mode.
- Command Buttons
- F1-User: These are 16 user assignable buttons that can be customized in the Button Assignment section in the Premiere Control Surface setup.
- Wheel: The wheel can be used to as a scrub wheel or shuttle wheel to navigate.
Premiere Pro
Premiere Pro has a short fader mode in addition to the standard mode for the main V-Console screen. To enable Adobe Short Fader Mode, go into the Preferences page in the V-Console Settings.
Adobe Short Fader mode Enabled.

Adobe Short Fader mode disabled.
NOTE: Some commands need to be manually mapped in Premiere Pro CC. To fix this go into the Button Assignments window in the Control Surface setup and assign the following:
- Button: Flip - Command: Go To Previous Edit Point
- Button: SMPTE/Beats - Command: Go To Next Edit Point
- Button: Cycle - Command: cmd.audiomixer.loop
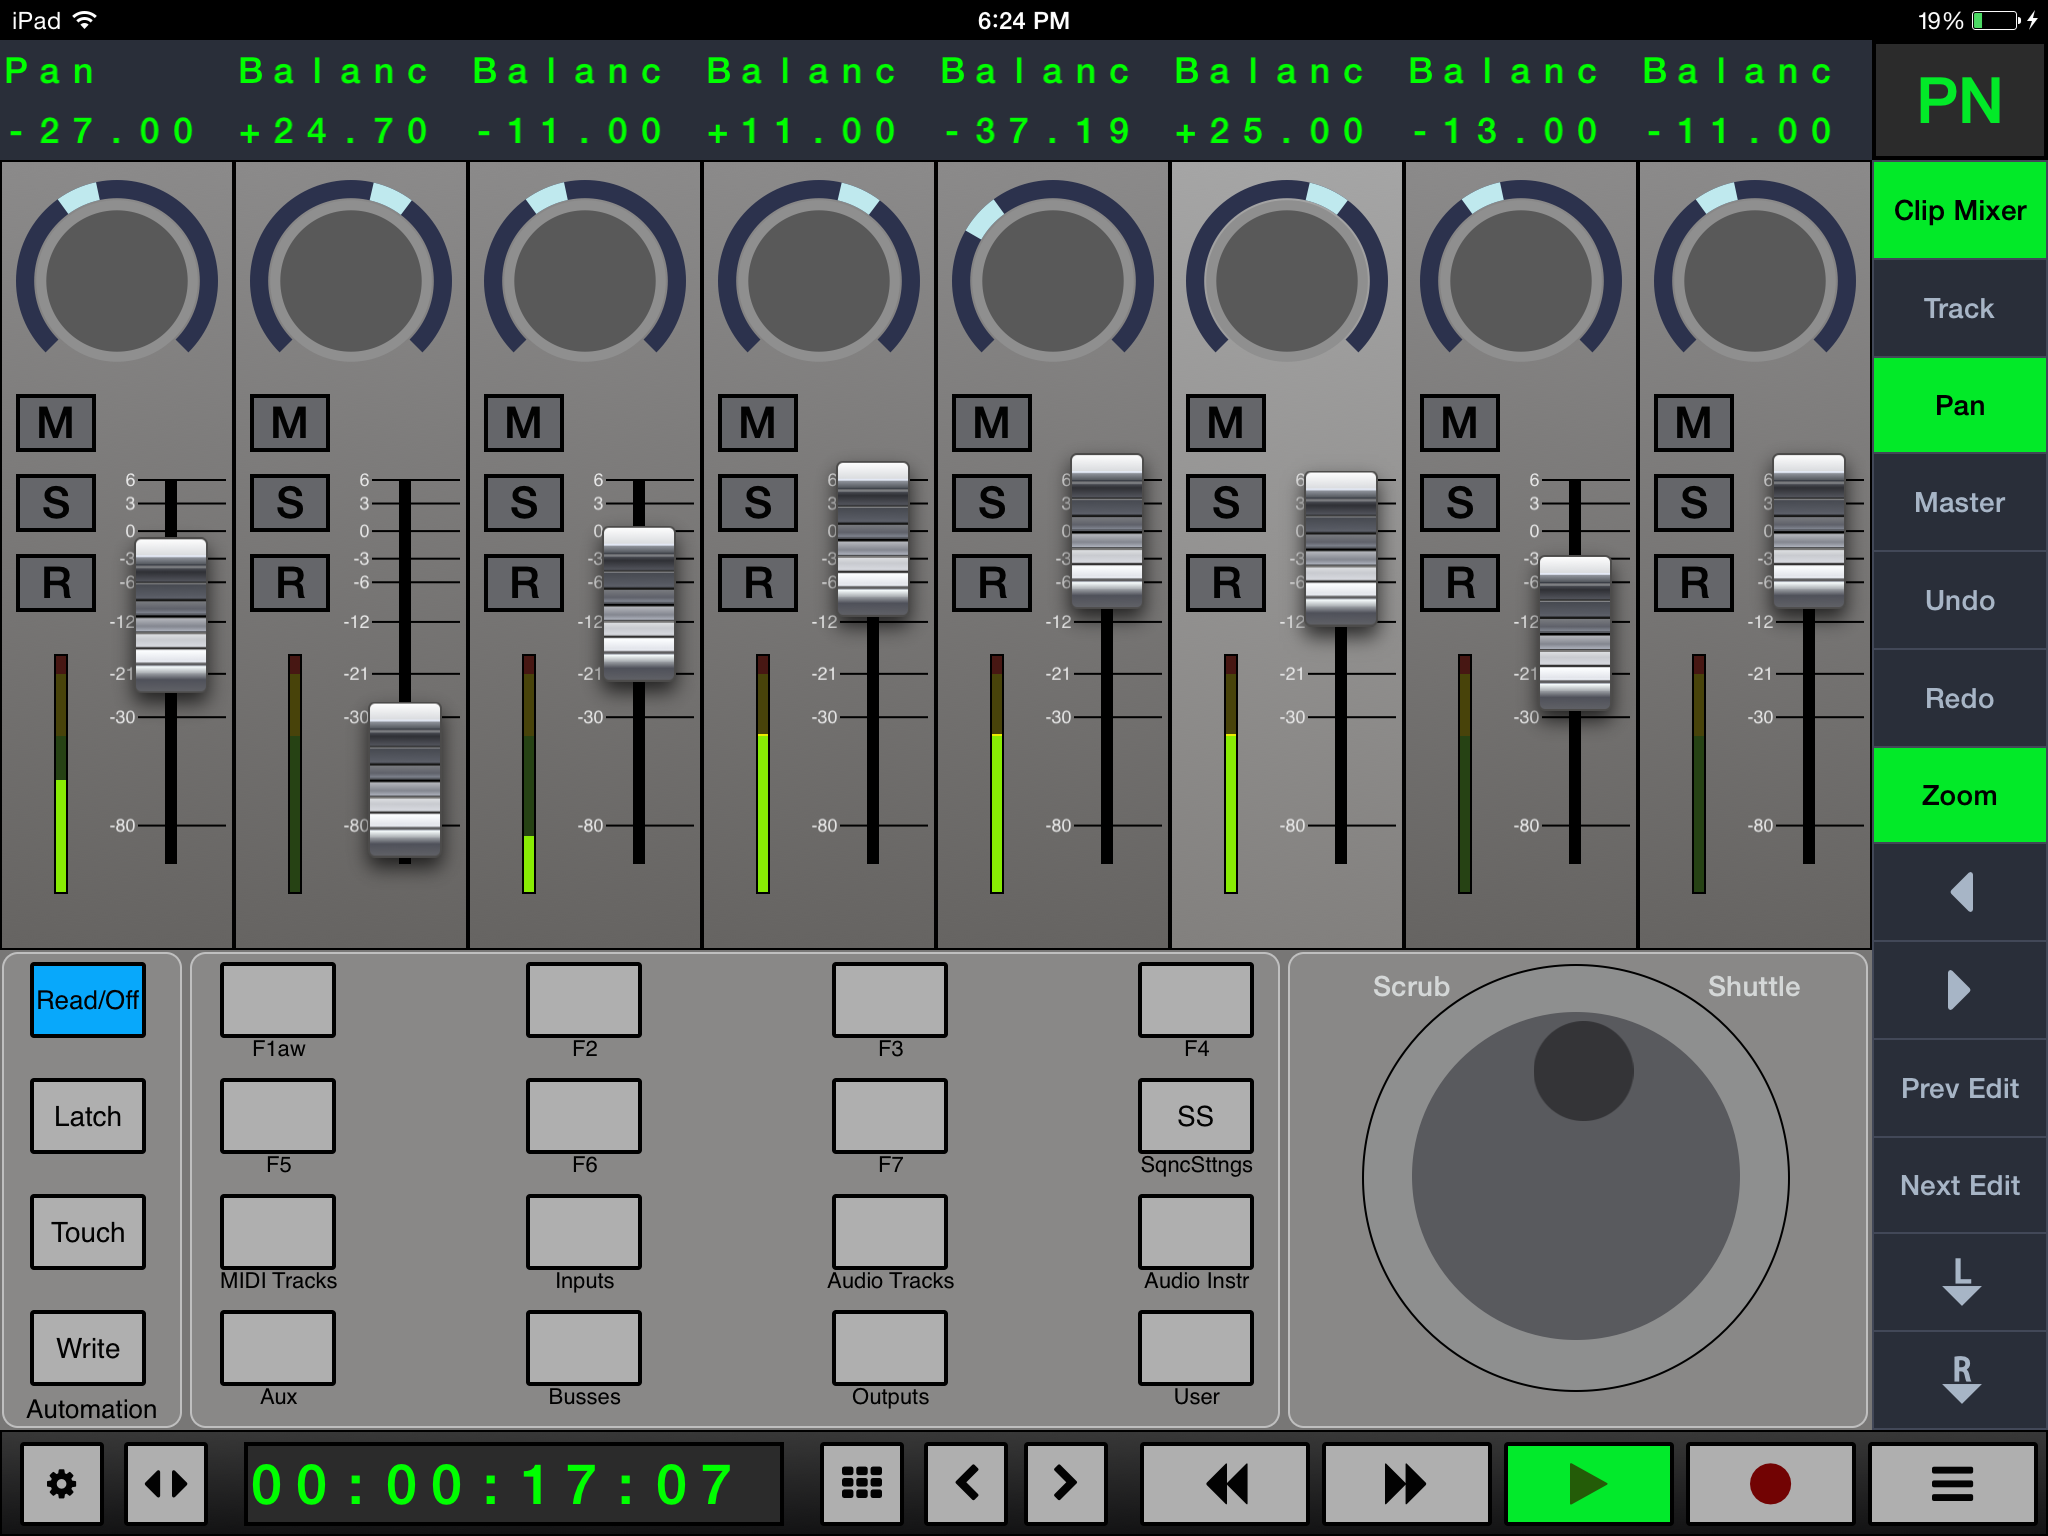
Premiere Pro Channel Strip
Here is a listing of the controls and functions of the channel strip going from top to bottom.
- Name: Displays the track name for the selected channel in Track Mode. Displays the current pan position value in Pan mode. Touch this area to select that channel.
- Rotary Encoder: Touch the rotary and drag clockwise to increase the value and counter-clockwise to decrease for stereo panning position.
- Mute(M): Touch the mute button to mute the selected channel. Touch it again to unmute the channel.
- Solo(S): Touch the solo button to solo the selected channel. This will mute all other channels. Touch the solo button again to unsolo the channel.
- Record(R): Touch here to Record Arm the selected Channel. Touch again to Record Safe the Channel.
- Fader: Touch the fader and drag it up or down to adjust the signal level of the channel. With multi-touch devices, multiple faders can be adjusted at once just like on a real hardware control surface.
- Level Meter: Each channel strip contains a level meter display that displays the signal level of the channel’s audio.
Premiere Pro Side Bar
Here is a listing of the controls and functions of the Side Bar going from top to bottom.
- Clip Mixer: Touch here to toggle between the Audio Track Mixer and Clip Mixer.
- Track: Touch here to have the track names be displayed in the channel strips.
- Pan: Touch here to have the current pan position be displayed in the channel strip.
- Master: Touch here to open the Master Fader Pop-up.
- Undo: Touch here to Undo the last action done in the session.
- Redo: Touch here to Redo the last action that was undone in the session.
- Zoom: Touch here to toggle the Zoom function On/Off to work with the arrow keys.
- Left/Right: When the Zoom key is enabled, use the left and right buttons to zoom in and out in the timeline.
- Prev Edit: Touch here to go to the Previous edit point on the timeline.
- Next Edit: Touch here to go to the next edit point on the timeline.
- Mark In: Touch here to set a Mark In Location at the playhead on the timeline.
- Mark Out: Touch here to set a Mark Out Location at the playhead on the timeline.
Premiere Pro Transport Bar
Here is a listing of the controls and functions of the transport bar going from left ot right.
- Settings: Touch here to open the Settings pop up window to change daw modes and preferences.
- Bank Window: Touch here to open the Banking Pop-Up Window.
- Counter: This displays the current time in the session.
- Loop/Big Counter: Touch here to open the Loop and Big Counter Window.
- Go To Left: Touch here to go to the Mark in Location on the timeline.
- Go To Right: Touch here to go to the Mark out Location on the timeline.
- Rewind: Touch here to move the playhead backwards in time. Pressing again will increase the speed.
- Fast Forward: Touch here to move the playhead forward in time. Pressing again will increase the speed.
- Play: Touch here to start the playhead.
- Record: Touch here to Record.
- V-Window/Edit Pop-up: Touch here to access the V-Window/Edit Pop-up window. Tap view to switch between V-Window and Edit Mode. (Edit Mode not available in Adobe Short Fader mode)
Premiere Pro Command Buttons
When Adobe Short Fader mode is disabled, the command buttons can be accessed through the Edit Pop-up window on the bottom right corner.
- Automation
- Read/Off: Touch here to Toggle Read/Off Automation.
- Latch: Touch here to switch to Latch Automation mode.
- Touch: Touch here to switch to Touch Automation mode.
- Write: Touch here to switch to Write Automation mode.
- Command Buttons
- F1-User: These are 16 user assignable buttons that can be customized in the Button Assignment section in the Premiere Control Surface setup.
- Wheel: The wheel can be used to as a scrub wheel or shuttle wheel to navigate.
Back to top
Reason
Reason Channel Strip
Here is a listing of the controls and functions of the channel strip going from top to bottom.
- Name: Displays the track name for the selected channel. Touch this area to select that channel.
- Rotary Encoder: Touch the rotary and drag clockwise to increase the value and counter-clockwise to decrease.
- Solo(S): Touch the solo button to solo the selected channel. This will mute all other channels. Touch the solo button again to unsolo the channel.
- Mute(M): Touch the mute button to mute the selected channel. Touch it again to unmute the channel.
- Record(R): Touch here to Record Arm the selected Channel. Touch again to Record Safe the Channel.
- Fader: Touch the fader and drag it up or down to adjust the signal level of the channel. With multi-touch devices, multiple faders can be adjusted at once just like on a real hardware control surface.
- Level Meter: Each channel strip contains a level meter display that displays the signal level of the channel’s audio.
Reason Side Bar
- 1: Touch here to switch the encoders to “auxiliary send 1” mode. In this mode, the rotary encoders are used to adjust levels for Auxiliary send 1 in Reason’s built-in mixer.
- 2: Touch here to switch the encoders to “auxiliary send 2” mode. In this mode, the rotary encoders are used to adjust levels for auxiliary send 2 in Reason’s built-in mixer.
- Pan: Touch here to switch the encoders to pan mode. In this mode, the rotary encoders are used to adjust left-right panning for their corresponding channel.
- Aux Return: Touch here to switch the encoders to “aux return” mode. In this mode, the rotary encoders control the levels of the auxiliary returns in Reason’s built-in mixer.
- Treble: Touch this button to switch the encoders to “treble” mode. In this mode, the rotary encoders are used to boost/cut the treble tone control of their corresponding channel, on Reason’s built-in mixer.
- Bass: Touch this button to switch the encoders to “bass” mode. In this mode, the rotary encoders are used to boost/cut the bass tone control of their corresponding channel, on Reason’s built-in mixer.
- Flip: Touch here to flip the functionality of the rotary encoders to the channel faders. When flip mode is engaged, any parameters that are normally controlled by the rotary encoders are now controlled by the channel faders.
- Normal: Touch the normal button to undo the flip function and return the faders and rotary encoders to normal operation.
Reason Transport Bar
Here is a listing of the controls and functions of the transport bar going from left ot right.
- Settings: Touch here to open the Settings pop up window to change daw modes and preferences.
- Bank Window: Touch here to open the Banking Pop-Up Window.
- Counter: This displays the current time in the session.
- Wheel/Big Counter: Touch here to open the Wheel and Big Counter Window.
- Rewind: Touch here to move the playhead backwards in time.
- Fast Forward: Touch here to move the playhead forward in time.
- Stop: Touch here to stop the playhead.
- Play: Touch here to start the playhead.
- Record: Touch here to Record.
- Utilities Pop-up Window: Touch here to open the utilities Pop-up Window for quick access to the V-Window/Edit Window.
Reason Edit Window
Here is a listing of the controls and functions of the Edit Window for each section.

- Pattern
- 1-8: Touch the corresponding buttons to switch between different patterns in a specified device.
- Bank
- A-D: Touch the corresponding buttons to switch between different Banks in a specified device.
- Run: Touch here to run a specified device.
- Previous Patch: Touch here to cycle to the previous patch in a device.
- Next Patch: Touch here to cycle to the next patch in a device.
- Device Parameters: Touch here to view the device parameters.
- Reset Automation: Touch here to reset automation for the currently selected track.
- Undo: Touch here to Undo the last action.
- Redo: Touch here to Redo the last action Undone.
- -Mute/Solo-
- All Mute Off: Touch here to cancel any Mutes on all tracks.
- All Solo Off: Touch here to cancel any Solos on all tracks.
- Mute Track: Touch here to Mute the currently selected track.
- Solo Track: Touch here to Solo the currently selected track.
- To Left Locator: Touch here to move the playhead to the Left Locator in the timeline.
- To Right Locator: Touch here to move the playhead to the Right Locator in the timeline.
- Song Position: Touch here to move the playhead to the current position in the timeline.
- Left Position: Touch here to move to the Left Position.
- Right Position: Touch here to move to Right
- Loop: Touch here to toggle Loop playback On/Off.
- Click: Touch here to toggle the click On/Off.
Back to top
Tracktion
Tracktion Channel Strip
Here is a listing of the controls and functions of the channel strip going from top to bottom.
- Name: Displays the track name for the selected channel. Touch this area to select that channel.
- Rotary Encoder: Touch the rotary and drag clockwise to increase the value and counter-clockwise to decrease.
- Solo(S): Touch the solo button to solo the selected channel. This will mute all other channels. Touch the solo button again to unsolo the channel.
- Mute(M): Touch the mute button to mute the selected channel. Touch it again to unmute the channel.
- Record(R): Touch here to Record Arm the selected Channel. Touch again to Record Safe the Channel.
- Fader: Touch the fader and drag it up or down to adjust the signal level of the channel. With multi-touch devices, multiple faders can be adjusted at once just like on a real hardware control surface.
- Level Meter: Each channel strip contains a level meter display that displays the signal level of the channel’s audio.
Tracktion Side Bar
Here is a listing of the controls and functions of the channel strip going from top to bottom.
Tracktion Transport Bar
Here is a listing of the controls and functions of the transport bar going from left ot right.
- Settings: Touch here to open the Settings pop up window to change daw modes and preferences.
- Bank Window: Touch here to open the Banking Pop-Up Window.
- Counter: This displays the current time in the session.
- Wheel/Big Counter: Touch here to open the Wheel and Big Counter Window.
- Rewind: Touch here to move the playhead backwards in time.
- Fast Forward: Touch here to move the playhead forward in time.
- Stop: Touch here to stop the playhead.
- Play: Touch here to start the playhead.
- Record: Touch here to Record.
- Utilities Pop-up Window: Touch here to open the utilities Pop-up Window for quick access to the V-Window/Edit Window.
Tracktion Edit Window
Here is a listing of the controls and functions of the Edit Window for each section.
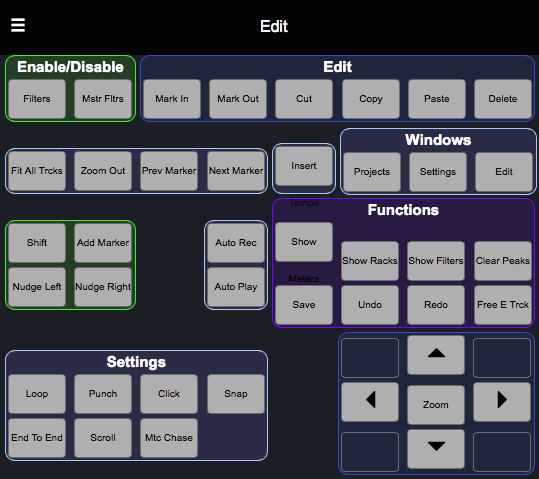
- Enable/Disable
- Filters: Touch here to toggle the filters view.
- Master Filters: Touch here to toggle the Master Filters.
- Edit
- Mark In: Touch here to set a Mark in point on the timeline.
- Mark Out: Touch here to set a Mark Out point on the timeline.
- Cut: Touch here to use the Cut command.
- Copy: Touch here to use the Copy command.
- Paste: Touch here to use the Paste command.
- Delete: Touch here to use the Delete command.
- Fit All Tracks: Touch here to fit all the tracks into the arrangement.
- Zoom Out: Touch here to Zoom
- Previous Marker: Touch here to move the playhead to the previous marker in the timeline.
- Next Marker: Touch here to move the playhead to the next marker in the timeline.
- Insert Tempo Change: Touch here to insert a tempo change point in the timeline.
- Windows
- Projects: Touch here to switch to the Projects Window.
- Settings: Touch here to switch to the Settings Window.
- Edit: Touch here to switch to the Edit Window.
- Shift: Touch here to activate the Shift modifier.
- Add Marker: Touch here to add a marker on the timeline.
- Nudge Left: Touch here to nudge a selected clip to the left.
- Nudge Right: Touch here to nudge a selected clip to the right.
- Auto Rec: Touch here to toggle On/Off Auto Record.
- Auto Play: Touch here to toggle On/Off Auto Play.
- Show Meters: Touch here to open the meters window
- Show Racks: Touch here to open the racks window.
- Show Filters: Touch here to open the filters window.
- Clear Peaks: Touch here to clear the peaks on the meters.
- Save: Touch here to save the session at its current state.
- Undo: Touch here to undo the last action.
- Redo: Touch here to redo the last action that was undone.
- Freeze Track: Touch here to freeze the selected track.
- Settings Enable/Disable
- Loop: Touch here toggle Loop On/Off.
- Punch: Touch here to toggle the Punch On/Off.
- Click: Touch here to toggle the Click On/Off.
- Snap: Touch here to toggle Snap On/Off.
- End to End: Touch here to toggle End to End On/Off.
- Scroll: Touch here to toggle Scroll On/Off.
- Mtc Chase: Touch here to toggle Mtc Chase On/Off.
- Back to top
Sonar
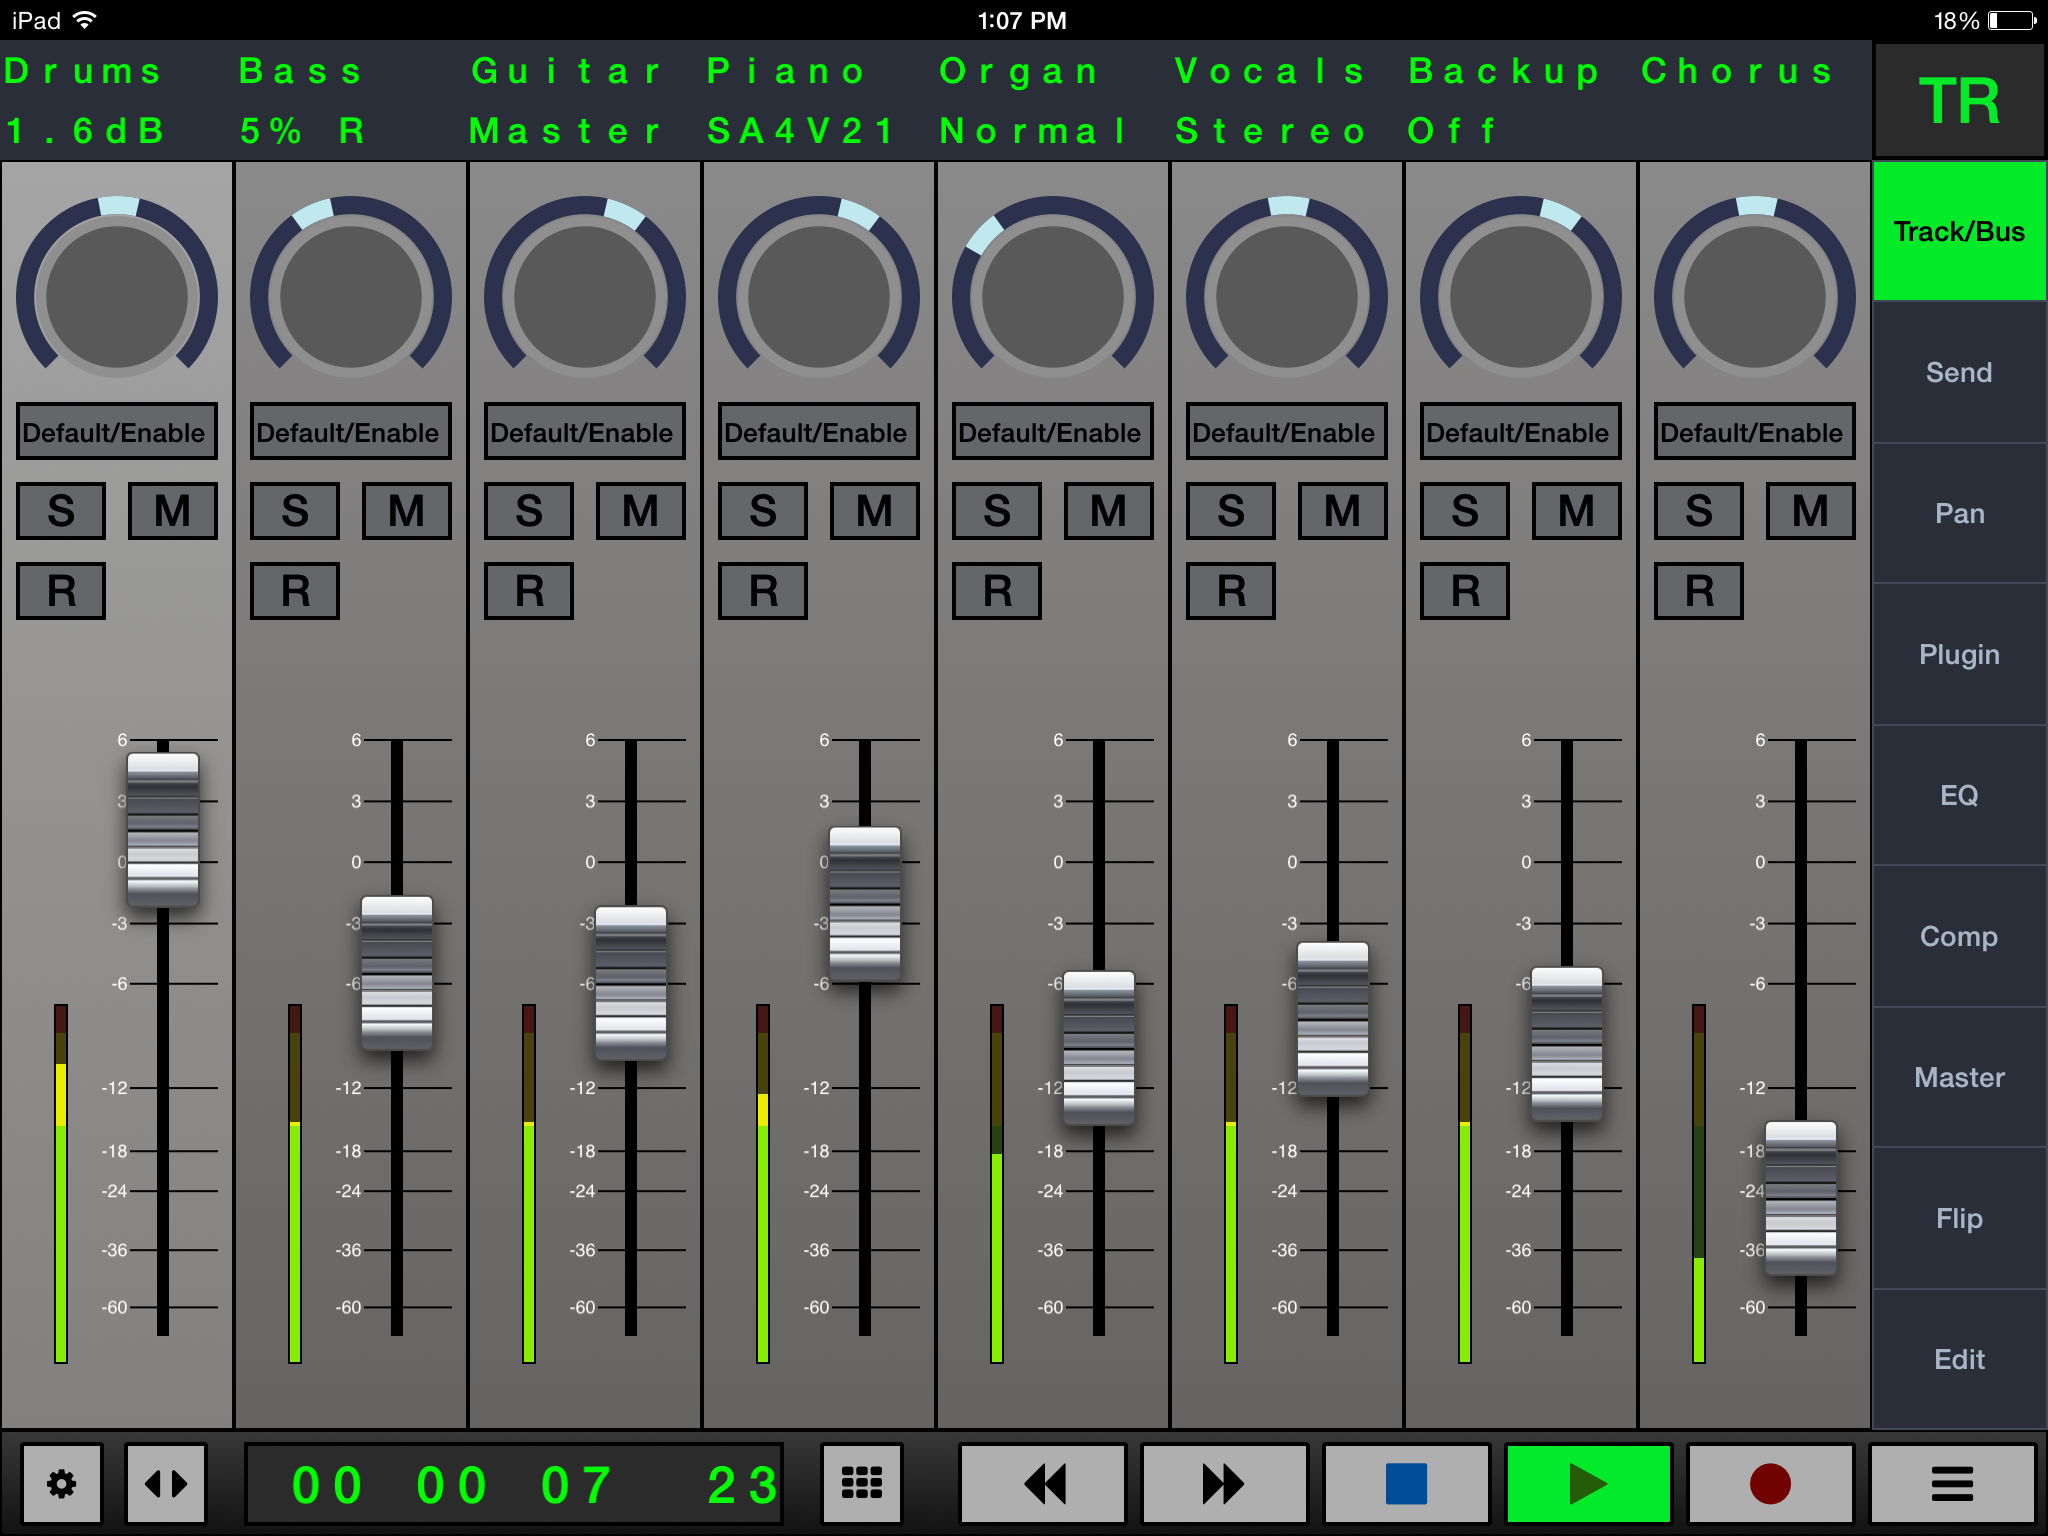
Sonar Channel Strip
Here is a listing of the controls and functions of the channel strip going from top to bottom.
- Name: Displays the track name for the selected channel. Touch this area to select that channel.
- Rotary Encoder: Touch the rotary and drag clockwise to increase the value and counter-clockwise to decrease.
- Default/Enable: Touch here reset the knob position to it's default state.
- Solo(S): Touch the solo button to solo the selected channel. This will mute all other channels. Touch the solo button again to unsolo the channel.
- Mute(M): Touch the mute button to mute the selected channel. Touch it again to unmute the channel.
- Record(R): Touch here to Record Arm the selected Channel. Touch again to Record Safe the Channel.
- Fader: Touch the fader and drag it up or down to adjust the signal level of the channel. With multi-touch devices, multiple faders can be adjusted at once just like on a real hardware control surface.
- Level Meter: Each channel strip contains a level meter display that displays the signal level of the channel’s audio.
Sonar Side Bar
Here is a listing of the controls and functions of the side bar commands from top to bottom.
- Track/Bus: Touch here to set the rotary encoders to control the selected track. Touch the Track/Bus button twice to enable track mode. From here users can adjust the following for the selected track using the rotary encoders:
- Volume
- Pan
- Output
- Input
- Phase Inversion
- Mono/Stereo
- Input Monitoring
- Send: Touch here to set the rotary encoders to control send levels. Touch the Send button twice to enable track mode. From here users can adjust the following for the selected track using the rotary encoders:
- Bypass On/Off
- Bus Send Level
- Bus Send Pan
- Bus Send Pre/Post Fader
All sends on the selected track will be assigned to the available rotary encoders. To access more Send parameters for a selected track, enable the Edit button on the Side Command Bar and Bank Left/Right to navigate between Sends.
- Pan: Touch here to set the rotary encoders to control stereo panning position. Touch the Pan button twice to enable track mode. From here users can adjust the pan position of the selected track as well as the pan positions for the Sends on the same track.
- Plugin: Touch here to set the rotary encoders to control plug-in parameters. Touch the Plug-in button twice to enable Track Mode. From here the plug-in parameters for the selected plug-in on the selected track will be assigned to the rotary encoders.
To cycle through other plug-ins enable Edit Mode and hold down the Modifier Key M1 while using the Channel Left/Right command.
- EQ: Touch here to set the rotary encoders to control EQ parameters for the selected track.
- Comp: Touch here to set the rotary encoders to control Compression parameters for the selected track.
- Master: Touch here to open the master fader pop-up window.
- Flip: Touch here to flip the fader and rotary encoders.
- Edit: Touch here to toggle Edit mode On/Off for the current session.
Sonar Transport
Here is a listing of the controls and functions of the transport bar going from left ot right.
- Settings: Touch here to open the Settings pop up window to change daw modes and preferences.
- Bank Window: Touch here to open the Banking Pop-Up Window.
- Counter: This displays the current time in the session.
- Wheel/Big Counter: Touch here to open the Wheel and Big Counter Window.
- Rewind: Touch here to move the playhead backwards in time.
- Fast Forward: Touch here to move the playhead forward in time.
- Stop: Touch here to stop the playhead.
- Play: Touch here to start the playhead.
- Record: Touch here to Record.
- Utilities Pop-up Window: Touch here to open the utilities Pop-up Window for quick access to the V-Window/Edit Window.
Sonar Edit Window
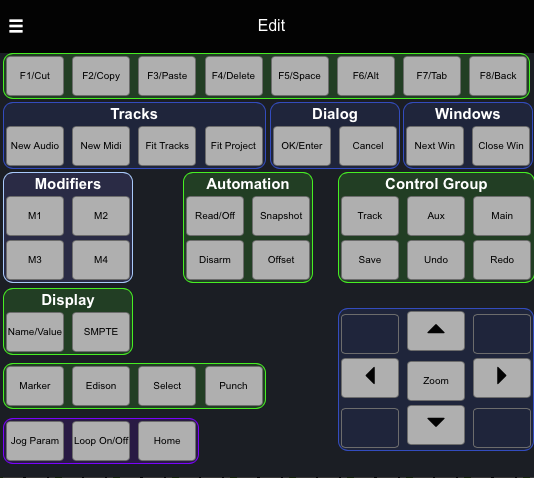
Here is a listing of the controls and functions of the Edit Window.
- F1-F8: The Function Keys (F1 through F8) are user assigned in the Mackie Control Utilities window in SONAR.
- Tracks
- New Audio: Touch here to add a new audio track to the session.
- New Midi: Touch here to add a new midi track to the session.
- Fit Tracks: Touch here to fit all tracks in the project window.
- Fit Project: Touch here to fit entire project in the project window.
- Dialog
- OK/Enter: Touch here to use the OK/Enter command for pop up windows.
- Cancel: Touch here to use the Cancel command for pop up windows.
- Windows
- Next Win: Touch here to cycle to the next window available.
- Close Win: Touch here to close the currently viewed window.
- Modifiers
- M1: Hold down to enable the Modifier key M1 to be used in conjunction with other keys and knobs.
- M2: Hold down to enable the Modifier key M2 to be used in conjunction with other keys and knobs.
- M3: Hold down to enable the Modifier key M3 to be used in conjunction with other keys and knobs.
- M4: Hold down to enable the Modifier key M4 to be used in conjunction with other keys and knobs.
- Automation
- Read/Off: Touch here to toggle Read/Off Automation on the selected track.
- Snapshot: Touch here to take a snapshot of the controls at the current time.
- Disarm: Touch here to disarm all automation controls.
- Offset: Touch here to toggle between Offset mode and Envelope mode.
- Control Group
- Track: Touch here to assign the faders in the channel strips to control tracks.
- Aux: Touch here to assign the faders in the channel strips to control busses.
- Main: Touch here to assign the faders in the channels strips to control mains.
- Save: Touch here to save the session at the current state.
- Undo: Touch here to undo the last action.
- Redo: Touch here to redo the last action undone.
- Display
- Name/Value: Touch here to switch displays between parameter name and value.
- SMPTE: Touch here to view SMPTE.
- Marker: Touch here to toggle Marker mode On/Off.
- Edison:
- Select: Touch here to toggle Select On/Off. Can be used with Modifier keys for track selection.
- Punch: Touch here to toggle Punch mode On/Off.
- Jog Param: Touch here to toggle Jog Param mode On/Off. Jog Param mode allows the Jog wheel to be used for numerical input.
- Loop On/Off: Touch here to toggle loop mode On/Off.
- Home: Touch here to jump to the beginning of the Session.
Back to top