V-Control Pro runs on a Mac or PC and connects controllers to software applications such as Pro Tools, Cubase, Logic Pro X and many others.
Features
- Control Fader Level and Stereo Panning per channel
- Control of Mute, Solo, and Track Arming per channel
- Edit Auxiliary Send Volume, including send muting and pre/post status
- Flip mode inverts functions of channel faders and rotary controls
- Select specific automation modes separately for each channel.
- Full Transport controls, jog wheel, and control of common transport related functions (loop, punch, online, etc.)
- Detailed time counter, small and large-sized versions (V-Console)
- Full editing commands panel, with large amount of shortcut controls completely customized for each specific D.A.W. platform.
- Quick access to Mark In and Mark Out points, and Marker creation and recall
- Automation write enable/disable for volume, pan, mute and send
- Multi-device use for up to 32 channels of control simultaneously.
- Assignable functions to hardware MIDI controllers for even more access
- Works seamlessly with Raven MTi/MTx to thanks to V-Control Pro’s ability to allow the use of MIDI controllers and mobile devices simultaneously.
- Use a second computer such as a laptop or notebook to control your D.A.W. through a web browser.
Back to top
Quick Start Guide
- Install and launch the V-Control Pro application on your computer as described in the 'Installing V-Control Pro' section.
- Run a media application for control
- Launch a supported media application for control such as Pro Tools, Cubase, etc.
- Setup your media application for control as described in Setting Up Applications
- Install a controller app on a device or MIDI controller as described in Using Controller Apps. For example, run V-Console on a
- Use the device browser and go to vcontrolpro.com
- Select a controller app such as V-Console
- Click the Install button.
- If using a phone or tablet, add it to the homescreen as described in Adding Controller Apps To The Home Screen
- Launch the app from the home screen
- Run a controller app on a device as described in Using Controller Apps.
- If using the V-Console app to connect, o to Settings - Connection and select the D.A.W. computer to connect to.
- If using a MIDI Controller, plug-in to main D.A.W. computer and setup as shown in the User’s Guide
Back to top
Installing V-Control Pro
V-Control Pro is a desktop utility that must be installed on your computer that runs the software applications you want to control.
Follow these instructions to install V-Control Pro:
- Quit any D.A.W. App currently running
- Download the V-Control Pro Installer at Neyrinck.com
- Double-click the downloaded installer to unzip the installer package if not done so automatically.
- Double-click the “V-Control Pro.pkg” icon to launch the installer.
- Follow the installer’s on-screen instructions to complete the installation process.
- Connect your computer to your chosen local network.
- Launch V-Control Pro
- Launch your D.A.W.
- Follow the setup instructions for your D.A.W. as shown in its corresponding section of this User’s Guide.
- Create the setup that you would like to use in V-Control Pro.
Back to top
V-Control Pro Bundle License
To activate a purchased V-Control Pro Bundle License follow these steps:
- Launch the V-Control Pro app on the host computer.
- Click on the V-Control Pro icon in the system tray.
- Select Activate License.
- Select Activate when the license authorization prompt appears.
- Enter the ilok ID and password used when purchasing the V-Control Pro Bundle license.
- Select the V-Control Pro Bundle license to activate it and select Next.
- Choose the location to place the license. V-Control Pro Bundle licenses can be placed directly on the computer or on an ilok USB dongle.
The V-Control Pro Bundle license will now be activated and V-Control Pro will operate with all available features and functions.
V-Control Pro Bundle licenses are valid on a yearly basis. V-Control Pro uses iLok license verification to authorize for full use.
The V-Control Pro Bundle license must be refreshed once a month to remain active. The refresh is an automatic process that is done through an internet connection. If your computer does not have an internet connection, you must place the license on a computer that has an internet connection for it to be refreshed for the next monthly period. This has to be done once a month if your license is not on a computer that is connected to the internet.
You can use the ilok manager or log in to your account on ilok.com to check on the expiration date for the license.
The V-Control Pro Bundle includes the following:
Back to top
V-Control Pro Preferences
To access the V-Control Pro Preferences Window, click on the V-Control Pro icon in the system tray and select "Preferences..." from the drop down menu.
HTTP Server Port: V-Control Pro uses port 7071 by default. You can use a custom port by selecting Custom and entering a port number in the field.
Enable Cubase HUI For V-Control Pro 1.9(Legacy): Check this option if using V-Control Pro 1.9(Legacy) with Cubase. It enables Cubase to recognize V-Control Pro 1.9(Legacy) as a Mackie HUI device.
Preferred MIDI Application: The default is set to Most Recently Launched. V-Control Pro will automatically switch which DAW it is connected by whichever is launched last. Click on the drop down menu to manually select a DAW to connect to and have priority.
General Troubleshooting
- Verify all devices are on the same network as the target D.A.W. computer.
- Verify that iLok is securely plugged into USB port.
- Verify that V-Control Pro is running on your target D.A.W. computer.
- On Mac OSX, V-Control Pro operates as a menu bar application and should be visible on the upper-right hand corner area of the monitor.
- Verify that you have selected V-Control Pro as the MIDI Input source and MIDI output source of your D.A.W.
- Verify that bluetooth is disabled for all tablets and smartphones.
- Verify that firewall blocking is disabled for V-Control Pro.
- Verify that the ports used by Bonjour on not blocked by your router.
- Verify that Bonjour is installed on your Windows systems.
- Verify that the Bonjour services are running on your Windows systems.
- Verify that any MIDI device used with V-Control Pro is properly connected to the D.A.W. computer.
- Verify that the V-Control Pro is setup properly with the D.A.W. as shown in the User Guide for the D.A.W. specific section.
- If using a network drive, ensure V-Control Pro is not using the same port. It can easily be changed in the 'Preferences...' menu of V-Control Pro.
Back to top
Resetting V-Control Pro Prefernces/Setups
Some issues with Setup or mapping configuration can be resolved by deleting the V-Control Pro Preference files. Follow the steps to reset the V-Control Pro Settings.
Resetting on OSX:
- Quit V-Control Pro and any DAW currently open.
- Go to the Finder Application
- Click on Go in the top menu bar for the Finder and with the Alt/Option key held down select Library.
- In the Finder window navigate to Application Support.
- Find the V-Control Pro folder send it to the trash bin.
- Empty Trash.
- Launch V-Control Pro. Add any ethernet surfaces again for a fresh setup and launch DAW of choice.
Resetting on Windows:
- Quit V-Control Pro and any DAW currently open.
- Open the Windows Explorer
- Enable to view hidden files and folders in Explorer.
- Navigate to C:\Users\{User Account}\AppData\Roaming\Appliation Support
- Find the V-Control Pro folder send it to the trash bin.
- Empty Trash.
- Launch V-Control Pro. Add any ethernet surfaces again for a fresh setup and launch DAW of choice.
Back to top
Setting Up with an Ethernet Control Surface on Mac
Requires Mac OS 10.10 and later.
With V-Control Pro, Pro Control, Control 24, C|24, Command|8 and the D-Command, owners can use their controller with the latest version of Pro Tools, Logic X, Cubase/Nuendo, Live, MixBus or Studio One. Follow the steps below to setup with Pro Tools.
- With ProControl, Control|24, C|24, or D-Command connected to the local network, launch V-Control Pro.
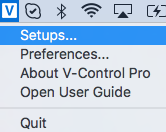
- Click on the V-Control Pro icon in the task bar and select Setups....
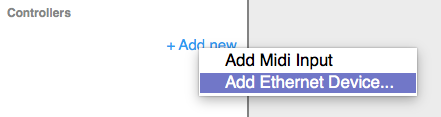
- Click on +Add New in the Controllers section of the Setups window and select Add Ethernet Device....
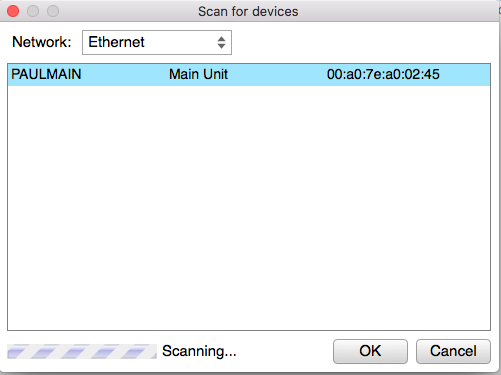
- Select the ProControl, Control|24, C|24, or D-Command unit you wish to add in the Scan Devices window once it appears and select Okay.
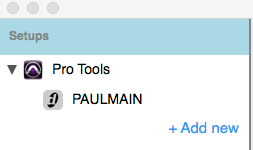
- Once The DAW is launched it will automatically pair with ProControl, Control|24, C|24, or D-Command in the V-Control Pro setups.
 WARNING: DO NOT USE Ethernet Setup in Pro Tools as it will try to recognize ProControl, Control|24, C|24, or D-Command
ProControl, Control|24, C|24, or D-Command is now setup to work with V-Control Pro. Click HERE to view the Control Surface User Guide. for setting up with your DAW.
Back to top
Setting Up with an Ethernet Control Surface on Windows
Requires Windows 10 and later.
With V-Control Pro, ProControl, Control|24, C|24, or D-Command owners can use their controller with the latest version of Pro Tools, Cubase/Nuendo, Live, MixBus or Studio One. Follow the steps below to setup with the Control Surface with V-Control Pro.
- With ProControl, Control|24, C|24, or D-Commandconnected to the local network, launch V-Control Pro.
- If you do not see the V-Control Pro icon in the task bar, click on the Up Arrow to show all hidden notification icons.
- Click on the V-Control Pro icon in the task bar and select Setups....
- Click on +Add New in the Controllers section of the Setups window and select Add Ethernet Device....
- Select the ProControl, Control|24, C|24, or D-Command unit you wish to add in the Scan Devices window once it appears and select Okay.
- Once the DAW is launched it will automatically pair with ProControl, Control|24, C|24, or D-Command in the V-Control Pro setups.
WARNING: DO NOT USE Ethernet Setup in Pro Tools as it will try to recognize ProControl, Control|24, C|24, or D-Command
ProControl, Control|24, C|24, or D-Command is now setup to work with V-Control Pro. Click HERE to view the Control Surface User Guide. for setting up with your DAW.
Back to top
Setting Up with a Command|8
- Click on the V-Control Pro icon in the task bar and select Setups....
- Click on +Add New in the Controllers section of the Setups window and select Add Command|8.
- Once The DAW is launched it will automatically pair with the Command|8 in the V-Control Pro setups.
- Back to top
Setting Up with a Digidesign 003
- Ensure the 003 drivers are properly installed on the computer before setting up.
- Click on the V-Control Pro icon in the task bar and select Setups....
- Click on +Add New in the Controllers section of the Setups window and select Add Digidesign 003.
- Once The DAW is launched it will automatically pair with the Digidesign 003 in the V-Control Pro setups.
- Back to top
Setting Up with a FaderPort
V-Control Pro supercharges a Faderport V2, FaderPort 8, FaderPort 16 and iOStation 24c for Pro Tools.
With the Faderport connected. Launch V-Control Pro
Click on the V-Control Pro icon in the system tray and select Setups...
In the Setups window Click on +Add New in the Controllers section.
- Click on Add Faderport V2 for a Faderport V2 or iOStation 24c.
- Click on Add FaderPort 8 for a FaderPort 8.
- Click on Add FaderPort 16 for a FaderPort 16.
Ensure the Faderport is in Studio One Operation mode and NOT in HUI mode.
Back to top
Setting Up FaderPort 8/16 in Pro Tools
Here is how to setup Pro Tools
- With the Faderport 8 or 16 added to V-Control Pro, launch Pro Tools.
- Open a session, then
- Click on Setups in the Pro Tools menu bar and navigate to MIDI and open the MIDI Input Devices window.
- Verify the V-Control ports are enabled.
- Click on Setups in the Pro Tools menu bar and open the Peripherals window.
- Navigate to the MIDI tab and setup the ports:
- Type: HUI, Receive From: V-Control, Send To: V-Control
- For Faderport 16 users: Add this row.
- Type: HUI, Receive From: V-Control XT2, Send To: V-Control XT2
- Type: M-Audio Keyboard, Receive From: V-Control MA Keyboard, Send To: V-Control MA Keyboard

The Faderport 8/16 is now ready to use with Pro Tools through V-Control Pro.
Back to top
Using V-Window
With V-Control Pro and the V-Window feature, users can instantly control any plug-ins or controls on screen through their control surface's channel strip with a touch of a button.
To activate V-Window, press the Master Faders button on most surfaces. For DAWs with a dedicated Master fader control, the Master Fader button will be required to be pressed multiple times to cycle to V-Window Mode.
V-Window Modes:
When V-Window is active, Press the Mute button on the Channel strip with V-Window to cycle between the different modes. The different modes available are:
- VButton: Use this mode to interact with button controls. The mouse will stay in its place and activate a button press when the fader is touched.
- VButtonSet: Use this mode to create and cycle through different button set points. With the mouse hovering above the on screen button's position press Shift+Solo on the control surface to set a Pin at that location. Using the fader in this mode will cylce between multiple Pins to use with VButton mode.
- VWKnob: Use this mode when interacting with knob controls on the plug-ins GUI.
- VWHSlider: Use this mode when interacting with horizontal slider controls on the plug-ins GUI.
- VWVSlider: Use this mode when interacting with vertically slider controls on the plug-ins GUI.
While in V-Window Mode, pressing the Solo button will pin the mouse location and revert to that location any time the fader is touched. Once the fader is released, the mouse is also returned to that pin position. This way it is very easy to pin a parameter and instantly control it without having to worry with the mouse cursor is on the screen.
Use the Select button while in V-Window mode to reset the fader position.
Back to top
Using MIDI Mode with a Control Surface
With V-Control Pro, users can enable MIDI Mode on their control surface with the touch of a button. MIDI Mode converts the surfaces faders, knobs, and buttons into assignable MIDI Controls that can be mapped in the DAW.
Use the following button to toggle MIDI Mode on the specified surface:
- C|24: Focus
- Control|24: MON/0
- D-Command: MIDI Events List
- ProControl: MON/0
Back to top
Setting Up Applications
Back to top
Back to top
Back to top
Back to top
Back to top
Back to top
Back to top
Back to top
Back to top
Back to top
Back to top
Back to top
Back to top
Back to top
Back to top
Back to top
Back to top
Back to top
Back to top
Setting Up Banks for Multiple Devices in V-Control Pro
When using multiple devices, each device can be assigned to different banks.
For V-Console in 8-track mode, the controller can be assigned to the following banks:
For V-Console in 16-track mode, the controller can be assigned to the following banks:
Here is how to assign different banks to a controller:
NOTE: When using multiple controllers, banking or moving channels left and right will affect all controllers. For example, if you have two controllers setup with one controlling banks 1-16, and the other controller 17-32, banking to the left or right on one controller will bank both simultaneously.
Back to top
Setting Up Your MIDI Device with V-Control Pro
With V-Control Pro, any MIDI Device has the capability of becoming a control surface such as a MIDI keyboard.
How to Setup your MIDI Device with V-Control Pro
- Connect the MIDI Device to the computer.
- Launch V-Control Pro
- Click on the V-Control Pro icon in the system tray and select "Setups.."

- Go to Controllers and select “+ Add new”, then select "Add MIDI Input".

- Create a name for the controller you are adding and select MIDI as the type
- Select the MIDI Controller you want for the Input and Output of that new controller.
You can now create setups with your MIDI device and link it up with your favorite D.A.W. For example, you can connect your MIDI Keyboard to control the Transport of Pro Tools.
How to Setup your MIDI Device to control the Pro Tools Transport
- In "My Set Ups" select "+ Add new"
- Select the MIDI controller and "Pro Tools" and click "OK"
- Click on the "+" button to add a new control
- Click "Learn" and press a control on the MIDI Device you would like to map
- Click on the drop down menu under the "Pro Tools" section and select "Transport/Play" to map the Play function to that MIDI control
- Repeat for all the commands in the Transport for Pro Tools
Back to top
Setting Up Your Web Browser with V-Control Pro
With V-Control Pro, you can control your D.A.W. from a web browser such as on a laptop, through the V-Console app.
- Open your web browser on your computer and go to vcontrolpro.com
- Go to V-Console in the Mobile Apps section.
- Go to "Install" and then name the device.
- In the settings section of V-Console for the "Connection", select the host computer that is running V-Control Pro and the D.A.W.
Back to top
Setting Up Your iOS Device With V-Control Pro
With V-Control Pro, you can control your D.A.W. from your iOS device, such as an iPhone or iPad.
- Open the Safari app on the iOS device and go to vcontrolpro.com
- Go to V-Console in the Mobile Apps section.
- Touch install and Add V-Console to Homescreen when asked.
- Open V-Console from the homescreen and name the device.
Back to top
Setting Up Your Android Device With V-Control Pro
With V-Control Pro, you can control your D.A.W. from most Android Devices.
- Open the browsing app on the Android device and go to vcontrolpro.com
- Go to V-Console in the Mobile Apps section.
- Touch "Install" and add V-Console to the Homescreen.
- Open V-Console from the Homescreen and name the device.
*When using the web app version of V-Console, if on a network with no internet connection, you will not see your computer listed and you must enter the IP address directly by tapping the "Change" button in the V-Console Settings/Connection tab.
- You can easily get your IP address by clicking on the V-Control Pro icon in the system tray and selecting "About V-Control Pro". The "About V-Control" Window will display the IP Address that your host computer is currently using.
Back to top
Setting up a Local Area Network with Wifi
V-Control Pro uses Wifi capabilities to bridge your external devices with your D.A.W. computer. Please make sure your D.A.W. computer and all your devices you wish to use with V-Control Pro are all on the same Local Area Network (LAN).
Back to top
Deleting Unused Controllers
To delete any unused controller paired with the DAW in the Setups section follow these steps:
- Select the paired controller you wish to delete.
- Press the 'delete' key on the computer keyboard.
- Select 'Yes' to delete.
Back to top
Setting Up for V-Control Pro 1.9(Legacy)
Current users of V-Control Pro 1.9(Legacy) must now use the V-Control Pro app instead of Ney-Fi to connect. Follow the instructions to connect:
- Download and install the latest version of the V-Control Pro app from vcontrolpro.com
- Launch the V-Control Pro app on your computer.
- Click on the V-Control Pro Icon (V) in the system tray and select preferences.
- Change the DAW track count to 8 if using V-Control Pro 1.9(Legacy) only.
- Launch V-Control Pro 1.9(Legacy) on the iPad.
- Press the gear in the bottom right corner to open the "Settings" Window.
- Select the "Connection" tab on the left column and then select your computer to connect.
- Launch the DAW and setup as shown in the DAW's setup section of the User's Guide.
Back to top